Data Source enables apps to work with data that is located in Database created on Snappii server or the data coming from external web services.\n\nUsers can use Data Sources to store and retrieve data inside apps. The data from Database can be populated from the Advanced list and users can update these lists right in the apps. Another way to update a Data Source is by using an Advanced Form. The information in the Data Sources can be sorted, searched, edited, updated, and deleted, it is stored on devices, uploaded from computer and can be sent via email. Everyone can use data from Data Source practically in all standard elements (YouTube button, Map, RSS, Twitter, etc.) to increase the app functionality.\n\nPlease find more details about each option below.\n\nThere are 2 scopes of Data Source: Global and Local. Global scope allows data to be available for all users on all devices; Local scope only shows the data entered on one device for one person meaning it stores data locally.\n\nFor managing Data Sources in your app you need to use Data Source dialog (click the Data Source button in the Editor right panel to view it).\n\nTo create Data Source do the following:\n\n-Open Data Source dialog. When you open it, you will be in the creation of a new Data Source mode. Existing Data Sources are shown under “My Data Sources” table.\n-Name the Data Source.\n-Choose Database scope.\nGlobal – data from Data Source seen on all devices, Local – data from Data Sourse is only visible on the device it was added from.\n-Choose time zone (optional), it will be shown in reports when you submit info via email.\n\n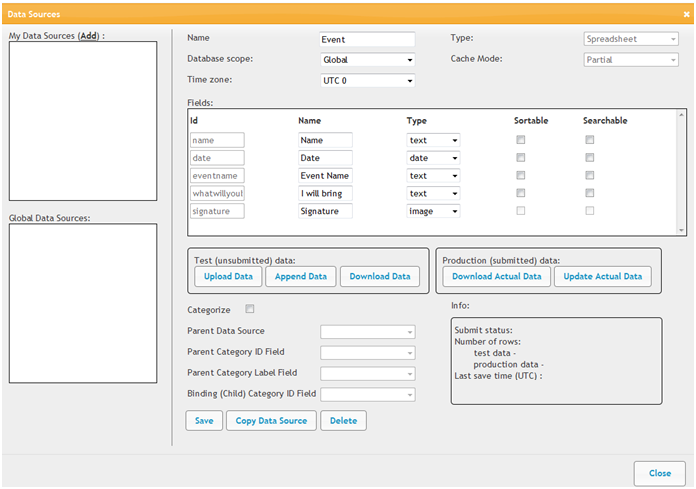 \n\nClick Upload Data. When you upload the Excel spreadsheet, keep in mind that the headers must not contain a space or any symbols. Use one word or a phrase without spaces and/or symbols.\n\n
 \n\nWhen it is uploaded, match the Columns: Id, Name and Type. “Id” is the column names taken from your spreadsheet. See the picture below. “Name” is how you want to call it. Type denotes item content and is meant to show how the particular field in the app is used. So, it is extremely important to choose the right type for each cell in the Data Source. When you upload a spreadsheet, the Snappii Editor tries to match type and upload content automatically.\n\n
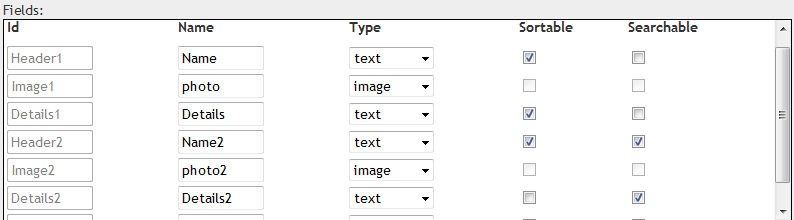 \n\n-Text – any textual information, please keep in mind that YouTube videos as well as Social Channels and URLs will also use this type.\n-Numeric – numbers that you use like price, ID, order number, phone numbers etc.\n-Location – coordinates of a particular place on the world map. Use the following format: “xx.xxxxx,yy.yyyyy” (where x – is latitude, y – longitude. Latitude value is in angles from 90.00000 to -90.00000. Longitude value is in angle from -180.000000 to 180.000000. Field with such type can be used in Map, location elements. In this field users will be able to upload coordinates to the Location Input.\n-Address – is a field with textual information about a specific Location. It can be used together with Location to describe the place more detailed, or apart from Location.\n-Datetime, Date, Time – fields to store date in different formats.\n-Image – field with the URL to the picture. Do not try to upload the picture into the spreadsheet, you must only add a link to it. Your app users will be able to upload their pictures or signatures into this field.\n\nATTENTION: If you don’t match the Type and Name correctly, the Data Source will not work.\n\nFor more detailed explanation, please read Chapter 10 of our User Manual here.
Sign up

 Login
Login
Free Forever Account
No Credit Card Required
Over 28,000 Apps built
and trusted by companies like:
and trusted by companies like:

-
For group sales please contact
sales@snappii.com
or signup with Google or Facebook account

