 It’s no secret that there’s a lot of mobile form solutions out there. We even made a blog post about the most common ones you’re likely to find while on your hunt for the perfect answer. And while these mobile form editors work, none of them give you the capability to turn your mobile form into a full-fledged mobile app that can do almost anything.
Snappii allows you to flip between the two. If you decide that there’s features that would benefit your business, it’s easy to combine them with your mobile form and make one cohesive app. This gives you a multitude of options for what’s possible in your mobile app. Check out our feature list here to see just how much functionality you can add in MINUTES.
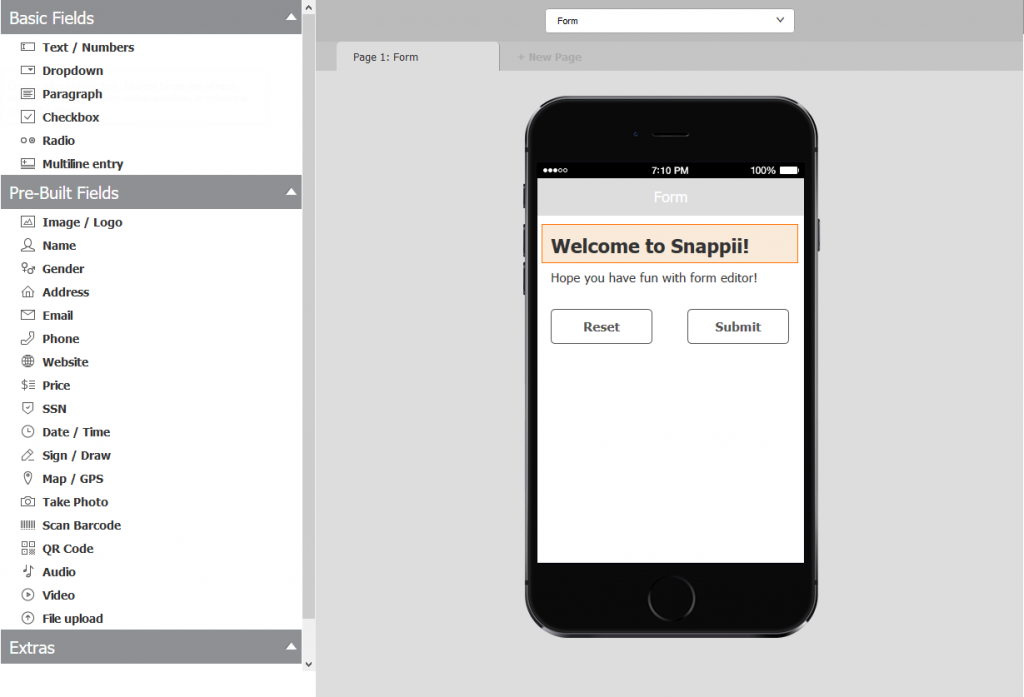
Snappii’s mobile form editor is a great tool to create forms that will work right off your mobile device. There are three different sub-sections in the editor, but don’t let the amount of options deter you from trying it out!
Basic Fields
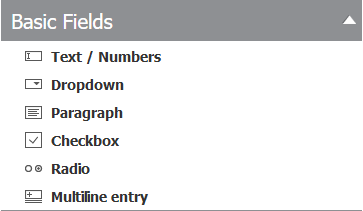 Basic fields are just that – basic fields. They’ll hold information for you that either reveals information to the user, or in some cases allow the user to input information via a dropdown or a checkbox. Here’s a breakdown of each function:
Text/Numbers – This field adds a single line that the user can enter information into. You can label the field as you see fit, which means this field can be used for a variety of functions. If you need more than one line, check out the Paragraph field below.
Dropdown – You’ve seen these before in countless websites. Dropdowns allow you to categorize things a bit easier. They also make it easy to make a selection if there are only a few options that are possible for that field. The end-user cannot add to the dropdown menu, so it’s important to make sure you include all options if you use this.
Paragraph – Much like Text/Numbers, paragraph provides a static line of text that the end user cannot mess with. Again, it’s useful for providing instructions. The main difference is that “Paragraph” allows more than one line of text, whereas “Text/Numbers” only gives you one.
Checkbox – Another one you’ve definitely seen before. Checkboxes are useful if the user has more than one option they made need to select. You’ve most likely seen something like this on the side-navigation of websites you like to shop on (see Amazon for a great example of this). The more viable options you have for a particular field, the more likely you’ll need “Checkbox” instead of “Dropdown”
Radio – Very similar to checkbox in that the user just has to click once to pick an answer, but different then checkbox in that the user can only select one thing. This is very similar to drop-down, but is usually used when users only have a few options, and a dropdown menu would be cumbersome. Again, play around with it and see what works for you and your employees.
Multiline Entry – This field is a bit harder to explain. Basically, it allows you to put a form inside your form. There are very niche cases that use this, and its functionality spreads wide across multiple industries. For more information on Multiline Entry, check out this link.
Pre-Built Fields
Pre-built fields are where all the magic happens. These fields allow the users to input their own answers for the questions provided. Most of them are self-explanatory, but we’re going to go over them just to clear up any questions.
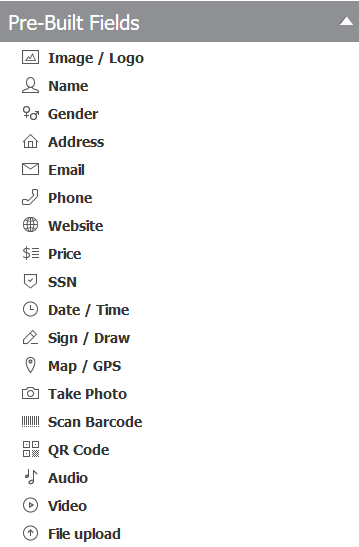
Image/Logo – Places a static image on your form. Since the user can print out forms, logo’s are often extremely important to companies. This field makes it easy to upload your company logo and place it throughout the form as you see fit.
Name – Creates a field where the end-user can input a name. If you’re a contractor and you’re making an invoice for a client, or if you work in the medical field and you’re trying to receive a clients information, this is a great place to start.
Gender – Creates a field that asks for gender. Male and female are preset, but if you can think of other ones you can always add them.
Address – Creates a field that allows the user to input their address. This field is standardized for American addresses, but you can always change it to what works for you.
Email – Create a field that allow the user to input their email address. In the field settings, you can also setup if you would like to send a copy of the mobile form to this email.
Phone – Creates a field that allows the user to input a phone number. Again, preset to American style, but it can be changed.
Website – Creates a field that allows the user to input their website.
Price – Creates a field that allows the user to input a price. This one can be used a variety of ways. For examples, contractors can add this field for estimations.
SSN – Creates a field that allows the user to input their social security number.
Date/Time – Creates a field that automatically captures the date/time of the interaction with the mobile form. This is great for making sure your employees were where they needed to be at a certain time.
Sign/Draw – The signature field is one of our most widely used tools. It’s exactly as it sounds – the user taps the field on their device and a signature panel that can be signed with a finger opens up.
Map/GPS – This is another tool to find out if your employees are where they need to be. The Map/GPS field can be hidden while it captures the users location, which means employees won’t really be able to tell if you’re tracking them or not. Worried about whether or not John went to the worksite today? Not anymore you’re not.
Take Photo – Creates a field where the end-user can input a photo. If you’re in inspection, this tool is invaluable as it provides a means for showing what the problem is rather than just writing it down.
Scan Barcode – Adds a barcode scanner to your mobile form. This is usually used in very specific industries, but the people who need it will know exactly how to use it.
QR Code – Similar to the barcode, but a bit more dated. We know some companies still like to use QR codes – no problem with that!
Audio – Creates a field where the end-user can input audio. Some examples could be to record voice when their hands may be tied up, or to record a particular sound a piece of equipment is making.
Video – Creates a field where the end-user can input a video. Same deal as audio, but allows you take a video instead. Keep in mind that videos are going to dramatically increase the file size, so try to keep them short!
File Upload – And finally, there’s file upload. This is useful for when you want to attach a PDF or document to your mobile form. To the receiver, it appears as an attachment to the completed form.
Extra Fields
 Then there’s the few extra’s we have. We’re still expanding this section, but it contains one of the most useful organization tools our editor can use.
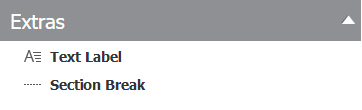
Text Label – Provides a static line of text that the end-user cannot adjust. This is a useful tool if you want to describe instructions for a particular part of the form, or if you want to remind someone to include something. It’s a flexible field that can help first-time users, especially ones that may not be as familiar with smartphones.
Section Break – Places a divider between fields. If you’re trying to section off different parts of your form, this is the best way to do it. You can also add new tabs, essentially creating a separate page for your forms. Mess around with both and see which works better for you.
Like I said in the beginning, Snappii allows you to flip between mobile forms and mobile apps. Once you have your mobile form ready, it’s only a short step to making it into a full-blown mobile app. The hard part will be coming up with which of myriad of features you’d like to include.
After reading this guide, you probably have a good idea of how mobile forms work, and you’ve probably come up with your own inspiration for neat tricks and ideas. That’s what we were going for. Try out Snappii’s form editor today, and make that idea come to life!

 Login
Login