
 Login
Login


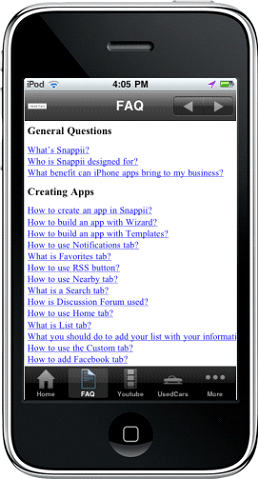
Frequently Asked Questions
General Questions
What is Snappii?
Snappii is an online mobile app building platform that allows individuals and companies
of any size to easily and quickly make custom apps for their business without requiring
any mobile programming skills.
The Snappii platform gives you the ability for rapidly building apps for Android
and iOS platforms without writing any code and without having to recreate the app
for each platform. Using a visual drag, drop and configure methodology and our Snappii
Preview App, you have the ability to create, test and submit your apps quickly and
easily.
We also offer options from building a free web app to unlimited native builds through
various pricing plans.
Who is Snappii designed for?
The Snappii mobile app builder is designed for anyone looking to build (non-gaming)
mobile apps because no coding skills are required. If you are a reasonably technical
user of the internet, a UI/UX person, wanting to go beyond wireframes and create
functional prototypes, or a programmer, even without having had time to obtain mobile
programming skills in Java, Objective C or Java script, you can build an app with
Snappii.
Whether you are looking for an app to promote your small business to consumers,
a developer or IT staff member looking to build company apps, a marketing person
needing to quickly create promotional apps, a QA person needing to provide prototypes,
or a whole host of other needs, Snappii is the platform that lets you build your
own apps!
Why Snappii?
With the robust nature and flexibility of the Snappii platform, App creation is
exponentially faster than traditional platforms, taking months of development time
and compressing it to days.
You can build cross-platform native apps that can run on all key mobile app platforms
without having to rebuild for each platform and with no mobile programming skills.
App updates are as easy as clicking “publish” to distribute changes to thousands
of mobile devices at once.
The cost of development and maintenance significantly less so you can build and
release apps faster and more cost effectively.
What benefit can apps bring to my business?
Making your own apps can offer a richer, more immediate and interactive way to engage
customers, as well as leveraging your existing infrastructure to streamline your
business operations and provide a greater return on investment:
Integrate with internal systems such as CRM tools to allow a host of functionalities,
for example, your sales reps being able to immediately enter notes and even do quotes
and email them from the road directly after a customer visit
Dramatically reduce the burden and backlog of IT development requests by being able
to create departmental apps as needed
More effective than email and more time is spend on a smart phone screen than on
the TV and computer combined
Create a group discussion or enable your customers to ask you questions. Become
the expert to your customers!
Keep everyone informed about your latest news using the RSS button.
Link them to your website, Facebook and Twitter.
Be easily reachable with one click to call, email and text (SMS).
What mobile platforms does Snappii Support?
Snappii removes the issue of having to build/rebuild a separate app for each platform
as it offers a single-build multi-platform capability. Currently, Snappii supports
native iPhone, iPad and Android (phone and tablet) platforms as well as HTML5 (web
based) apps which work across all browsers (ie. Safari, Firefox, Chrome, etc).
For more information, please, read the User
Manual.
What kind of apps can you build with Snappii?
Snappii allows you to create data rich, sophisticated, enterprise class apps with data coming from the web, internal systems and the cloud.
I already have a mobile site, why should I have an app?
An App provides a more interactive and robust mobile user experience:
- Allows you to send notifications directly to user phones which is 10 times more effective than email
- Ability to have local databases on mobile devices
- Enable users to take advantage of their built in camera
- Gives users better performance because the app runs within the device rather than from the web
- Help your business be found through the App Stores where tens of thousands of searches occur per day in your area
- Native apps offer better security because the binary code is compiled and more difficult to compromise
Can we charge for the apps we make?
Yes, you can charge for your app by setting the price in the App stores.
Do you make games?
No, we are purely a business focused software developer.
Who can make apps on Snappii?
Reasonably technical non programmers and programmers. Prior experience using visual studio tools for building UI or graphics editors like Photoshop is helpful.
Partnership
How do I sign up as a Partner?
Becoming a Snappii partner means being able to build your business through the creation of unlimited apps for your customers, at whatever price point you determine, while still paying only one price to Snappii. To sign up as a partner, please contact us at: sales@Snappii.com and we will contact you to discuss your partnership opportunity.
Do I need to pay when I sign up as a Partner?
You can try out the Snappii platform including building apps, previewing them through the Snappii
App Previewer and creating web apps at no cost. Once you are ready to release and publish apps
please purchase a developer license.
Please note that the Snappii splash screen and “powered by Snappii” verbiage will display on your demo apps until you have purchased the Snappii platform.
Please note that the Snappii splash screen and “powered by Snappii” verbiage will
display on your demo apps until you have purchased the Snappii platform.
Do I pay for White label as a partner?
No, you do not pay for White label apps. It is included in the Partner Program.
Creating Apps
Do I have to build my app(s) from scratch?
No. You can make your own app in Snappii using one of our hundreds of pre-built
app templates allowing you to add your own content and have your own native app
built in minutes. Just sign up to access these templates and begin developing your
app.
If you want to start from scratch, you will be able to leverage our easy-to-use,
drag, drop and configure WYSIWYG Visual Editor.
With either option you can simultaneously build your app and view it on your smartphone
or tablet.
For more information, please, read the User
Manual.
What is WYSIWYG editor and how does it help me build my app?
WYSIWYG is an acronym for What You See Is What You Get. WYSIWYG Editor gives you
total control over the User Interface (UI) of your app.
Just drag anddrop user interface objects on the screen and configure the properties
based on your preferences. To see how it works you can watch the tutorial
video here!
Can I change fonts in the app?
It’s easy to customize your app and make it look nicer changing the fonts inside it.
You can choose among various fonts that can be found under “Color theme” in Editor.
- Set up Default font for your app
- Choose to change font for all controls with one button click
- Use different font for different elements in the app
Can you make an app for me? How much time does it take for you to make me an app?
Snappii professional service staff or our partners can make an app for you. The turn around time and cost will depend on the complexity of the app but we can often have it build for you in a few days. Please contact sales@Snappii.com for more information.
I have completed and tested my app and am ready to submit it to the Appstore and Google Play. What's next?
To submit an Android app to Google Play within the Snappii platform is a straight
forward process, just click the “submit” button in the WYSIWYG editor and follow
the directions. Android apps are usually available immediately after submission.
From the Snappii platform, the process to submit your app to Apple is the same,
just click the “submit button” and follow the directions. However, Apple requires
a review process by their engineers which may delay the release of your app. We
strongly recommend utilizing our pre submission review service to increase the odds
of your app being approved. Please contact sales@Snappii.com
to get more information.
Web Apps
What is a web app?
A web app is an app based on HTML5 code and is accessed by users over a network.
Web applications are popular due to the ubiquity of web browsers, and the convenience
of using a web browser as a client. The ability to update and maintain web applications
without distributing and installing software on potentially thousands of client
devices is a key reason for their popularity, as is the inherent support for cross-platform
compatibility.
Snappii ad supported web aps are free of charge. Web apps do have some limitations
as they cannot access device features such as GPS and the camera. Also you cannot
have a local database to store data. They only really work in a connected mode where
internet is present.
What advantages do Snappii web apps offer?
Web apps are available on mobile devices right after their creation. Snappii users
can distribute a link to their web apps using a QR code image and/or a convenient
code to be placed on their site. They can also be released immediately after being
created and be distributed simply with a link/URL. With the Snappii platform you
have the ability to build ad supported web apps at no cost. If you then want to
have them available on iPhone, iPad or Android devices you can purchase a Snappii
subscription for Apple and/or Android and publish your apps without having to rebuild
them again. The Snappii platform offers a wide variety of functionality for dynamic
web apps, including data collection from users via forms and the ability to access
data from corporate databases and cloud services. Web apps built with the Snappii
platform are data rich, enterprise class apps. The list of features supported for
web apps is always growing. Ask –sales to find out the available features.
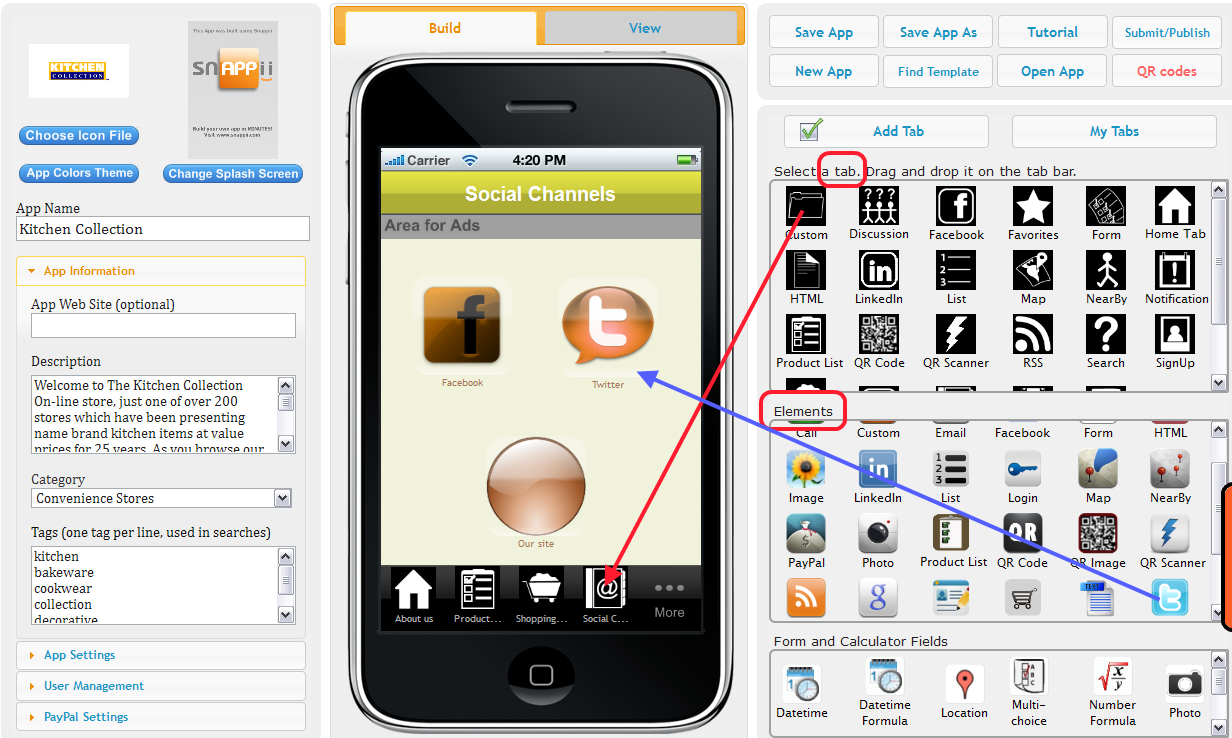
Tabs and Buttons (Elements)
What is the difference between a tab and a button (element)?
A tab is placed along the bottom “row” of the app and a new tab is added each time
you want to create a new page. Selecting from the different tabs determines what
type of page you will create (ie. Home, NearBy and Custom).
A button/element is an icon you put within a page to allow for various functionality
(call, email, facebook, lists, etc).
What is the difference between tabs and buttons/screen elements which have the same name?
Tabs are what sit at the “bottom” of your app screen and allow users to locate different
pages within your app, whereas the buttons are what allow functionality within the
app. Some are invoked from the bottom of the screen and others can be selected by
putting them anywhere within your pages.
What is the Favorites tab?
The information like Phone numbers or locations can be added to Favorites via the Map and/or NearBy elements. If you have these elements in your app, drag and drop Favorites tab where all the places, added to Favorites from NearBy/Map, are stored.
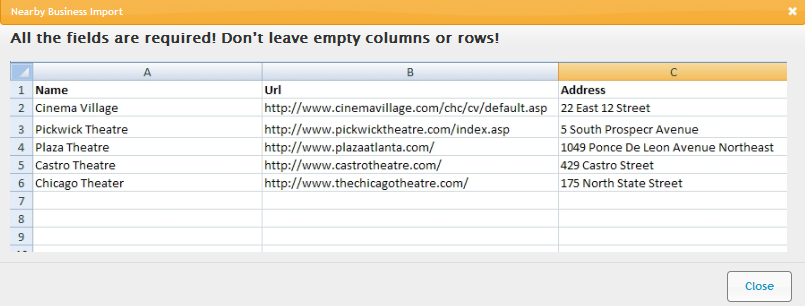
What is the NearbyTab?
Nearby Tab perfectly suits businesses with multiple locations. All you need to do is enter the name of your business, and it will show up in Nearby wherever user happens to be. Just imagine how convenient it is! You can always drive users to your nearest location.
When you modify the Nearby button, you will see several options to specify the locations.
For example,
- you can upload a list of your business locations If you want to show a list of your business locations, simply upload Excel file which contains:
- • the name of needed location (for example AMC Cardian Lodge);
- • it's Url (https://www.outdoors.org);
- • address (774 Shem Valley Road);
- • city (Alexandria);
- • region (NH);
- • country (if it's not located in USA);
- • postal code (3222);
- • phone numbers;
- • emails addresses;
- • logo link (https://www.yvts.co.uk/images/bibicon/casestudy.pgn);
- • notes (if you want to show more details);
- • description of that business.
- use default categories;
- specify your own categories;
- show search results for a specific keyword.
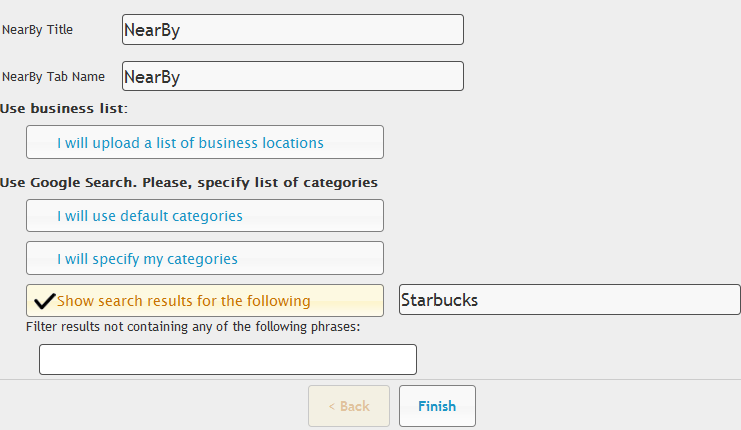
You can even Filter results that don't contain any of the particular phrases.
What is the Search tab?
Search allows you to either browse a specific site you enter, or internet for a specific keyword.
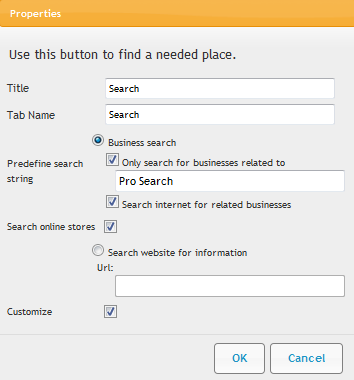
When you choose to browse site, you enter a keyword in a search string, it will show all the related info to the search term.
When you choose to browse the Internet on a particular keyword, it will show all the results as if you were browsing Google.
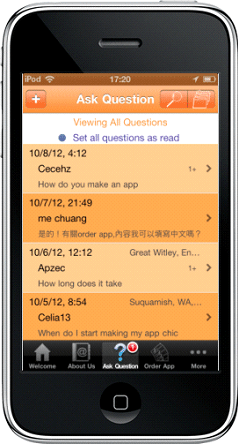
How is Discussion Forum used?
Adding a Discussion tab to your app helps you open a dialog with your customers. Use this tab to help customers interact with each other and with you. Your customers can ask questions and other customers or you can answer them. To participate in discussion forum, a user needs to log in, so this is one of the obvious benefits of signing up.
You will never lose any question or answer, because you will have push notifications about new discussions, as well as red badges with numbers of unread threads.
You will also receive emails with new discussions, questions and answers.
It is very convenient for users to keep in touch with other people on forum. Forum can help you get feedback from users, and assist them.
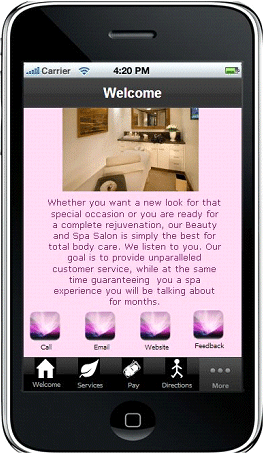
What is the Home tab?
Home Tab is like a face of your app. You can place your logo for users to see, and write a short message either about what the app is about, or what your company does, or a logo, etc.
What it is meant for is adding your contact info, so that your customers could reach out to you easily. Fill in your email address and your phone number - make it easy for users to connect you.
Another good thing about this tab, it allows users to Sign up and then Log in. Being a registered member of your app allows users to participate in discussion forum, rate places, write reviews and track unread discussions.
And you will collect your own database of users to send messages to them, and get their feedback.
What is the List tab?
Use List button when you want to show a list of items. When an item is selected a detailed view is shown.
You can upload different lists to show info you wish. Drag and drop the List tab/button, download sample spreadsheet
and modify it exactly how it looks in sample. You can’t use spaces in the headers, you can’t use formatting like Bold,
Italic or Underline. Your file must be Excel 2003 and higher. You will see the List view template – it means how your app users see the list.
You can choose any of the 4 templates and move to the Detail view template and choose 4 variants of the detail view.
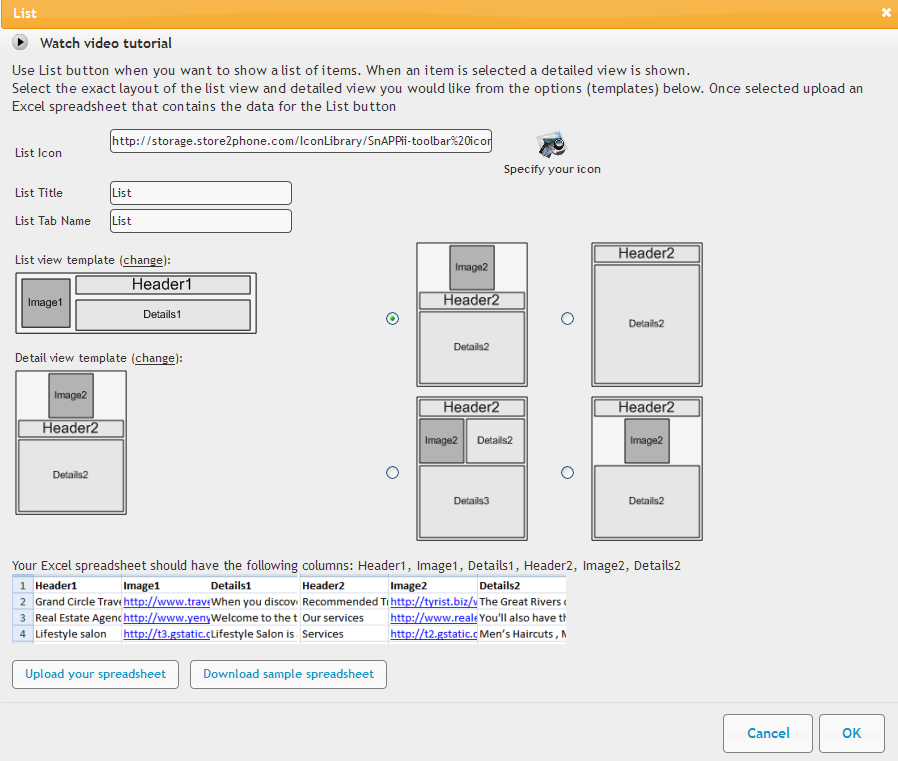
Choose the icon you want the list to have. You can choose from Snappii gallery, or upload your own. Keep in mind it must be black-and-white with appropriate alpha transparency. This is an example of how the List view looks like:

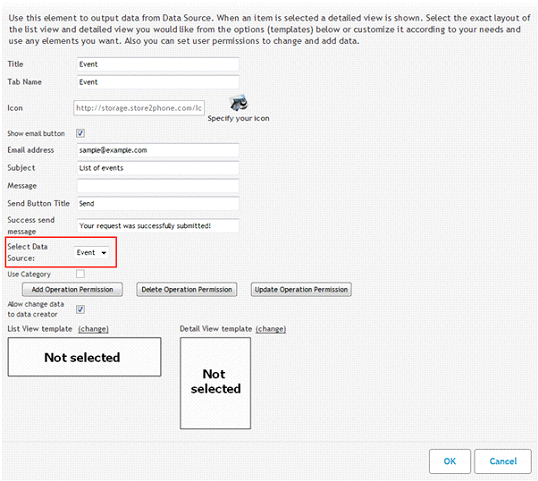
What is the Advanced List button?
The advanced list button allows deeper and more detailed information and functionality than the standard list button.
An advanced list takes advantage of datasources to provide a richer more robust functionality to your users.
For example, as a manufacturing company/department you may have a list of currently available inventory from your warehouse
within your app. As inventory levels change, you can update the existing list, right from the app (instead of uploading a
whole new spreadsheet from the Snappii platform) and users can sort the list by part name, number, type, etc. Any field you
used in the spreadsheet will be searchable.
Search/Sort filter
Search/Sort filter allows app creators to specify within the editor detailed search and sort parameters on advanced list. This gives great flexibility in how information is displayed within the app and allows app creator to enable/disable user control of search/sort as well. Sorting and searching filters allow to organize data the way you want it. Sort in descending or ascending order, search by any criteria you specify in Editor. Please read our User Manual for more details.Search filter
Search filter allows to specify the search criteria that will Always apply for users, or be overridden when a user selects search or sort from the app. For example, by default I want to show only the BMW cars, so I specify it in the search filter, see the image below: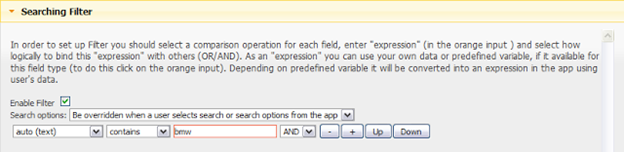
In the app, user will only see the BMW cars, but with the filter “be overridden when a user selects search or sort from the app” users can search for other cars.
How to use Datasource dialog?
Data Source enables apps to work with data that is located in Database created on Snappii server or the data coming from external web services.
Users can use Data Sources to store and retrieve data inside apps. The data from Database can be populated from the Advanced list and users can update these lists right in the apps. Another way to update a Data Source is by using an Advanced Form. The information in the Data Sources can be sorted, searched, edited, updated, and deleted, it is stored on devices, uploaded from computer and can be sent via email. Everyone can use data from Data Source practically in all standard elements (YouTube button, Map, RSS, Twitter, etc.) to increase the app functionality.
Please find more details about each option below.
There are 2 scopes of Data Source: Global and Local. Global scope allows data to be available for all users on all devices; Local scope only shows the data entered on one device for one person meaning it stores data locally.
For managing Data Sources in your app you need to use Data Source dialog (click the Data Source button in the Editor right panel to view it).
To create Data Source do the following:
- Open Data Source dialog. When you open it, you will be in the creation of a new Data Source mode. Existing Data Sources are shown under “My Data Sources” table.
- Name the Data Source.
- Choose Database scope.
Global – data from Data Source seen on all devices, Local – data from Data Sourse is only visible on the device it was added from. - Choose time zone (optional), it will be shown in reports when you submit info via email.
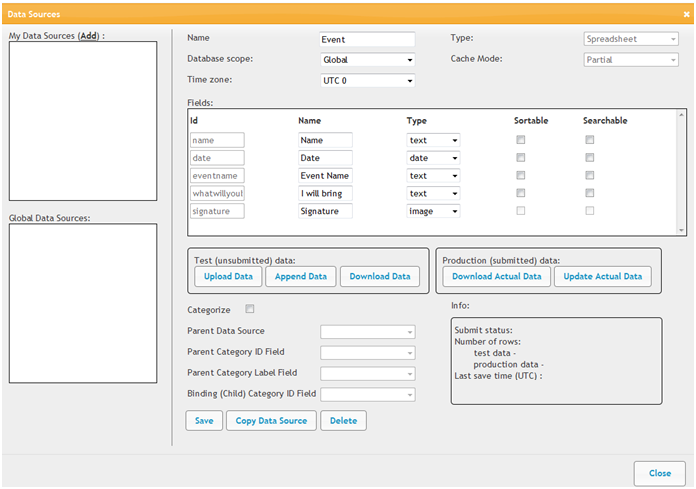
Click Upload Data. When you upload the Excel spreadsheet, keep in mind that the headers must not contain a space or any symbols. Use one word or a phrase without spaces and/or symbols.

When it is uploaded, match the Columns: Id, Name and Type. “Id” is the column names taken from your spreadsheet. See the picture below. “Name” is how you want to call it. Type denotes item content and is meant to show how the particular field in the app is used. So, it is extremely important to choose the right type for each cell in the Data Source. When you upload a spreadsheet, the Snappii Editor tries to match type and upload content automatically.
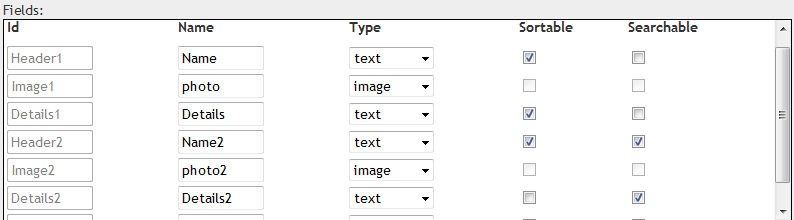
- Text – any textual information, please keep in mind that YouTube videos as well as Social Channels and URLs will also use this type.
- Numeric – numbers that you use like price, ID, order number, phone numbers etc.
- Location – coordinates of a particular place on the world map. Use the following format: “xx.xxxxx,yy.yyyyy” (where x – is latitude, y – longitude. Both values are in angles from 90.00000 to -90.0000. Field with such type can be used in Map, location elements. In this field users will be able to upload coordinates to the Location Input.
- Address – is a field with textual information about a specific Location. It can be used together with Location to describe the place more detailed, or apart from Location.
- Datetime, Date, Time – fields to store date in different formats.
- Image – field with the URL to the picture. Do not try to upload the picture into the spreadsheet, you must only add a link to it. Your app users will be able to upload their pictures or signatures into this field.
How to create multilevel lists using relationships?
Relationships project allows Snappii users to create multilevel lists using advanced lists and advanced forms tabs and buttons. There are 3 types: One to One, One to Many and Many to Many relationships types.
- One to One.
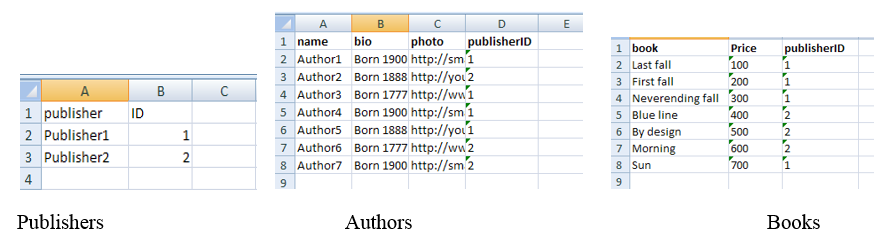
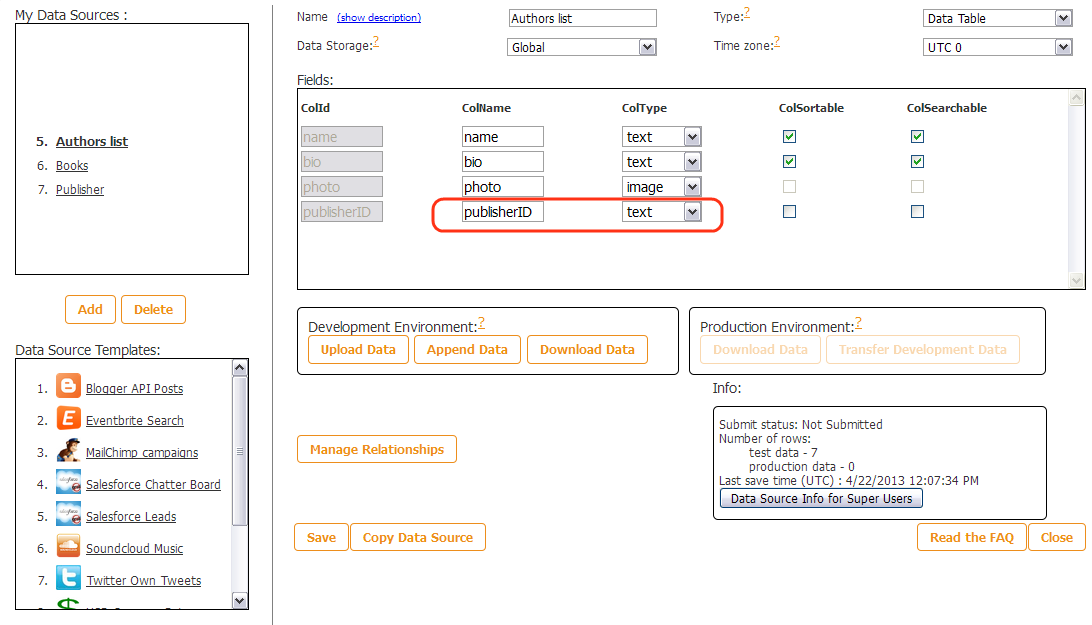
Use Case: list Authors and their books. Create a spreadsheet with Authors and their Books. ID field indicates what book belongs to what author.
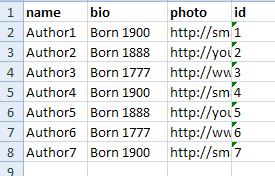
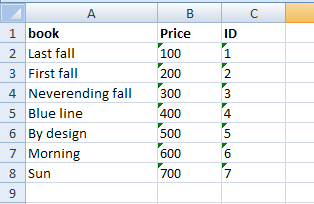
When you upload the spreadsheets set the ID field type as “text” instead of “numeric”.
Save the data sources.
Click Authors data source, then Manage relationships. Choose Relationship type “One to One” -> choose related data source as Books -> ID fields must match the id columns from the spreadsheets. Click Add and you’ll see the relationship. Click Close.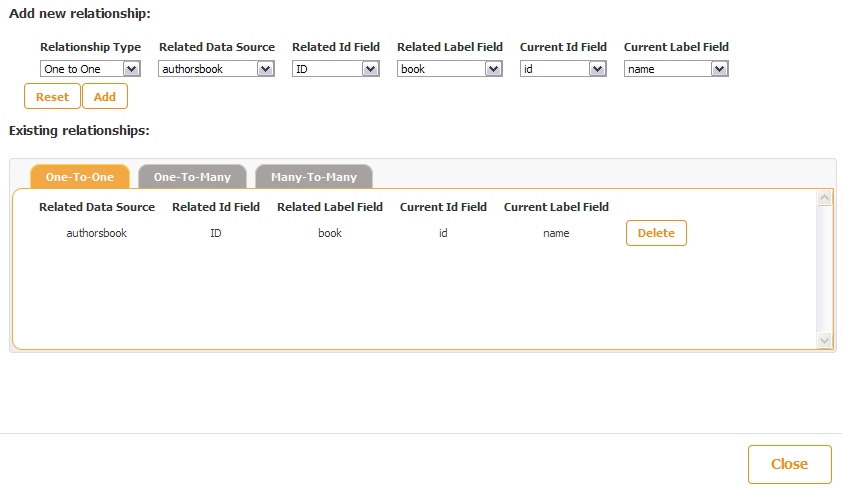
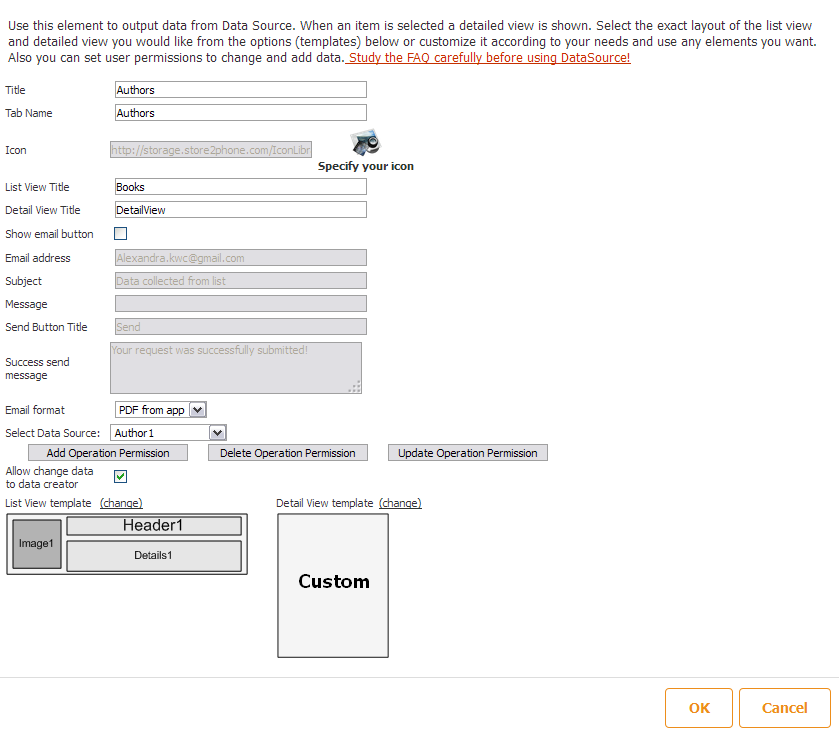
Drag and Drop Advanced List tab and choose the Authors datasource.
In the settings of Advanced Lists you can specify the following:- Tab/button titles
- Tab/button icons
- List/Detail View titles
- List/Detail views
- • Button
- • Framed View
- • Full Screen View
- Enable sending emails
- Email format
- Select datasource
- Modify operation permissions
- Select a Template or Custom view to display the data from the spreadsheet.
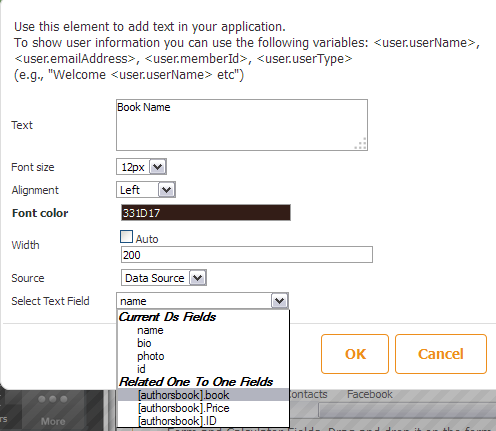
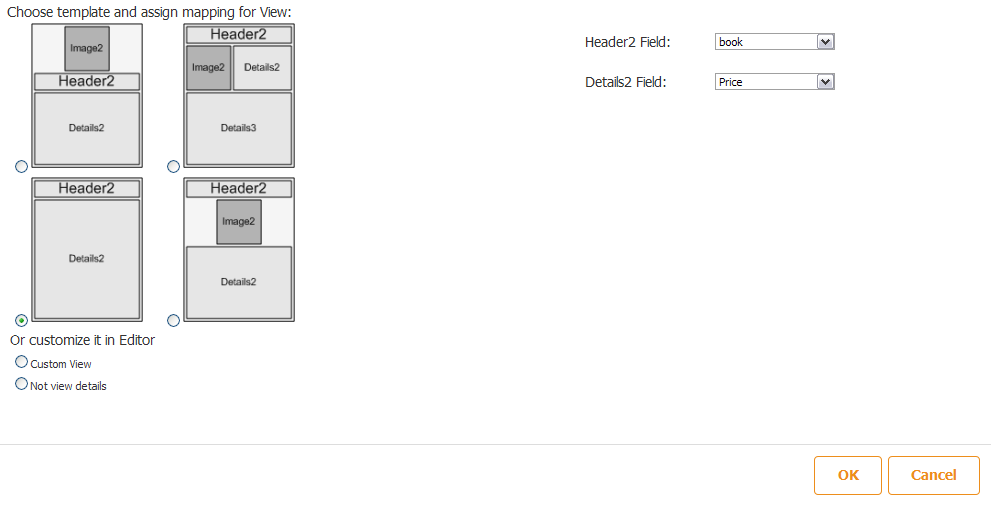
When you drag and drop elements you must match them with the corresponding datasource columns. For example, to show a book name, I will choose “book”. See below.
Click save the app, on preview you’ll see the following:
- One to Many.
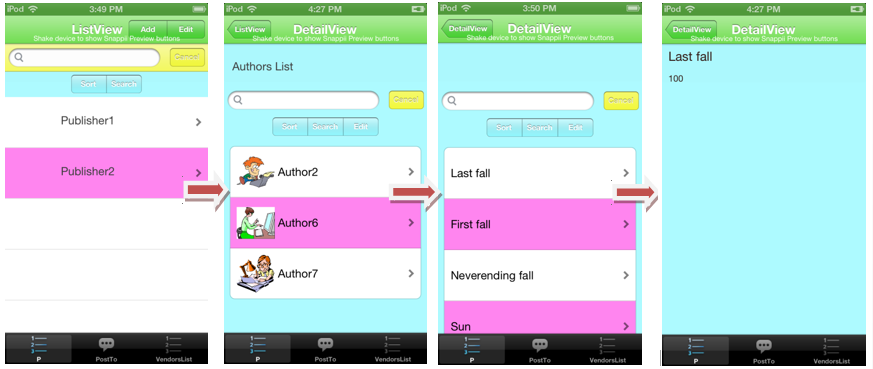
Use case. A Publishing house wants to list the publishers, authors and books with descriptions. Earlier, Snappii user had to create custom buttons and populate it with texts and images. Today it is easy to create the 3 spreadsheets with the information on publisher, authors and their books, and bind these spreadsheets inside Snappii Editor. App user will see the list of publishers, click on one, see the list of authors, click on any author and see the books.- I Create 3 spreadsheets:
- •PublisherID
- •Authors
- •Books
-
II. Upload the spreadsheets into the DataSource dialog in the Editor. Keep in mind that you need to choose “text” type instead of “number” for ID and publisherID. Save them.
-
III. Click Publisher datasource and Manage Relations button below.

Choose One To Many relationship type -> Related Data Source will be “Authors List” -> ID fields must contain IDs.
Click Add button and you will see the newly added relationship.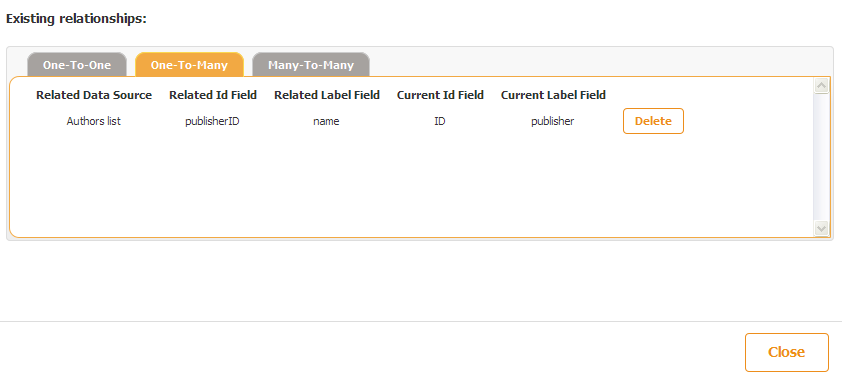
Click Close button. -
IV. Click “Authors List” data source and then manage Relationship button.

Choose One to Many -> Books will be related Data source -> publisherID will be as ID fields in both cases. Click Add.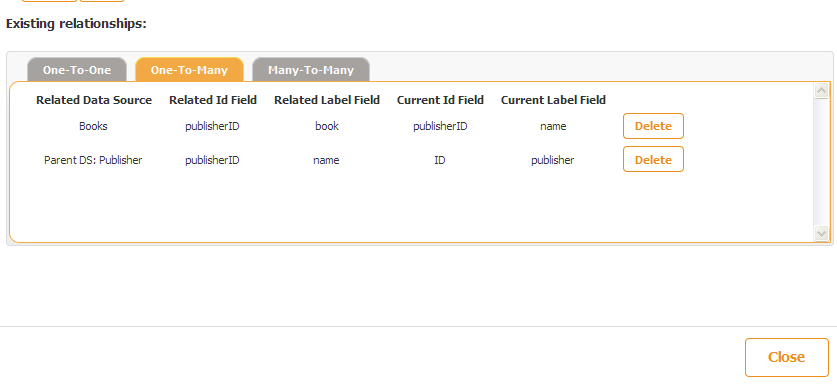
This is how the two One to Many relationship types will be visible. Close the Data Source dialog. -
V. Drag and Drop Advanced List tab. Choose the Publishers List and specify the List view and detail view by either using a template, or customizing in Editor.
We will need Custom detail view to have the ability to add another Advanced list button on it.

Close this window and double click Cell view to specify what data to show from the Publishers spreadsheet. Double click Detail view to add another Advanced List button.
And specify its layout. Here you can see the settings that will allow to show the list of Authors.
In the settings of Advanced Lists you can specify the following:- Tab/button titles
- Tab/button icons
- List/Detail View titles
- List/Detail views
- • Button
- • Framed View
- • Full Screen View
- Enable sending emails
- Email format
- Select datasource
- Modify operation permissions
- Select a Template or Custom view to display the data from the spreadsheet.
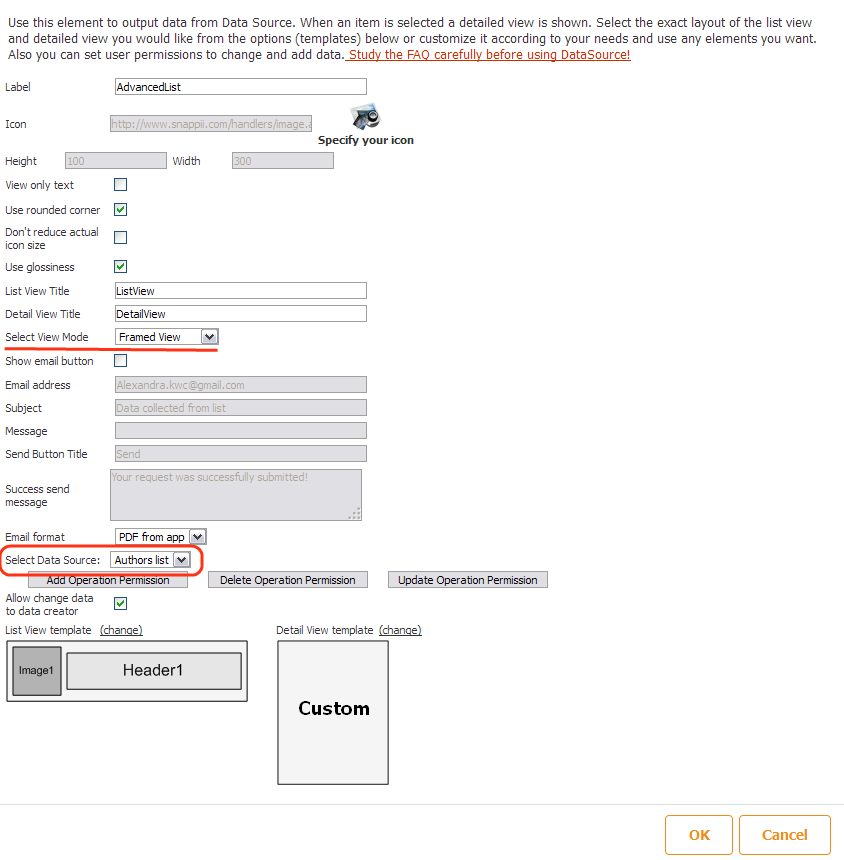
Click OK. Drag and drop the new Advanced List button on the Detailed view of this second level. This time I choose template view for the Cell – will show Books names as and Template view to show Books Price.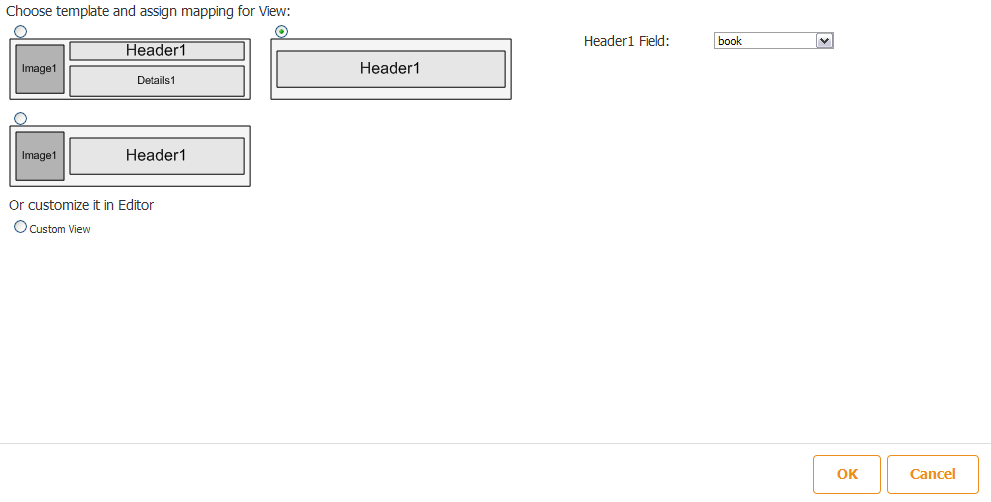
Save the app. This is what you get as a result.
- I Create 3 spreadsheets:
-
Many-To-Many
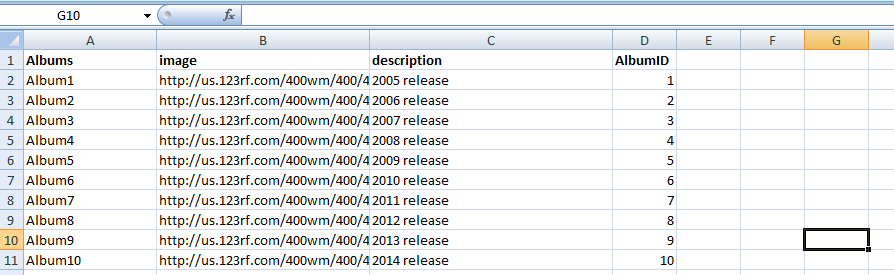
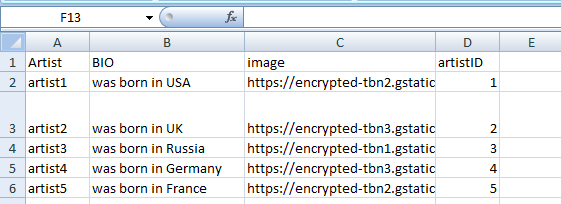
- Create 2 spreadsheets with the data you want to show in your app. I have made the following:
- Please ensure you added the required id column to each of your spreadsheets
- For Many-To-Many Relationships type make a junction spreadsheet which will bind the both spreadsheets above.
My junction spreadsheet looks this way
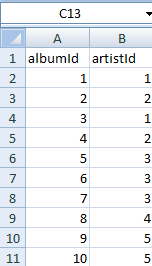
Bind the items you need in it. For instance my junction spreadsheet shows that: - 1st artist created albums # 1 and 3 , 5th artist made 9th and 10th albums etc. - Upload the first two spreadsheets in the DataSource dialog in the Editor

Make sure you chose “Text” ColType for IDs in the uploaded spreadsheets
Once you uploaded and saved everything, select “Albums” and hit “Manage Relationships”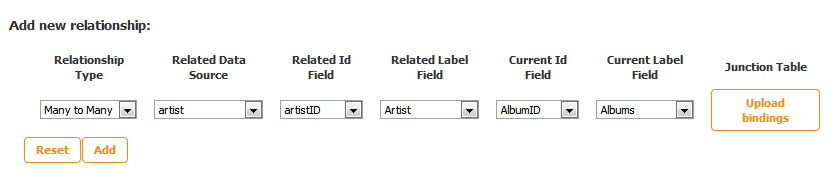
Select ManyToMany type and choose the related data source from the list. Related ID and Current ID Fields must contain IDs only.
Click on “Upload bindings” button. The details will appear below.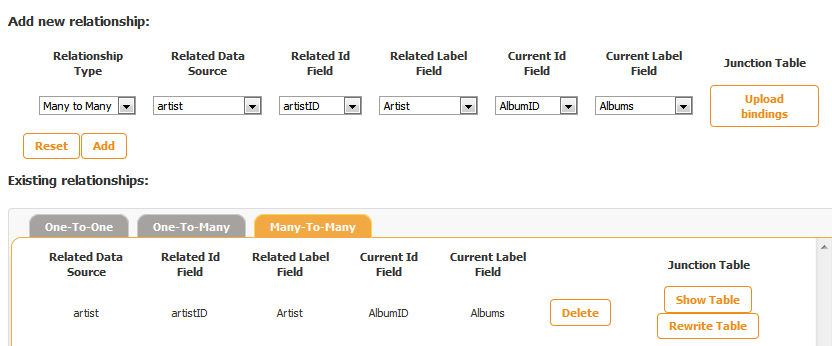
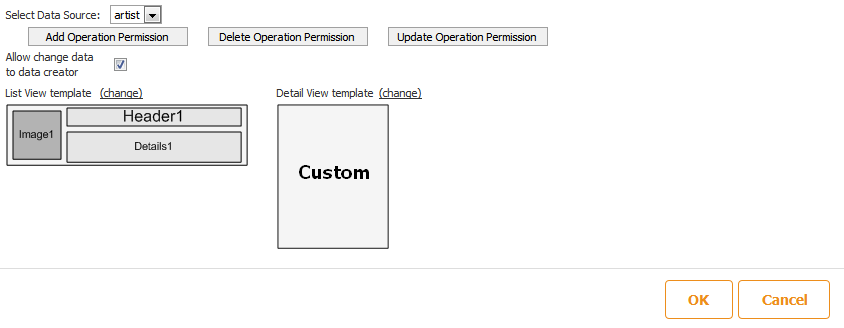
Hit “Save” to save all the changes in the DataSources - Add Advanced List tab or button on a Custom tab
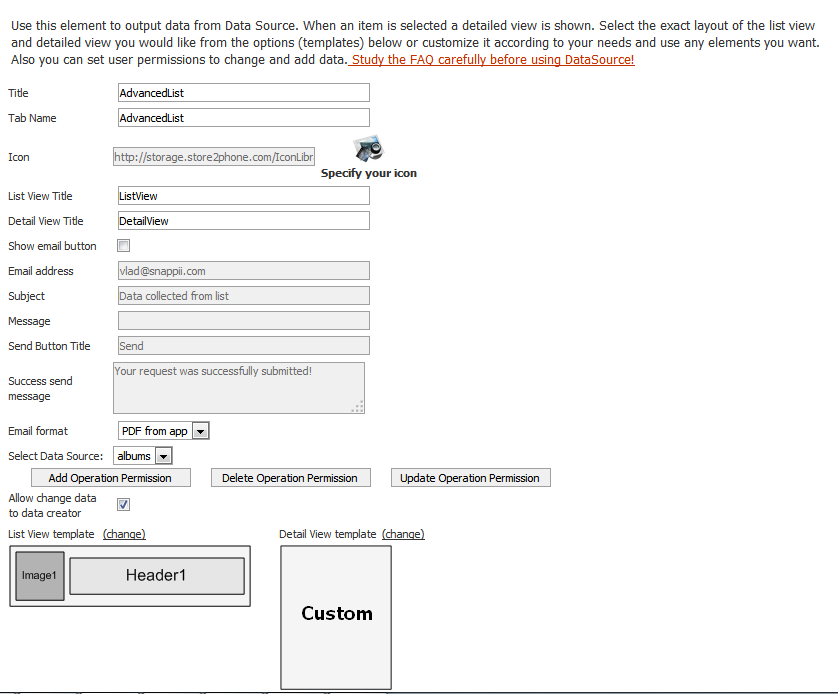
In the settings of Advanced Lists you can specify the following:- - Tab/button titles
- - Tab/button icons
- - List/Detail View titles
- - List/Detail views
- • Button
- • Framed View
- • Full Screen View
- - Enable sending emails
- - Email format
- - Select datasource
- - Modify operation permissions
- - Select a Template or Custom view to display the data from the spreadsheet
This time I choose the second list I have and select the required views On the new Detail view I again drag and drop another Advanced List button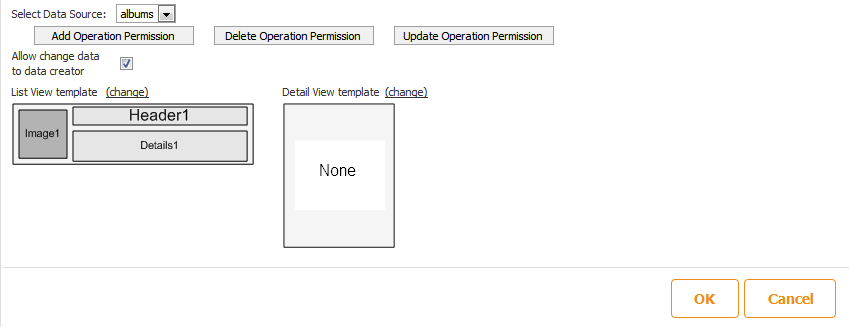
This time I choose “Albums” and specify my views. When you select any Template view don’t forget to choose the information you want to show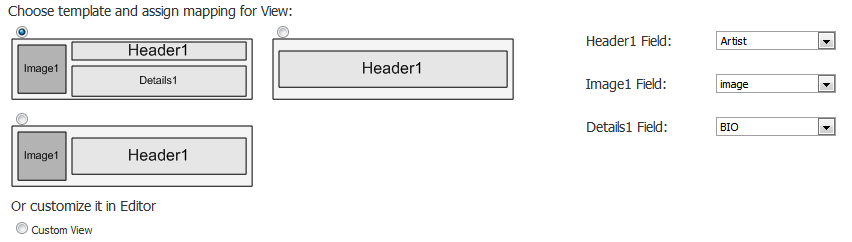
In case you are using Custom View add the required controls right on the screen like text, hyperlink, call, email etc and bind them with the items from the uploaded data source.
After “Save” we can take a look at the app on a device.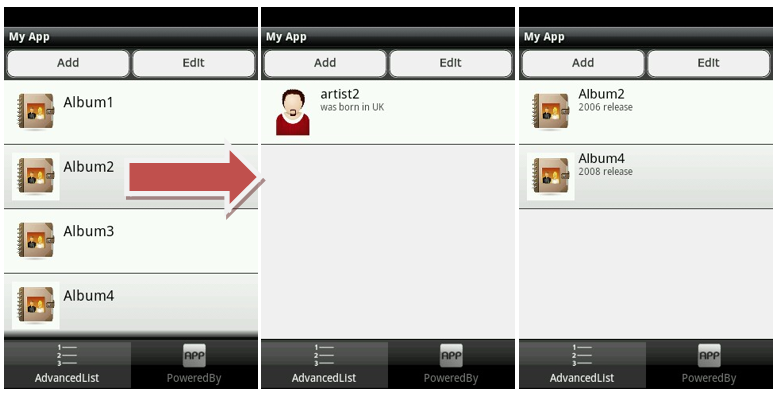
- Create 2 spreadsheets with the data you want to show in your app. I have made the following:
What is the form tab/button?
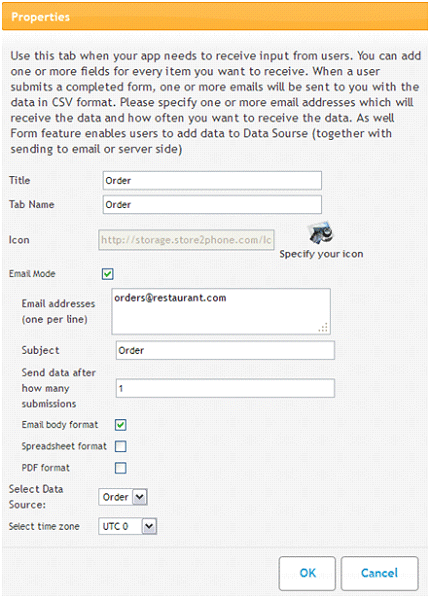
The Form Tab/button allows you to create forms that can be used to collect information from your users in whatever format your wish (application, registration, survey, etc). The information is then emailed as a spreadsheet or PDF to whatever email address you have specified, can be posted to a website or sent to back end corporate systems.
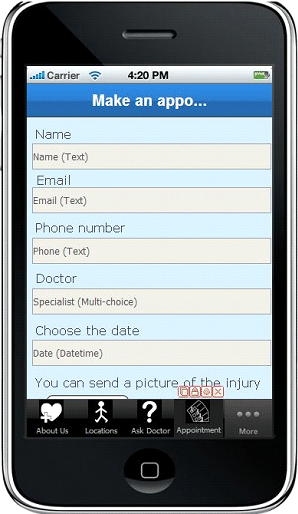
Forms are more easily created with the help of the form wizard. App creators can select various form fields, fill in placeholders and even save each form as a template for quick access and reuse. Once built in the wizard, users can further modify the form for additional text and customized field placement in the editor.
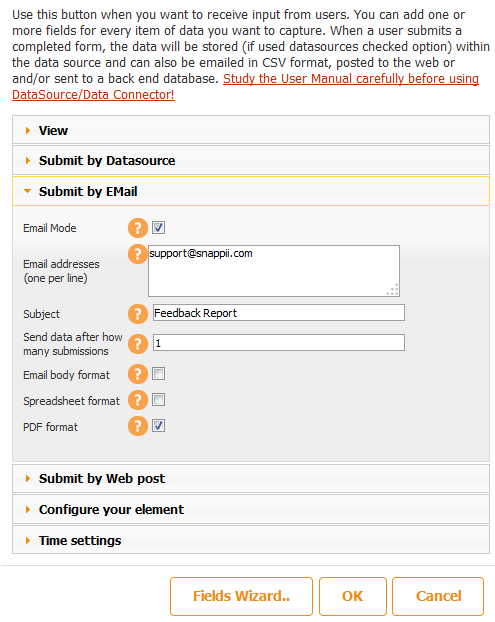
What is the Advanced Form button?
As with the Advanced List, the Advanced Form button allows deeper and more detailed
information and functionality than the standard form button. An Advanced Form takes
advantage of datasources to provide richer, more robust form details to be collected
and submitted. As well, the data collected can be uploaded from the Snappii editor,
emailed (via spreadsheet or PDF), posted to a website, sent to a back end corporate
system or stored directly on the device.
For example, a moving company makes visits to a customer’s homes to do a visual
inspection of the property. Information about the customer, the property and specific
details about the move can be entered into the advanced form by the various sales
reps in different geographic locations. The form can then be submitted through the
app to the CRM system at the moving company office where a quote can be generated.
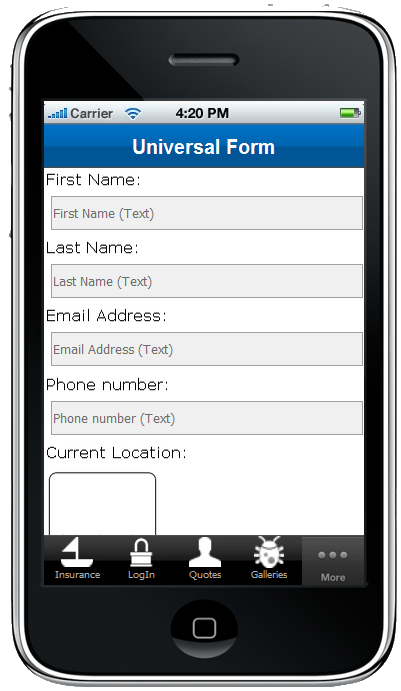
What is the Universal Form tab/button?
Universal form is a combination of a simple Form and a Form that uses DataSource. If you need to put a form to your app, you can choose whether to use a simple form or a form that would take data from the DataSource. Use Universal Form to create input fields which can collect information from users.
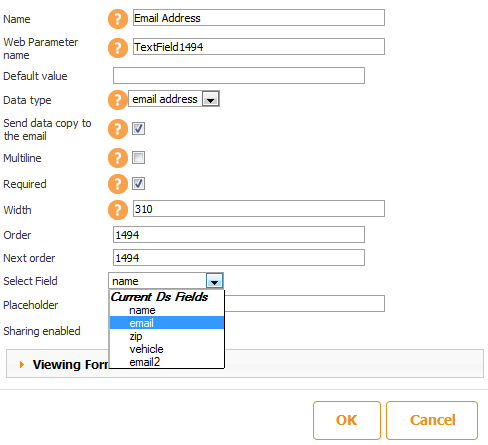
Use "Universal Form" to create input fields which can collect information from users. Examples: registration fields, schedule appointment, fill out application, submit request, etc. Form fields allow you to make calculations, collect feedback from users, get copies of sent out forms, etc. The data can be received in PDF file, Excel spreadsheet or in email body. The form can go to several email addresses that you specify.
 Web post mode supports Get and Post methods. Choose method, response type and enter web server URL to take data from. For example, you can enter zip code and find out the weather, or retrieve any data from server.
If you need to use datasource, then open “Submit to Data Source” dropdown and put a check next to “Use Data Sources”.
Web post mode supports Get and Post methods. Choose method, response type and enter web server URL to take data from. For example, you can enter zip code and find out the weather, or retrieve any data from server.
If you need to use datasource, then open “Submit to Data Source” dropdown and put a check next to “Use Data Sources”.
 1. Add Data Source (see How to use Data Source dialog? question)
2. Drag and drop Universal Form tab or element on an iPhone canvas in the Snappii WYSIWYG editor. You will see the dialog.
(In our example the uploaded Data Source is called “Retrieve quote”)
3. Specify the following settings:
- -Advanced Form name
- -Tab icon
- -Select a required Data Source (if you have only one Data Source it will appear automatically)
- -Check the required options if you need them
- • Multiple Adding
- • Auto fill data
- • Auto fill data
- - Use Command
ModeCommand mode is an option for web service datasources. It allows executing custom commands, which must be described in the connector of this datasource. - -Activate Email mode if you want to send the Universal Form data to any email address/es once it is filled out and submitted
- -configure Universal Form by changing its size and view
- -adjust Time Zone settings
Use Case: You are a medical institution and you need to fill out lots of forms about your patients. Paper work is eliminated and the reports can be stored on device and sent via email as PDF file whenever the doctor decides to do so. If you have no Internet connection, you can still fill in the forms and click Submit button. Once the Internet connection is reached, the forms will be sent out. The Advanced Form feature will be especially useful for those who work in fields and don’t have constant access to PCs.
Universal Form Wizard
Fields Wizard allows to create a form that can be saved as a template form. Click on a field you want to add to your form, click Add, name it and it will appear in your form.
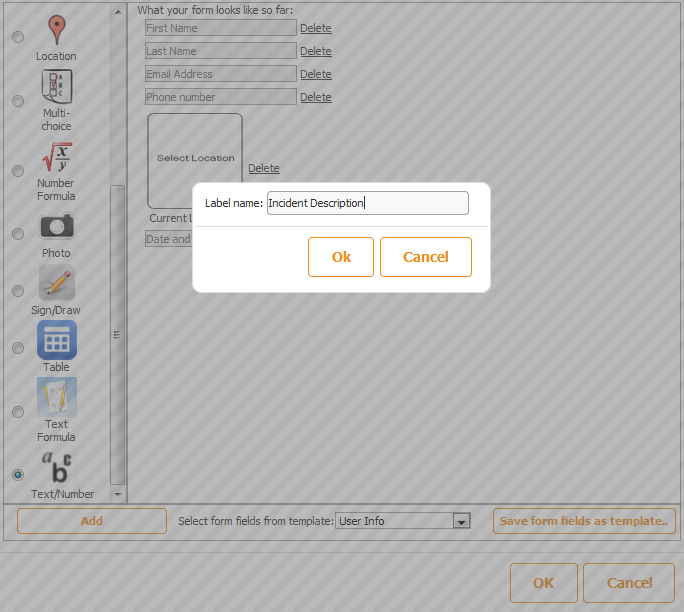
You can save the form fields as a template and use in your other forms by clicking “Select form fields from template” and choosing your saved template. The added form fields look this way:
What does Pagination allow to do?
Pagination makes it possible to split long digital forms into several pages for an easier and more convenient access. Each page can be submitted separately if all required fields are filled out properly. Percents at the bottom right corner show how much of the form is already completed.
To enable paging go to Universal Form settings -> Paging -> check the box next to Paging
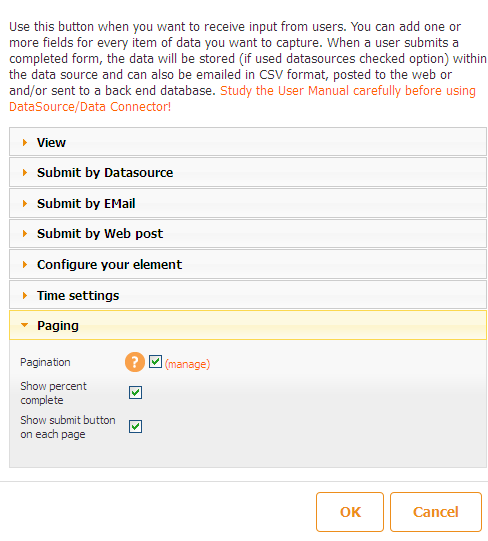
There is also an opportunity to show percentage of the form completed and have Submit button on each page.
To add/delete/edit pages tap Manage button. You will get the following pop-up window:
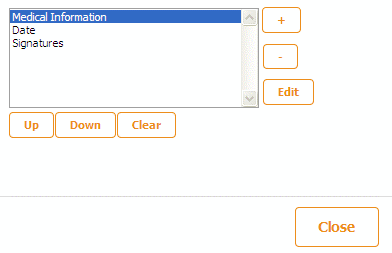
Here you can specify Form Pages names and edit the pages.
- “+ “- use it to add a new page
- “-“ – use it to delete the selected page
- “Edit” – use it to change a page name
- “Up” “Down”- use them to change the order of pages
- “Clear” – use it to delete all pages at once
Please keep in mind the title of the Universal form will be used as the name of the first page!
In the editor you will see all the pages after a click on the Universal Form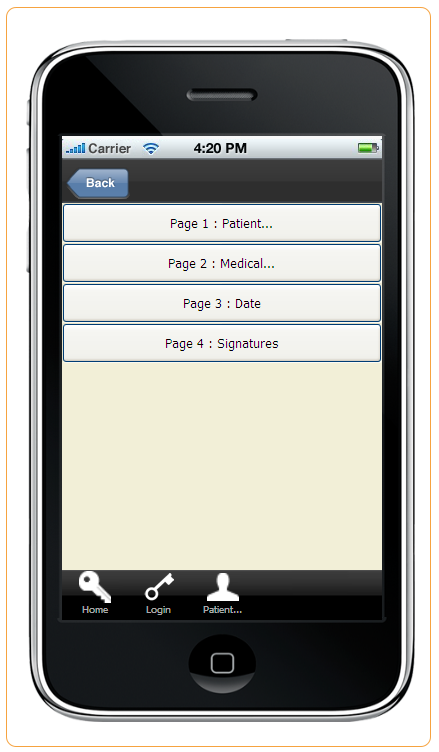
You can tap any of the pages to drag and drop any inputs you will want right on them.
On a device it will look the following way:
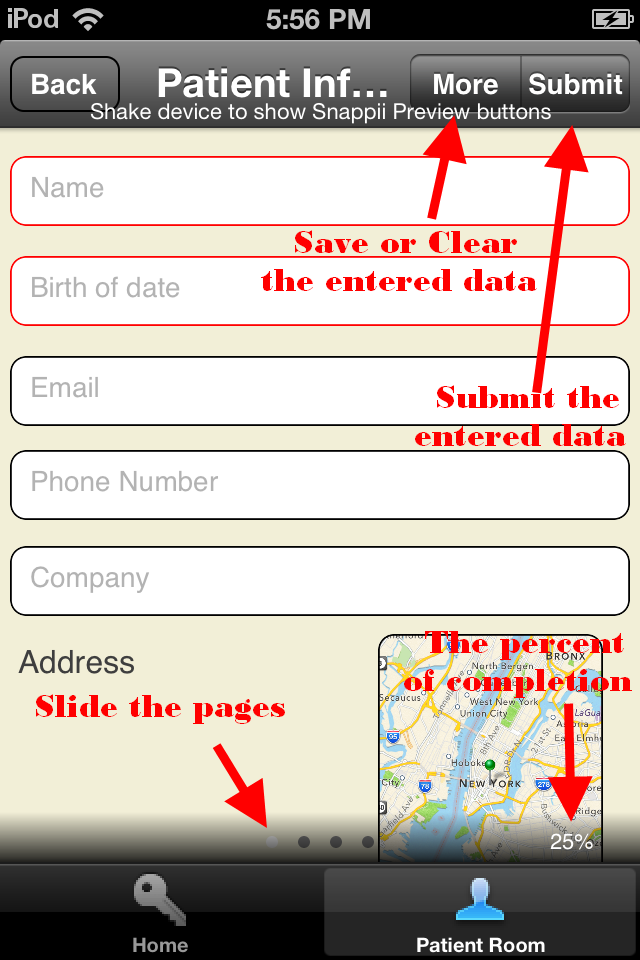
Slide right to see the rest of pages or left if you aren’t at least on the first page. You will not be able to submit your form if some required fields are left empty.
Pagination will make your digital forms look professional and more user-friendly.
Please keep in mind that Pagination will not divide the already existing forms into several parts. It will just place all your form inputs onto the first page of your form. You will have to copy or make those inputs for other pages from scratch.
What is the Map tab?
With the Map Tab you have the ability to display your business locations on a map, and give users directions how to get there. This will help users of your app to visually see how to get to your business locations. To add this tab to your apps, log in, go to My Apps, click Edit your app, click Add Tab and choose Map tab. Simply upload a list of your locations, and see them all on the map in Preview app. You can upload as many locations as you want. If you have more than 50, you will see the Show more button. You can also change your current location by clicking the globe icon.

What is the Advanced Map tab/button?
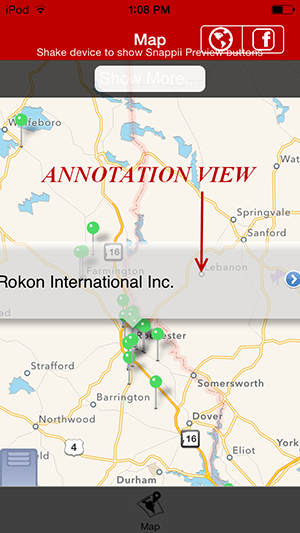
The Advanced Map allows users to show all items from the list on a map. You must add latitude/longitude location column to the list. You have total control over the Map view now. Choose to:
- Text for each pin on a map
- Information your app users will see once the pin detail view is clicked
- Show all locations via list deciding what information your app users will see
Annotation View – info that appears when user taps the pin
Detail View – info that appears when user taps Annotation View
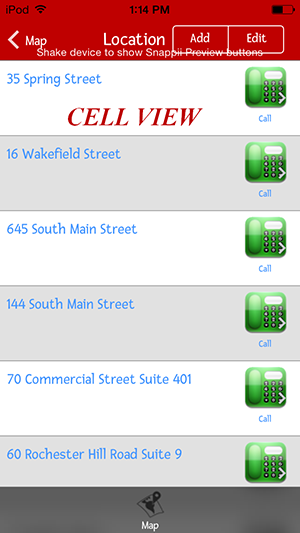
Cell View – info that appears when user taps to view all locations as a list.
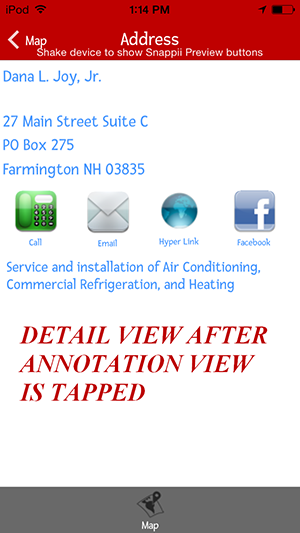
Use case. Chamber of commerce can show a list of businesses with locations, descriptions, contact information and details. Allow app user to find a business of interest and contact it right from the app. Advanced Map vs. Simple Map has the following benefits:
- Total control over the map layout
- Choose the information to show to the app user
- Decide the call-to-action buttons
- View locations as map and as list
- Offline work
What is the Custom Tab/Button?
Use a Custom Tab to create a totally customized page where you can drag and drop text, images, email button, call button, social media buttons, hyperlink button and YouTube button, etc.
This enables you to have total freedom and control over layout of buttons and screen elements. You can build really customized apps for many industries and uses.
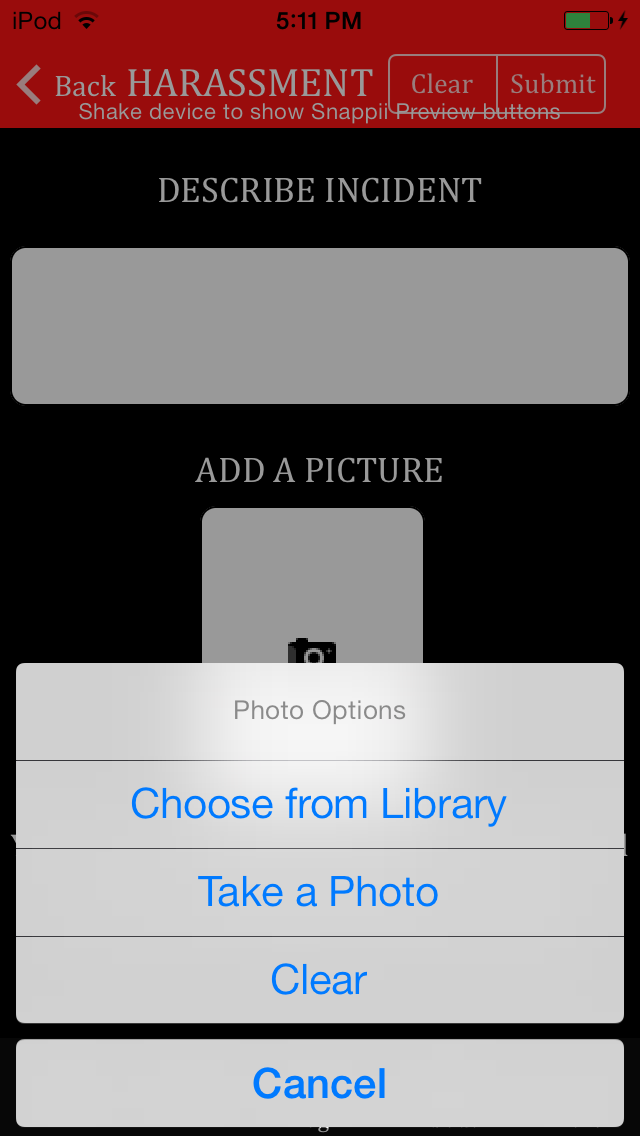
What is the Photo Button?
The Photo Button lets developers create apps that leverage the mobile device camera to take pictures which can be shared, emailed, posted to a website, and sent to a corporate database. The camera has become a scanner of sorts to take pictures of documents and for other personal and business needs. This can be very useful for any number of reasons:
- • Document car accidents
- • Report vandalism
- • Report news
- • Send pics of houses for rent and purchase
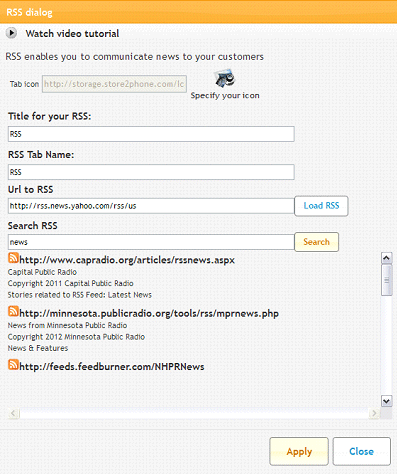
What is the RSS button?
RSS looks like a news feed when added to an app. User can read news right from your site, and recurrently visit it. If your site doesn't have an RSS, then you could add an RSS about the topic around your app.
Some Snappii users get an RSS from their Twitter, it's also a good way to get people's interest.
Anyway, it won't hurt to add something useful for your users to read. Simply add RSS tab/button and
you’ll see a dialog asking you to load the feed.
JS Plugin Tab/Button
Extend you app with HTML, CSS, JAVAscript code to do anything you want. For example use in-app HTML to create custom database query, registrations, integration with other systems, etc. You can re-use existing code from your website. The resulting mobile apps:
- Have better performance, scalability and security
- Enable better migration from web apps to native mobile apps
- Give customers protection against well know HTML5 failures
- Allow customers to leverage existing Web Apps
* Code Reuse. Snappii app builders can reuse existing code from their websites and other apps and drop it in the JS PLUGIN control bringing the same features to their mobile app.
* JavaScript library use. JavaScript is the most popular programming language in the world. It has become common in both game development and the creation of desktop applications, and it is now possible to use it in mobile apps development as well.
* Extensibility. Further extend the Snappii platform features by enabling JavaScript plugins to create fully customized, enterprise mobile apps. For example use in-app HTML to create custom database query, registrations, integration with other systems, etc. It is also possible to add many more features such as image galleries, graphics, animations, etc. by way of different existing JS/jQuery plugins. Even simple games are available for adding into Snappii mobile apps.
* Enable Javascript extensions to work in Offline mode when internet access is not present.
Read more about the JS Plugin here. Let’s see using a gallery example: You can use “Photo Swipe” plugin (https://www.photoswipe.com/) for a gallery. On its site you can see that this plugin is mobile-oriented. That’s why it works and looks fine for all devices.A Zip file with the HTML code was uploaded. It contains only one html file (index.html), js (JavaScript) and css (styles) files and also images files. The js and css files are connected to the .html file and all links must be relative (not absolute):
<link href="photoswipe.css" type="text/css" rel="stylesheet" />
<script type="text/javascript" src="klass.min.js"></script>
The links for images are relative too (e.g., <img src="images/01.jpg"…).
Using the JS/HTML control all paths must be relative for the offline mode to work properly.
Push Notifications
Push Notification is a built-in technology in smart phones that allow pop ups to
appear when notifications are pushed out. They are a great way to keep your users
updated on the latest happenings with your business.
Please keep in mind that Apple rejects apps that send promotional material "Apps
that use Push Notifications to send unsolicited messages, or for the purpose of
phishing or spamming will be rejected".
Snappii users can send notifications right from the app. In order to do so, simply click "Communicate" dropdown to find the following tabs/buttons:

- One Time Notification
This tab allows to create and send Push Notification right away to all or predefined groups of users from devices
- Ongoing Notification
This tab allows to create and send Push Notifications to all or predefined groups of users from devices.
Users can send Push Notifications on daily/weekly and monthly basis. If weekly Notifications are selected then monthly fields should be skipped and vice versa.
- Scheduled Notification
This tab allows to create, schedule and send Push Notifications to all or predefined groups of users from devices.
These settings can be specified in the User Management section in the Editor.
What are the Product List Tab/Buttons & Shopping Cart?
The Product List works in much the same way as the List tab/button does, by downloading
a spreadsheet. However the Product List also contains pricing details which are
visible then in the app as well as the Details page which shows up a Shopping Cart
button. After making selections, a chosen item goes directly to the Shopping Cart
to be purchased.
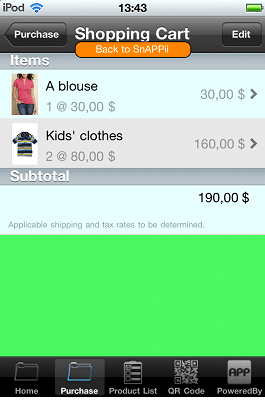
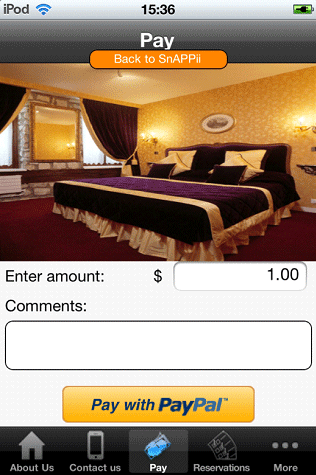
Can I build apps that take credit card payments?
Yes. Snappii provides paypal support for credit card payment functionality. PayPal
allows users to purchase physical goods or services such as organization memberships
that give users benefits outside the app itself.
Use of the PayPal function for the following types of purchases is not allowed (from
Apple review guidelines):
- • Apps that unlock or enable additional features or functionality with mechanisms other than the App Store will be rejected
- • Apps utilizing a system other than the In App Purchase API (IAP) to purchase content, functionality, or services in an app will be rejected
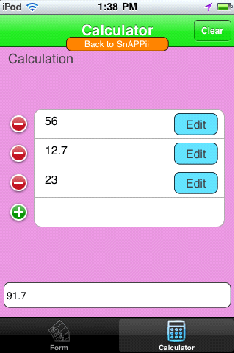
What is the Calculator button?
The calculator button allows you to make calculations using the date/time and/or number formula fields within a form. Drag and drop text or datetime fields onto Calculator tab/button. Choose the "Number" in the Data type of your text field and date, time or datetime format in your datetime field. To make calculations, use the Datetime or Number formula fields. Enter the formula to get needed calculation result. How to create formulas:
-
• Arithmetic operations: +, -, *, /, % (modulo), &, |, ^ (exclusive or), <<, >>
- • Place input control names in <>. For example, <StartDate>
- • Date/time operations: A date/time may be subtracted from another date/time. A time interval may be added or subtracted from a date/time. Time intervals include: YEARS, MONTHS, WEEKS, DAYS, HOURS, MINUTES. Example: <Date1> + 26 WEEKS
- • Date constants: TODAY (today's date) and NOW (Current date/time)
- • To use conditional expressions (may be nested): ( comparison ? expression1 : expression2)
- • Comparison operators: > , <, > =, <=, == (equal), != (not equal).
Examples:
(<Operator> == "Double" && <Number1> > = 0 ? <Number1> * 2 : 0) (<Date1> == TODAY ? 1 : 0) - • IS_ONLINE - formula of checking network status that returns "true" or "false" values.
Example: IS_ONLINE ? "Online" : "Offline"
(Formula can be recalculated for elements after each updating of screen on device but for tabs it works only once after opening app.) - • To sum a column in a table input: SUM(<TableName.FieldName> ).
Calculated / Formula Fields
Calculated / Formula fields allow making calculations, showing user’s personal information, location data and more. Formula fields can be added to such controls as Form, Advanced Form, Universal Form, Advanced List and Gallery Layout and can be found in the Elements Panel - Form and Calculator Fields. They are:
- Datetime Formula
- Number Formula
- Text formula

Datetime Formula Field Datetime Formula allows making calculations with date/time/datetime data types.
Datetime may be subtracted from another datetime formula/input. A time interval may be added or subtracted from a date/time. Time intervals include: YEARS, MONTHS, WEEKS, DAYS, HOURS, MINUTES.
Example: <Date1> + 26 WEEKS
Date constants that can be used: TODAY (shows today's date) and NOW (shows current date/time)
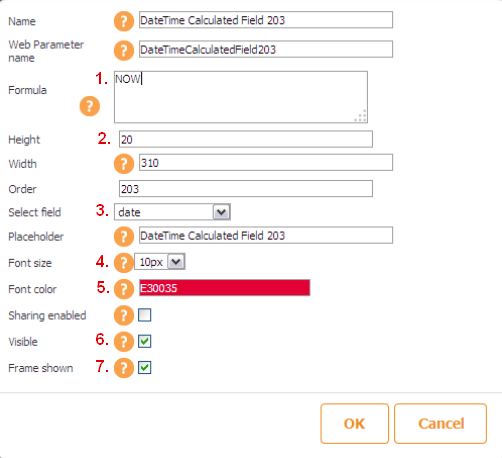
Datetime Formula settings :
(if adding the field to Advanced/Universal form)
- Field for entering formula
- In contrast to ordinary fields, formula fields allow changing the field height, font size (#4) as well as the font color (#5)
- If you want data from the field to be submitted to the data source (and advanced list), you need to specify the field the data will go to. Notice, the column in the data source you want to submit data to should be of the corresponding data-type – datetime/date/time
- Please, see #2
- Please, see #2
- You can specify if the field is visible or not when you look at the app from device. E.g. your today’s day to be submitted to the data source/email report, but you don’t want an app user to enter it manually. In this case invisible option of the Datetime Formula field will work for you. Put TODAY in the Formula field, make Visible unchecked and that’s it.
- You can specify if you want the field to be framed or not.

There’s also an opportunity to drag and drop the all Formula controls to the cell or detail views of Advanced list and Gallery Layout. The settings of the formula controls in this case will be almost the same with the only difference – there won’t be Select field option (#3).
Number Formula Field
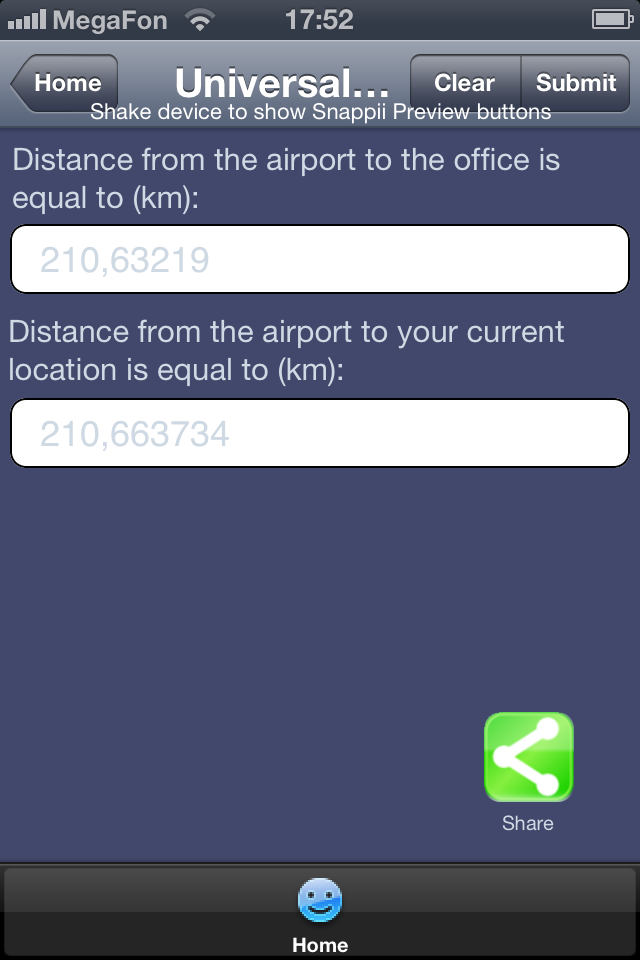
Number Formula allows making calculations with numeric (number) data type. Besides simple arithmetic operations of addition, subtraction, multiplication etc. the field supports more sophisticated formulas like ability to calculate distance based on two GPS locations.
For example:

Calculates distance between two certain locations (coordinates are entered)

Calculates distance between user’s current location and some certain point
That’s how it looks in the app on device:
Text Formula Field
Text formula allows showing text as a result of some calculations. There’re several examples it can be used for:
1. It can replace device/app specific variables with text: Device/app specific variables are:
<user.userName>
<user.emailAddress>
<user.memberId>
<user.userType>
<user.location>
<user.location.latitude>
<user.location.longitude>
<user.location.textAddress>
<device.version>
<device.model>
<device.language>
<device.id>
<device.platform>
For example:
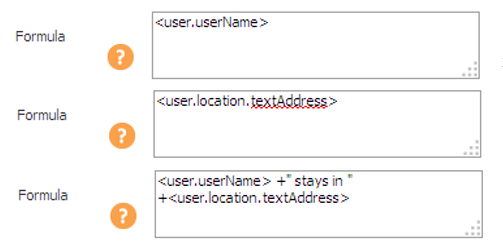
Shows the name of the user when he/she is logged in (will show anonymous if a user is not logged in)
Shows current user’s location as a text address
Will show that a user stays in his/her current location.
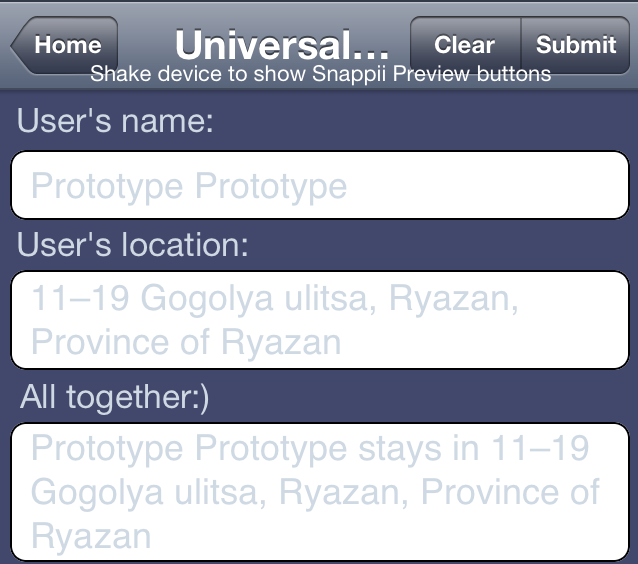
That’s how it looks in the app on device:
- DATE_OPERATION(...) - calculates data/time operations in Text Formula
Example: DATE_OPERATION(NOW) - TOTAL – Number Formula function that calculates total rows in datasource
- IN_DAYS(...) - Number Formula function that converts data/time operation to days
Example: IN_DAYS(<saleEndingDate> - NOW) - IN_TEXT(...) - Text Formula function that converts numerical calculation Example: IN_TEXT(<value1≶ + <value2>)
- .replace(searchvalue,newvalue) - Text Formula function that searches a string for a specified value and returns a new string where the specified values are replaced. Parameters : - searchvalue - The value, that will be replaced by the new value - newvalue - The value to replace the searchvalue with Example: (“OldValue”).replace(“Old”,”New”) . Result is “NewValue”
- .toUpperCase() - Text Formula function that converts a string to uppercase letters. Example: (“Value”).toUpperCase() . Result is “VALUE”
- .toLowerCase() - Text Formula function that converts a string to lowercase letters. Example: (“VAlue”).toLowerCase() . Result is “value”
- .substring (from, to) - Text Formula function that extracts the characters from a string, between two specified indices, and returns the new sub string. Parametrs : - from - The index where to start the extraction. First character is at index 0 - to - The index where to stop the extraction. If omitted, it extracts the rest of the string Example: (“Hello world!”).substring(3,7) . Result is “lo world!”
- .indexOf(searchvalue,start) - Text Formula function that returns the position of the first occurrence of a specified value in a string. Parameters : - searchvalue - The string to search for - start - Default 0. At which position to start the search Example: ('Hello world, welcome to the universe.').indexOf('e',5) . Result is '14'
As it has been already mentioned above, all Formula controls can be added to the cell or detail views of Advanced list and Gallery Layout. Input controls when added to the cell and detail views must have names different from data source columns if used in formulas. The name of the data source columns you want to show data from should be

That’s how it should look like in the setting of Txt formula control.
Here’s one more example: you can show distance from any locations specified in the data source to the user’s current location. The function can be used in Number Formula control as follows:
DISTANCE(<Location>, <user.location>) - where Location is a field in the data source;
Thus, the way how formula controls work inside advanced lists is similar to the way simple Text element functions – they both display data from data sources with the only difference: when using Test element, you need to choose the necessary data source filed from the drop down list in the elements settings, but when using Formula control, you need to specify the data source field name like this: <fieldname> inside the formula filed in the control settings.
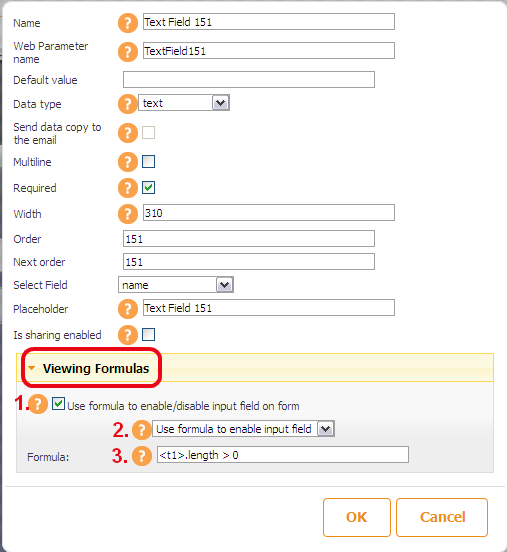
Viewing Formulas Option
Viewing Formulas option allows you to enable/disable input fields for Form and Calculator controls (Datetime, Location,
Multichoice, Photo, Sign/Draw, Table and Text/Number fields) depending on the condition (formula) you’ll specify.
When any of the input controls is dragged and dropped to Calculator, Form, Advanced Form, Universal Form, Advanced list, Gallery Layout,
there will be an option to use formula to determine whether the control is disabled or enabled. Here’s how it looks like in the editor:
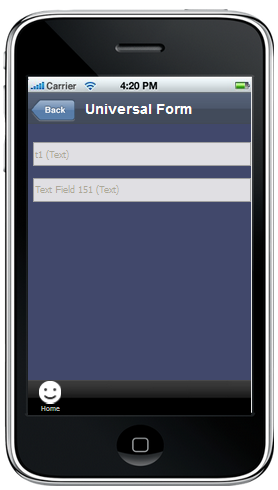
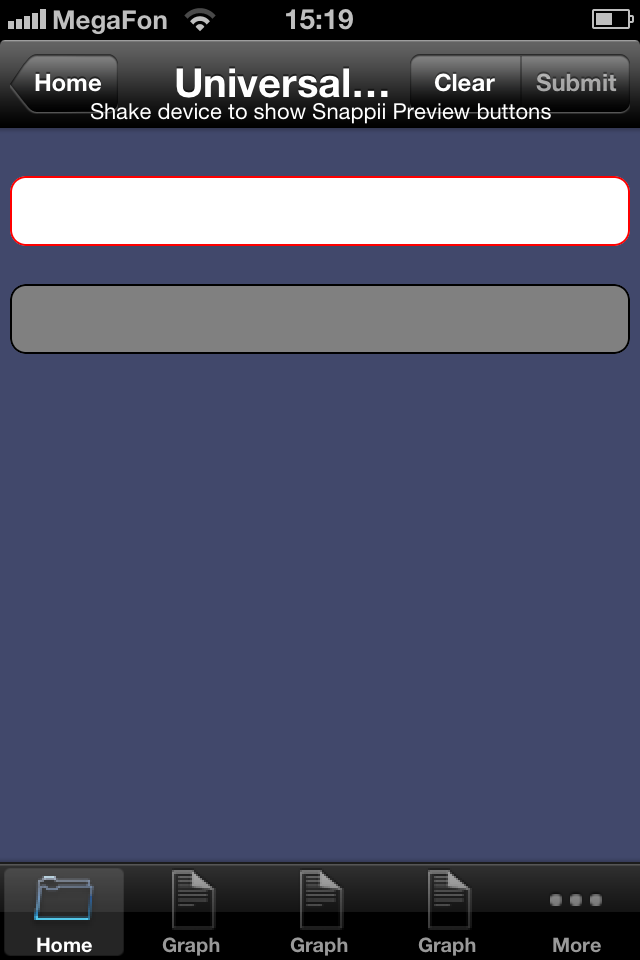
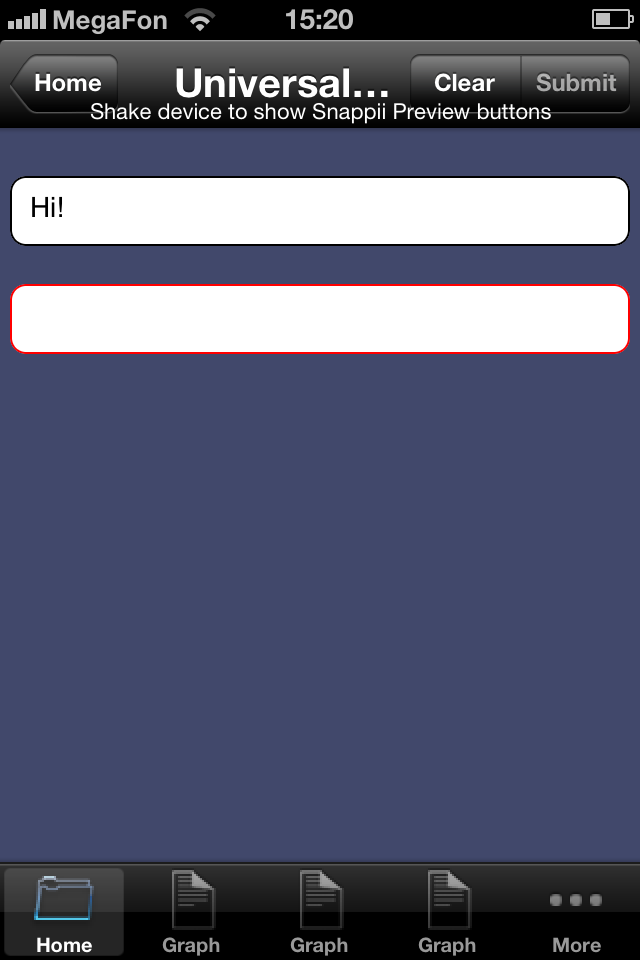
We have added two Text/Number fields into the Universal form, named the first one ‘t1’ and used Viewing Formulas option for the second one.
If you open the Viewing Formulas menu, you will see the following:
- Use formula to enable/disable input field on form – allows to ‘switch on/off’ the option
- Dropdown menu allowing to specify if the field is going to be enabled or disabled depending on some condition. (We set ‘enable’ option, which means that if a user fulfills the condition, the field will be enabled).
- Formula – that is where the necessary condition should be specified.
(We entered the following formula:
.length > 0 where ‘t1’ is the name of the first field and if the length of this field is more than zero (i.e. if a user fills any data in there) the second field will be enabled).
Thus, you can specify a condition that involves any of the input controls you have inside the form. The formulas format should be similar to the one of Number Formula and Datetime Formula controls.
Here are some formula examples you can use in Viewing Formula Field:
- <FieldName >.length > 0 – will enable/disable the field if the other field (standing for ‘FieldName’) is filled out;
- DISTANCE(44.123456, 54.123456, <user.location >) < 200 - will enable/disable the field if a user is located further than in 200 mi/km from a certain point (the coordinates of which are specified in the formula);
- DISTANCE(<Location1 >,<user.location>) < DISTANCE(<Location1>, <Location2>) - will enable/disable the field if the first distance (from a certain location to a user) is smaller than the second distance (from one location to the other);
- (<date1 > - <date2 >) < 3 - will enable/disable the field if the difference between the two dates is less than 3;
- <user.userName>.length < 100 - will enable/disable the field if the user name has more than 100 characters in it;
- SUM(<TableName.FieldName >) <= <NumberField1> + <NumberField2> - will enable/disable the field if the sum of all the data from the table is less or equal to the sum of the two number fields (‘NumberField1’ and ‘NumberField2’);
- <FieldName≶ == “YES” - will enable/disable the field if the value of the other field is equal to ‘Yes’;
- <date1> > < date2 > - will enable/disable the field if the date in one field (called ‘date1’) is greater than the date in the other field (called ‘date2’);
- <date1> == TODAY - will enable/disable the field if the date entered in one field (called ‘date1’) is the today’s date;
- <user.userType > = “LoggedIn” - will enable/disable the field if the user who sees it is logged in.
Can I collect data from users?
Yes, you can. The universal form tab/button allows you to collect whatever information you would like to receive from your users. You can use this form
for many things including surveys, completing applications, scheduling appointments and signing up for membership. The data is then collected right
from the app and emailed to you in the format you have specified.
Can I send an automated email to users who registered within my app?
You can use the Sign Up Email box that is placed to the left from the iPhone simulator in Editor under “Miscellaneous” to say ‘Hello’ or thank
registered users for choosing your app. Just input any message in the box and all users who signed up in your app will receive your follow up email.
Image Gallery
Image Gallery
Allows to create image galleries by taking images from uploaded DataSources. The following image galleries types are available:
- - Grid
- - Horizontal view
- - Split View
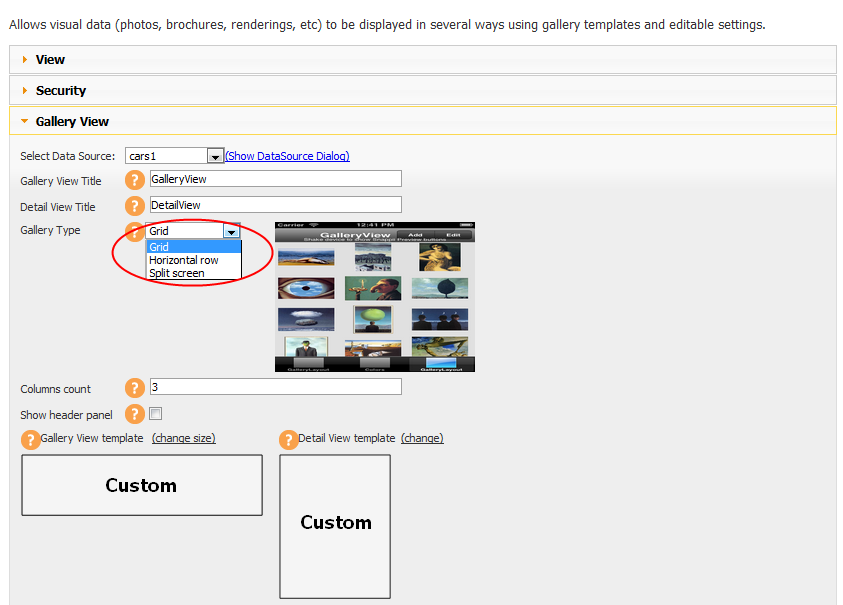
In the settings you need to choose the DataSource you will take the data from. Read more about creating data sources in Data Sources Chapter.
Here you can also enter Cell/Detail views titles and specify if they will have a custom or templetized look.
Columns count will define the number of images to be shown in a row.
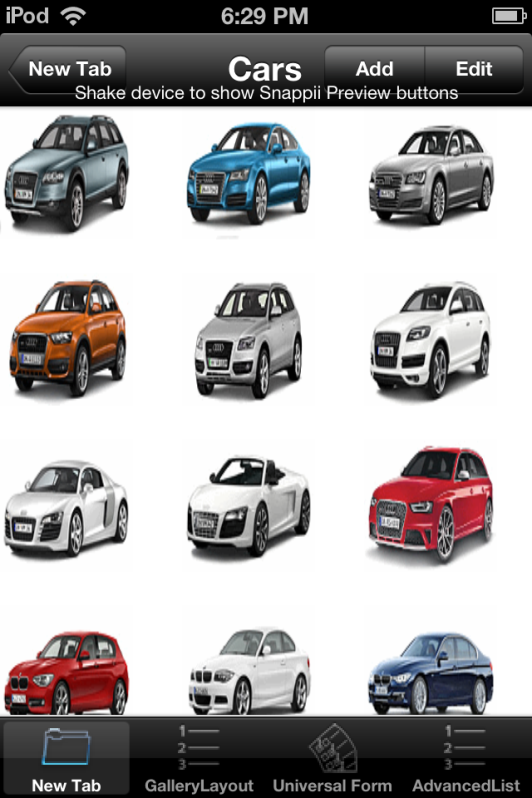
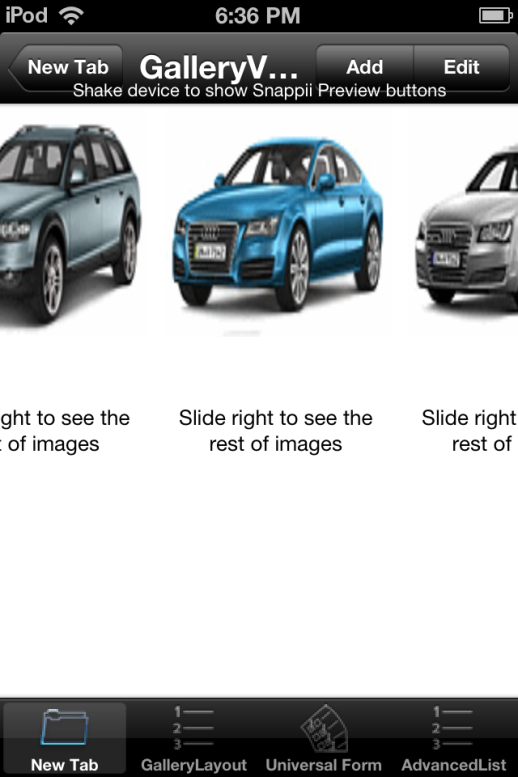
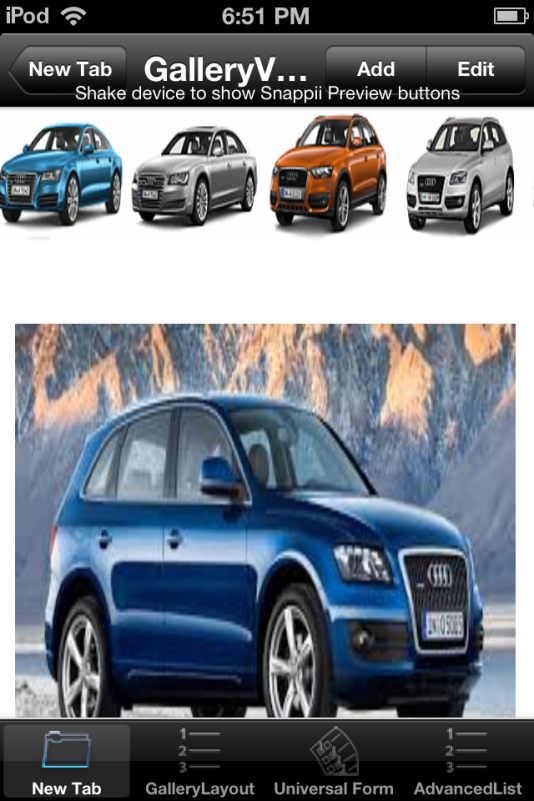
Below are some examples for each gallery type:
- Grid view shows all images in several rows based on column counts and the image size specified in the settings. Users can scroll down to see all the images.
- Horizontal view allows to show all images in a row. Users can slide right and left to see all of them.
- Split view includes horizontal view as well as the picture specified for the detailed view. When users click on any
picture at the top they see another one taken from DataSource or the same but bigger depending on the settings.
How to connect apps to Enterprise backend systems?
Apps created with Snappii can connect to Internet web services and enterprise backend systems using RESTful services. This can be done without any programming. You create a data connector that is an XML document which specifies how to “talk” to a web service. Once the document is imported into Snappii and appropriate security is enabled, any app can receive and update data in any systems. Here is a link for more information: https://www.Snappii.com/blog/articles/The_Snappii_Platform_Brings_Web_Services_to_Your_Enterprise_App
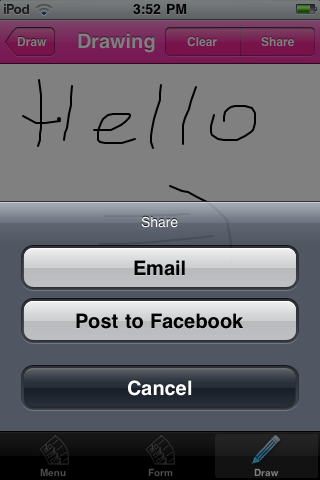
What is the Sign/Draw form field?
With the help of this tab it is possible to create and share digital signatures or draw pictures and
send them to your friends and etc. Just add this element and draw anything you would like to share.
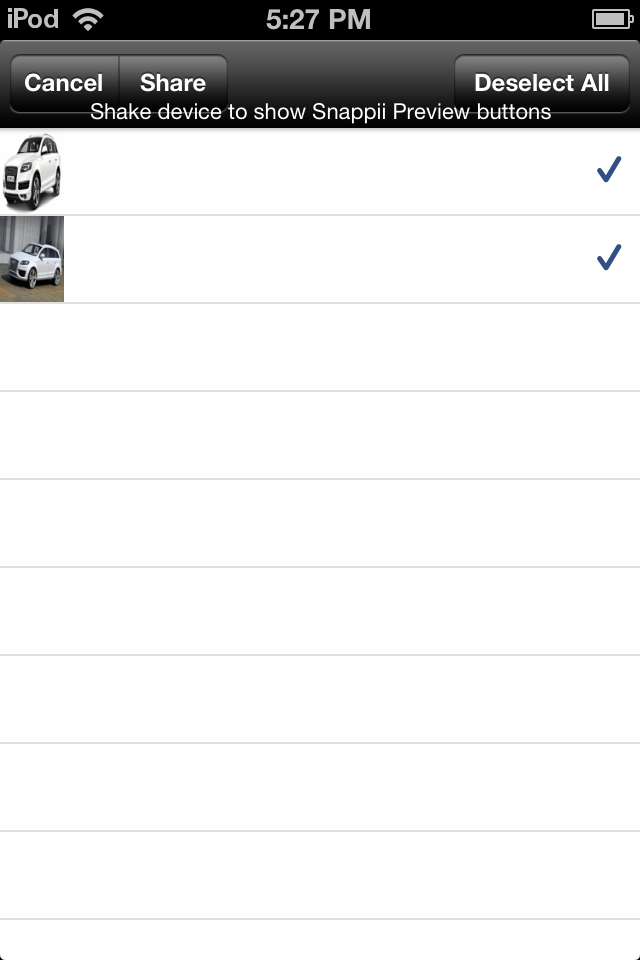
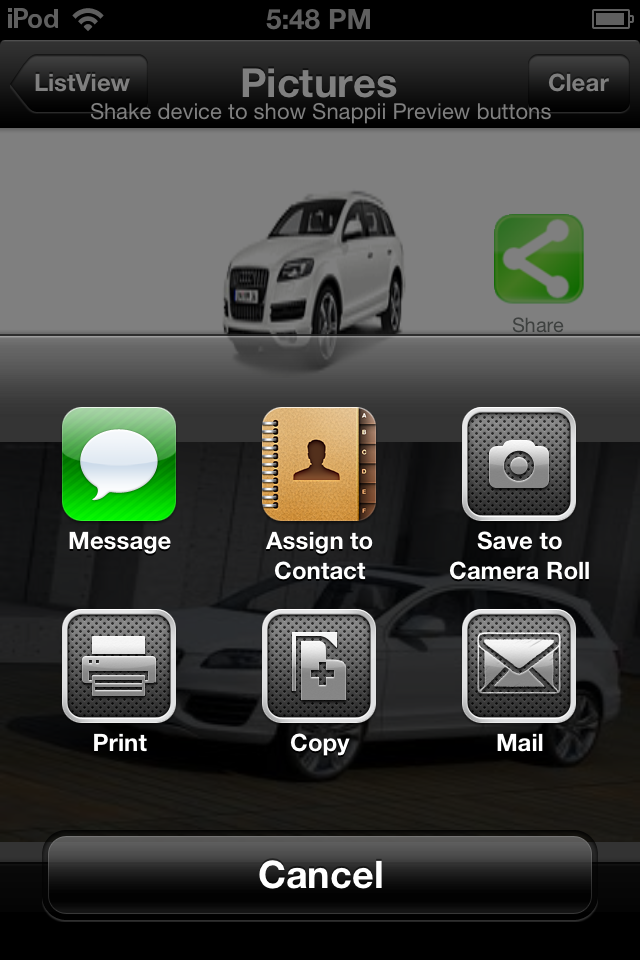
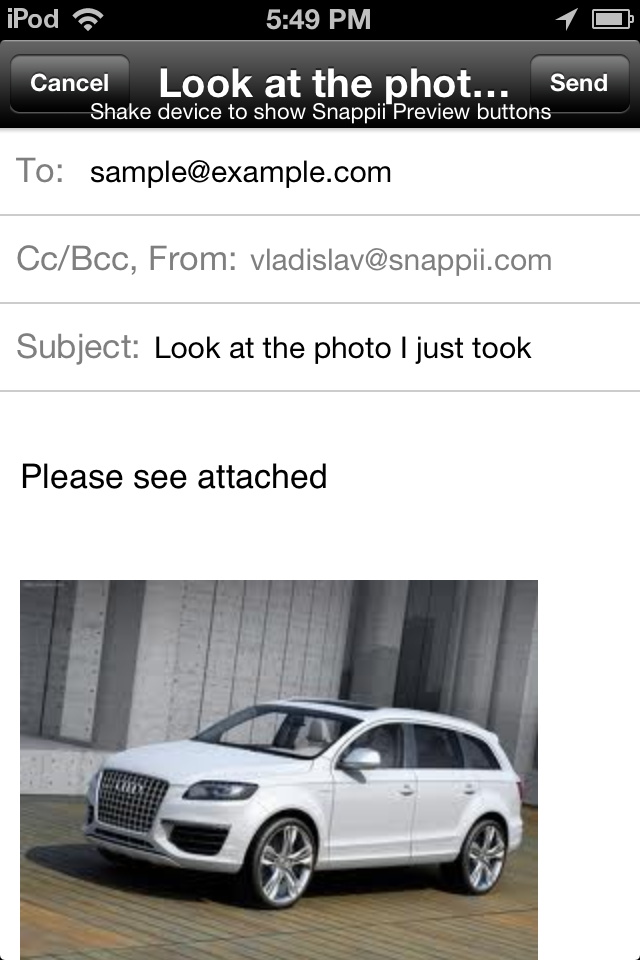
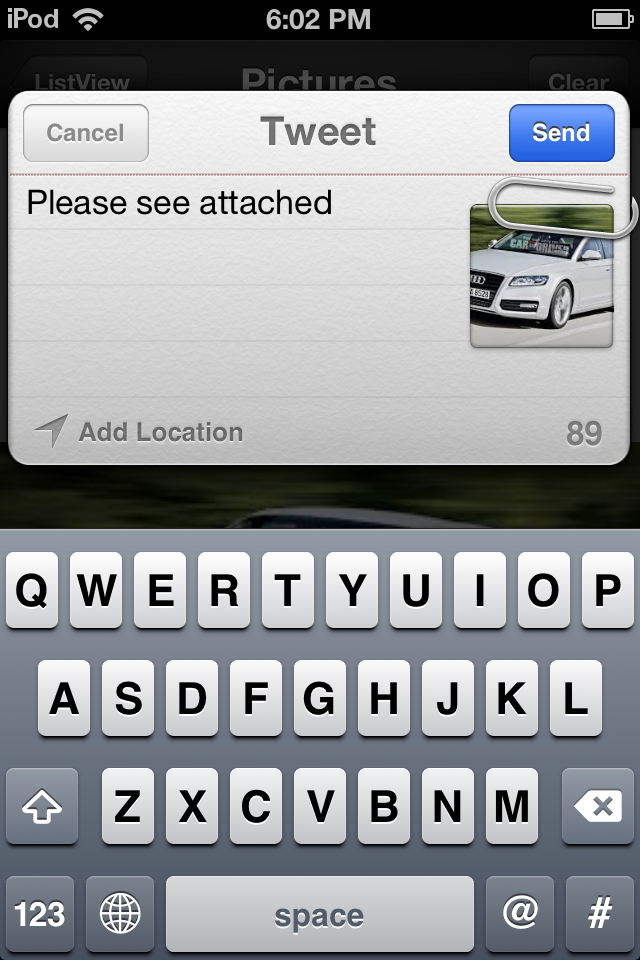
Share Button
This control allows to share data by posting via Facebook, Twitter, Weibo, sending via Email, SMS, assigning to Contacts, copying to Board,
printing out and saving to Camera Roll..
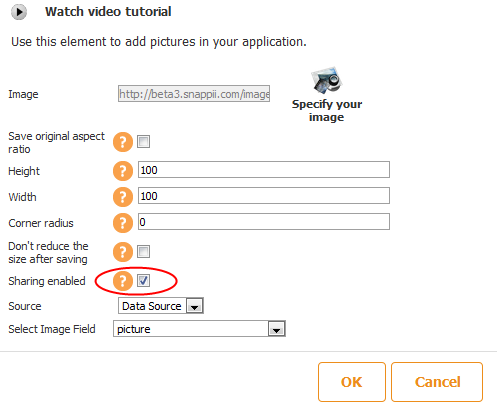
To share images user needs to enable sharing in the image settings, as shown in the image below
Then drag and drop Share control on the canvas. The control can be added to Custom tab/buttons as well as to cell/detail views of Advanced List.
Specify the share options available by holding CTRL button and selecting the required
options with Left Mouse Key. If all options are necessary use CTRL+A command that will select all items in the list.
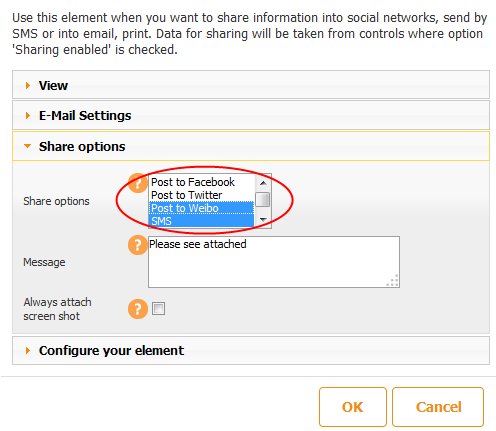
You can specify a message recipients will receive/see together with your shared items.
The whole process is below:
Or if Twitter is chosen:
Facebook Tab/Button
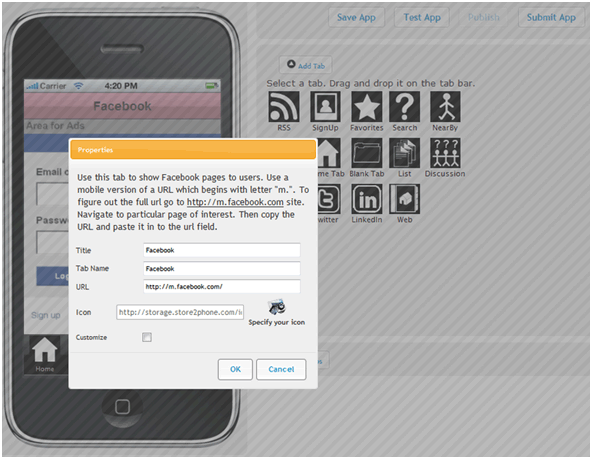
Use this tab to show Facebook pages to users. Use a mobile version of a URL which
begins with letter "m". To figure out the full url go to https://m.facebook.com site. Navigate to particular page
of interest. Then copy the URL and paste it in to the url field.
Now you can share your Facebook page with your app users. Add Facebook Tab to drive
your app users to your Facebook page.
To link Facebook with your app you need to follow the steps below to create a Facebook
app:
• Go to https://developers.facebook.com/apps.
• Login to Facebook if not logged in already.
• Click the "Create New App" button.
• Enter app name and continue until app is created.
• From Settings -> Basic, copy the Facebook App ID, and enter it in the
Snappii WYSIWYG editor.
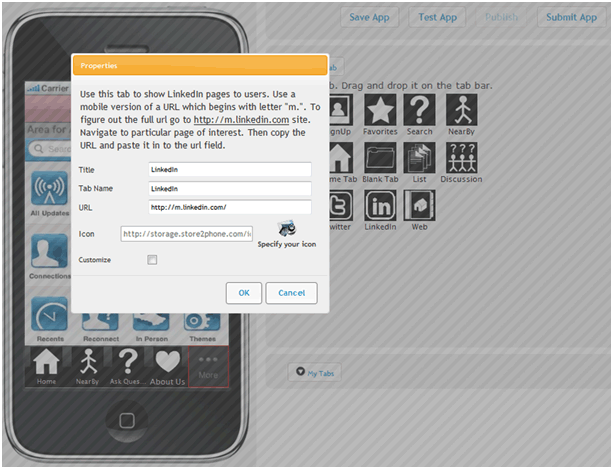
LinkedIn Tab/Button
Use this button to show LinkedIn pages to users. Navigate to particular LinkedIn
page of interest using mobile browser. Then copy the URL and paste it in to the
url field of LinkedIn control.
Now your app users will find you on LinkedIn.
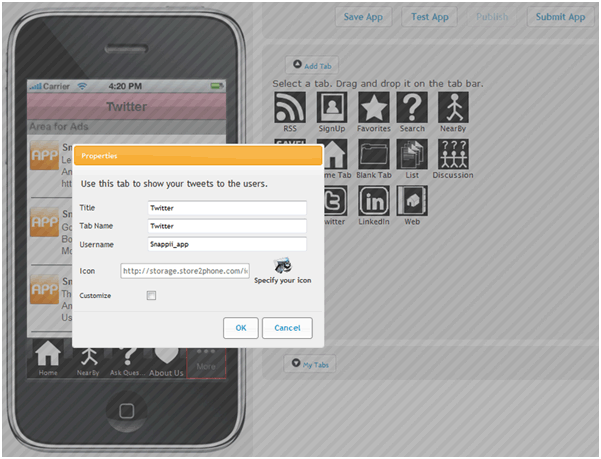
Twitter Tab/Button
Use Twitter tab to show your tweets to the users. Simply enter your username on
Twitter. Now your app users can see your Twitter updates.
YouTube Tab/Button
You can add a link to your YouTube videos, simply copy it and paste in the YouTube tab/button.
Web Tab/Button
This button allows you to add links to websites. The links will open inside the app or in browser.
Call Button
Use this button to one-click call a number specified in Snappii editor.
Email Button
Use this button to one-click send an email to the email address specified in Snappii editor.
Image
You can add images to your app using this element. Add this element to the tab, a window asking about image location will appear. You can find the image in the internet, upload it from your computer, specify the web page with this image, or specify a direct link to this image. Choose Image’s height and width, as well as its quality by checking the “Don't reduce the size after saving” option, and click Save. If you need to edit the image, click on the image and choose Edit element button.
Login
This button allows users to log in into your app with the credentials they used when registered, or with the credentials you send them in case of User Management.
Text area
Use this element to add text in your application. To show user information you can use the following variables: <user.username>, <user.emailAddress>, <user.memberId>, <user.userType> (e.g., "Welcome <user.userName> etc"). Specify the text size, color, alignment and width.
Send Text Message
This button allows your app users to send text messages to the predefined phone number.
Add to Contacts button
This button makes it easy to add a contact to the user’s Address book.
Select Contact button
This control allows to auto-fill form fields with the contact information from Address Book on users’ devices.
Post to Facebook button
This button allows to post to Facebook directly from your app. You can specify the post text in Snappii editor.
Post to Twitter button
Add this button to allow your app users to post tweets to their Twitter. You can specify the post text in Snappii editor.
Send email button
This button allows your app users to send emails with the predefined message you set up in Snappii editor.
Widgets
What is Widgets?
Widgets are tabs and elements from the Editor created by Snappii users with predefined content. Users have the ability to save their tabs and elements with content as widgets that they can later use in their other apps. Users can suggest adding widgets they treat as extremely useful for every Snappii user to access and utilize in their apps. Users can create as many widgets as they wish For example, you can create a tab with elements as call, email, contact form that you later wish to use in other apps. Save this tab as widget and insert it in another app! Another example, you are using database in your app, have multilevel lists that you'd like to use in your other apps. Save this as a widget and add to your next app, no need to recreate that functionality from scratch anymore! Creating widgets allows to save time and development work, speeds up app making process significantly. Widgets are saved under Widgets tab in the Snappii Editor.
You can add any element as widget and save it under “My Widgets”. You can suggest your widget to be added as a “Community widget” for all Snappii users to have access to. If you believe your widget is very useful for all users, you can send it to the Snappii team for review.
QR Codes
What is a QR Code?
A QR code is a specialized type of bar code that allows you to encode information that can be read by a scanner app running on a mobile device. The QR stands for “quick response” because they allow the end user to quickly capture information you want to share. Much like a product bar code, the QR code is unique and the pattern is created depending upon the information it contains. To read the QR code you need to download a QR code reader to your smart phone or other mobile device. To read the code you simply activate your QR code app, and point it at the QR code square. Your device will read the code and transmit the information it contains.
QR Code Tab/Button
To start making QR code click on "QR codes" at the right top corner. Fill in the form with data depending on the type
of QR code you want to create. The required fields are marked with red. In a drop-down menu choose the type you would like to be coded.
Specify the size of QR code image to be displayed. After all the necessary information is inputted click on Save button.
Now you can select readymade QR code in Tabs and Buttons settings.
To make another QR code go to QR codes again and press Add at the left corner. All the created QR codes will be listed on the left menu.
What is a QR code coupon?
You can use QR code as coupon.
A QR code coupon is a special type of QR code that you can use in your app to give your customers special discounts or rewards.
The QR code coupon is only scannable from your app.
Your app will track the number of times a user scans the coupon, and unlock after a specified number of scans to give the user a
reward. You can also require users to register and login to your app to be able to use the coupon.
A QR code coupon is a great way to reward customer loyalty.
Let's take a closer look at how you can easily and quickly create your own QR code coupon in a matter of minutes.
After registering on our site, reading and watching all the useful stuff you visit WYSIWYG editor and press
QR code button at the top right corner. Here we go...
In front of you there is a window showing all the necessary information for creating QR code coupons. The fields marked red are
required to be filled out. They will vary depending on the type of the QR code you create. All of them can be seen in a dropdown menu.
The following types are required:
- - Contact info (MECARD or vCARD)
- - Email address
- - Geo location
- - Phone number
- - Text
- - URL
- - YouTube
- -Calendar Event
After choosing a definite type of a QR code you will get some fields to be filled out below. It can be only one field like in case with email address type or even seven fields if Contact Info is chosen. Specify the size of a QR code. Three variants are given. Once data is entered there is the very time for a significant moment which makes a QR code coupon out of a usual QR code. It is the settings at the bottom of the window. Check "Use as coupon" and specify the settings. Checking Active will make the coupon function. The number of scans needed for redeeming the coupon can be specified by you as well. It will help you track the usage of your QR code coupons. If you offer a discount after 3 scans for instance you will be able to let customers take part in rewarding by checking Restart the scan count after a coupon is redeemed. In opposite case your coupon won't count the number of scans to be redeemed. Hardly ever you will allow your QR code coupon to be visible if you use it for rewarding clients' loyalty. If it is so don't check it. One more limitation is to let users scan the coupon only after they are logged in. Keep in mind -only the users of your app will be able to scan QR codes you offer them for discounts or any other cases. Once all is done, click on Save button and your QR code coupon will become available to the left. Need more coupons, press on Add button and go on making them.
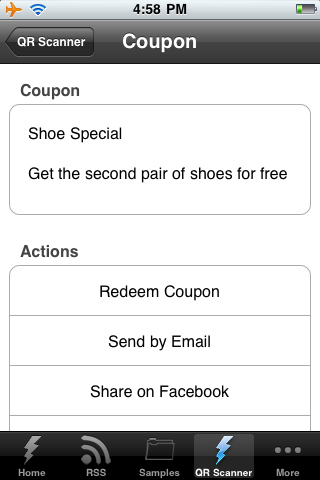
QR Code Scanner Tab/Button
User Management
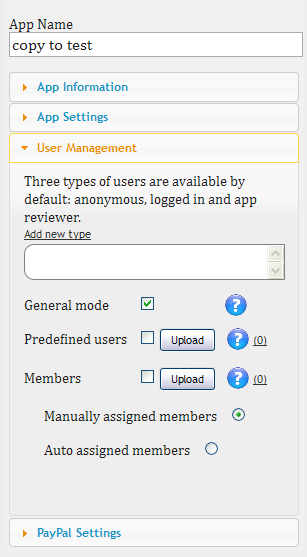
What is User Management?
User management option will help you specify the groups of users who will be able to use your app, e.g. setting various levels of access to an app. Find this button in the left part of editor menu. By default, there are the following types of users: anonymous, logged in and app reviewer. You can add more types, click on "Add new type" button and enter the needed types. In case you want to remove the types you entered, click on red cross to the right from type title. UM provides 3 registration modes:
- General mode - it allows anyone to register in the app and use default users' types.
- Predefined users - Upload a speadsheet containing the following fields:
- userName
- • emailAddress
- • password
- • memberId (optional)
- • userType (will default to LoggedInUser if not specified)
- • expiration date (required)
Sample spreadsheet is available for your convenience. (click on Question mark and download it). Predefined users are likely friends or employeers who don't have to register in the app, they get access to apps just by logging in. If the user was previously entered, then the password will not be updated (user can change their password in the app). Any users already entered, but no longer in the spreadsheet will be disabled and will not be able to log in. - • InApp memberships
Member - App creator specifies member ids by entering the spreadsheet with the following fields: - • memberId (requried)
- • userType (will default to LoggedInUser if not specified)
- • itemId (required) - itemId from PayPal element or product list
- • Either:
expirationDate (required)
or
membershipLength (required)
membershipLengthUnits (required) - days, weeks, months, years
Users may purchase their membership for the app and get assigned manually or automatically (specify it by choosing one of the options). Manually assigned members - After purchasing, app creator sends users their member ID, they can use to register in the app. If the user was already registered as a general user, he will be able to update his profile and enter his member ID. Auto assigned members - The user purchases membership then immediately register in the app, and will be assigned a member id and expiration date. When a user is assigned a member id, the app creator will receive an email specifying member id, user information, and PayPal transaction id for the app creator's records. As well as manually assigned members, auto assigned members can also update their profile and enter member ID in case they were registered as general users.
PayPal Functionality
How can I add Paypal capability to my app?
- Login to developer.paypal.com with your developer credentials
- Open https://developer.paypal.com/webapps/developer/applications/accounts
- You will see the list of sandbox accounts. You can check their settings, or create new test accounts.
How can I use Paypal with my Apple account?
Before submitting your app to Apple, you need to submit your app to PayPal to receive a PayPal Live App Id. Please make sure that you enabled PayPal settings in your app and entered a Sandbox Merchant PayPal ID. Otherwise you will not be able to test PayPal functionality:
- From www.Snappii.com, click on the button to submit your app. Select Apple. You'll get a message saying you need to submit to PayPal first. Click test build. Click ok.
- In a while, you will receive an email with links to two files. Download them onto your computer.
- Go to www.x.com and sign in using
your PayPal credentials.
Specific instructions are available here: https://www.x.com/developers/paypal/documentation-tools/going-live-with-your-application
You will need to fill out all required fields marked with a *. - In the section, "App Information", make sure you select platform iOS. For the description,
just give an overview of how people will use your app to make purchases.
- In the section "Services used by App", click on "Adaptive Payments" and select "Mobile Express Checkout Library".
- In the "Testing Information" subsection, once again give an overview of how people will use your app to make purchases.
- In the "Supply Test Account Name and Password field, enter:
- account name: appreview@Snappii.com
- password: appreview
- Upload both the ipa and mobile provisioning files that you received in #2.
Making Changes in apps
Can I make changes to Snappii apps?
Yes you can change your app in the WYSIWYG editor, save them, and your changes will
appear instantly to your users.
For more information, please, read the User
Manual.
What kind of changes can I make to my app?
Anything you want, add buttons, change colors, change how buttons work, content, etc.
What does the term Resubmit mean?
Resubmit is a process which is needed to change information about your app in the Apple App Store. It usually takes several days depending on the complexity of the changes you make. Before you hit “resubmit” make sure that is what you need to do, sometimes using the “publish” feature takes care of the changes you have made.
What changes to my app do I need to Publish and what to Resubmit?
You need to click on Publish button when you want to make the following changes:
- App color theme;
- Content of the tabs and elements (phone number, email, text, Url etc…) and their order in the app;
- The name of tabs and elements (icons)
Using the “publish” feature is a much faster option as it sends out updates to apps immediately without having to do an app store submission.
You need to click on the Resubmit when you want to change:
- Splash screen, icon;
- Name of the app;
- Description;
- Keywords;
- Category;
- App website;
- App language.
If you add new elements (tabs/buttons) which are not supported by your current app version (new functionality since the last version of your app) you will get the message telling you to Resubmit your app.
Will Snappii make changes to my app once it is released?
You can make changes to your app once it is released either through the “resubmit” or “publish” option depending on the changes you have made.
White Label
Can we white label Snappii?
Yes. The white label app option is available with any subscription purchase of the Snappii platform. However, we do not white label the platform.
How do I remove the ads (Snappii spalsh screen and “powered by Snappii”)?
As mentioned above, once you purchase a subscription you have the ability to put your own branding information in place of the existing Snappii information within the app.
Can we run our own ads in our apps?
Currently, no but that is something we will enable soon.
Can we run ads or show ads we sell within our app?
Yes. We don’t currently support the use of any ad networks, however you definitely can put ads inside the app. You have the flexibility to decide how you want the ads to appear, for example you can create banners, logos, pages, hyperlinks, push notifications, etc with ads from companies who purchase ad space, provide a sponsorship, or however else you want to make ad space available.
Hosting
Who owns the app that I make on Snappii?
You own the content, we own the code. You are basically “renting” the code from us for your monthly subscription price.
Can we have a dedicated server to host our app?
The app is hosted on our server, but for additional fee yes. Please contact us at sales@Snappii.com.
Can I host the app myself?
No. Snappii is a CMS (content management system) and any changes, updates, distributions, needs to go through the Snappii platform.
How to get Apple Developer ID and test my apps
How can I join Apple Developer Program?
You can sign up to Apple Developer Program here Apple Developer Program
How do I get my device ID?
To create a test build of your app, you need a device ID. Here are the steps how
to get it.
1. Open iTunes and connect your device
2. Click “serial number” label. It will change to Identifier
3. Choose from the file menu: Edit -> Copy. (This will put the device ID in your
clipboard so you can paste it)
4. Paste the device ID

How and why do I enter my Apple ID (login)?
You enter your Apple dev id to have an option to test your app before submitting
it to Apple.
when you like what you have, you submit the app to Apple under your own account.
have access to downloads, and the stats.
Apple ID costs $99 onetime payment.
Here’s where you can get one.
Can I test my iPhone app before submitting it?
Prior to having purchased your subscription
you can test your app on the iPhone/iPad by using the free Snappii App located
in the App stores.
Previewing/testing your app is as simple as downloading the
Snappii App logging in with your Snappii credentials and you can
then see and test the functionality of your app exactly as it will appear when released
(except for white label).
Once you have purchased your subscription you can test the app on the iOs platform
with the white label functionality (if applicable) using the Web2phone copy feature.
This allows you to copy your app and install it directly on your device for testing
purposes.
After saving any changes to your app within the "App Settings" portion of the Snappii
platform, you will need to request a new Web2phone copy. When the new link is received,
delete the old Web2phone copy from your device, install the new copy and your changes
will appear.
How to make a web2phone copy
Do you already have an Apple developer account? https://developer.apple.com/programs/ios/
To be able to make web2phone copies, you need to do the following:
- Complete apple developer profile here https://developer.apple.com/devcenter/ios/index.action
- Add at least one device ID to your Apple developer profile here https://developer.apple.com/account/ios/device/deviceList.action
- Go back to Snappii and click My apps --> at your app click web2phone copy
- You will receive an installation link to view the app on your device.
To test your app using a web2phone feature you should do the following: Upload your certificate in .p12 format and enter a valid password
OR
Revoke your distribution certificate and we will make you a new one when you click on Web2phone copy.* You can revoke it here https://developer.apple.com/account/ios/certificate/certificateList.action Please choose the one that has iOS Distribution type
Go to Snappii editor and click Web2phone copy again. In this case, you don’t need to upload anything to us.
*If you don't have active apps subscribed under this certificate you'd better choose the second way.
How to make the web2phone copy work for other devices
You need to change your existing provisioning profiles so that they included the newly added device id.
Here's a link to do it
https://developer.apple.com/account/ios/profile/profileList.action Find the Ad Hoc profile you wish to modify, click on it, then click Edit button and put a check at the device IDs you wish to have the web2phone copy work for. Click Generate. Done.
After that you need to rebuild your app using web2phone copy.
How can I get updates in my iPhone Preview App?
Within the Snappii App on your smart device, just press "Back to Snappii" and then click on "View" or “refresh” in app list. All the updates/changes you have made will be immediately viewable.
How much time does it take for an app to be approved in the Apple App Store?
Usually Apple reviewing takes 1-2 weeks maximum and once approved your app will go live in the Appstore.
I have added a device ID for iOS but my test build doesn't work
You need to change your existing provisioning profiles so that they include this device id.
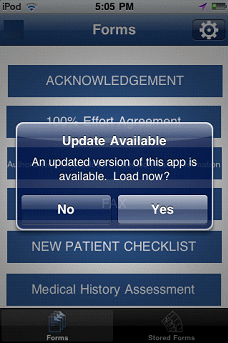
Web2phone copy build keeps showing "Update Available", but there is no update. How do I stop it?
A Web2 phone copy allows you to create a binary executable and copy it to your mobile device for testing. The “update available” notification is not unusual for test builds. This type of pop-up message won't show up for live apps when no updates are available.
How to submit apps to Android
How to sign up to Android Developer Program?
Sign up here for the Android Developer Program. Google has a one time.
How much time does it take for an app to be approved by Android?
Usually Android apps go live on Google Play immediately after submission.
Is there anything special about app names for Android Market Place?
App names for the apps to be submitted to Android Market Place must contain no more then 30 characters.
Can I test my Android app before submitting it?
As with Apple, prior to having purchased your subscription you can test your app on your Android device by using the free Snappii App located in the Google Play store: https://market.android.com/details?id=com.store2phone.Snappii or making a web2phone copy. Previewing/testing your app is as simple as downloading the Snappi Preview App logging in with your Snappii credentials and you can then see and test the functionality of your app exactly as it will appear when released (except for white label).
How can I submit my app to Google Play?
From the Editor or from the “My Apps” click the Publish button and choose Android, enter your credentials and we’ll do the rest. We would need access to your Google Play Developer Console to successfully complete the submission process.
To give us access to your Google Play Developer Console please add one more user to your developer account. We will not be able to get access to other Google services (e.g., Gmail) under your account, but will be able to submit your apps to Google Play. Here is guidelines how you can do this:
- Login to your developer account here https://play.google.com/apps/publish
- Go to Settings -> User accounts and rights
- Click Invite new user button
- Enter admin@Snappii.com in Email address field, select Release manager role and click Send invitation button. Please see this screenshot - https://lh5.googleusercontent.com/-xPIMzDgjl-0/UoSc3LDDRLI/AAAAAAAElAI/B8__Yyzo01s/w614-h601-no/send-invitation.png
- We will receive your invitation and accept it
- You will receive our acceptation by email and will need to grant access here https://play.google.com/apps/publish#AdminPlace
How can I get updates in my Android Preview App?
Within the Snappii App on your smart device, just press "Back to Snappii" and then click on "View" or “refresh” in app list. All the updates/changes you have made will be immediately viewable.
Dashboard
What is a Dashboard?
Your app Dashboard is a place where you can monitor how you app is being used, who’s
downloading the app and how often it’s being downloaded. It is also the tool you
will use to send your push notifications.
As a registered (non-subscribed user), you are able to access the Snappii dashboard
features 5 times to test functionality.
Once you become a subscribed customer you have unlimited access to the Dashboard.
The Dashboard helps you track your app usage through many helpful reports. You can
even select the specific period of time you wish to review:
First Time Users - shows users who use your app for the 1str time
Usage Frequency - shows the number of times your app has been run by users
Active Users - shows users' activity over time
Registered Users - shows when and how many users have registered.

Support
What are your support hours?
We offer live chat from our website from 1am to 5pm EST Monday through Friday.
What if my app crashes or has an issue? How can I get you specific information?
If your application closes unexpectedly, you can submit the Snappii app's crash logs or a bug report to the Snappii development team for review.
Where else can I get help about app creation?
Welcome to our support forum, you can ask and answer questions about apps creation, development, submission process, etc.
What are the various levels of support that Snappii offers?
Snappii offers a wide variety of support options from the support page on our website as well as webcasts, email, online chat, phone support and training. The level of support varies depending on the Snappii subscription plan selected.
I paid for White label, but still see the Powered By Snappii screen and splash screen in my app.
Click Publish, restart your app and you will have eliminated the Snappii ads and Powered by button. Click Resubmit to make the Snappii splash screen disappear (Apple will not show this immediately as it usually takes a few days to a week to be processed).
Pricing
What does the Snappii platform cost?
Snappii operates on an annual subscription based model with varying price points depending on your specific needs. Please visit our pricing page for full details. Remember that you can build your demo app and preview it with full functionality (iphone, ipad, Android) using our Snappii App Previewer for iOS (add link) and Android at no charge!
What is the price for a custom app?
Pricing for custom development depends on the app's complexity including number of platforms, potential development of custom code, etc. The Snappii platform offers a wide range of customizable options but if you require even more custom built functionality outside of the platform offering, please contact us at: sales@Snappii.com to discuss your needs.
How is it possible that your platform is so inexpensive? I have been quoted thousands of dollars for an app.
Our platform is a code generation technology. We are not writing code from scratch which enables app creation that is about 30 times faster. Less times equates to dramatically reduced costs.
What does my monthly subscription cover?
Your monthly subscription gives you the ability to make changes to your app(s),
distribute changes to all devices, take advantage of new features and enhancements
that we continually release for the platform, product support (based on your subscription
level) bug fixes, and unlimited submissions to the App stores (Apple and Google).
The monthly payment must continue for at least one year. That's a minimum term of
commitment. If payments stop, your app will be disabled. After one year you are
free to stop the monthly payments, but you won't be able to update your app.
Do I pay extra for each platform?
No. All platforms, iOS, Android and HTML5 are included in your subscription price.
What happens if I cancel my subscription to Snappii?
Please, take into account that it is an annual commitment. If you cancel before the year is up we will disable your app on our server. If you cancel after 1 year your app will continue to run but you won't be able to login into Snappii to update your app/apps until you renew your subscription.
About the Company
Where is Snappii based?
Snappii is currently based in two locations, the United States and Russia.
What type of company is Snappii?
Snappii is a private software development company. Our management staff has extensive experience in the technology sector with proven success in high tech and start-up companies like Vkernal, Ecora, Cleversoft, Keyword Competitor, Cabletron, Alcatel and IBM.
Who is the Founder/CEO of Snappii?
Alex Bakman is the Founder and CEO of Snappii.
You can contact Alex at: abakman@Snappii.com
When was the company founded?
Snappii was founded in January 2010.
Other
Can I create apps that run on iPhones, Android and other smart phones?
Yes! Today we support iPhones, iPad and Android platforms and any smartphone/tablet with a browser can run your app through HTML5.
Can I get the source code of the apps created with Snappii?
No, you will not have access to the source code. We do plan to enable users to extend the Snappii platform with custom coded plug-ins to augment the current functionality. Information will be forthcoming.
Can I send emails to my app users from my own email server/account?
Yes, you can. Please go to App settings in WYSIWYG editor and fill out the required
fields there: SMTP host, SMTP port, SMTP login, SMTP password.
This account will be used for the following emails:
- Data collected from forms
- Discussion notifications
- Signup emails
- Requests to reset passwords
What is Snappii’s architecture?
You can view details on the Snappii architecture here.
What is the development process with Snappii?
You can view details on the Snappii development process here.

