
 Login
Login

General Questions
Snappii is an online mobile app building platform that allows individuals and companies of any size to easily and quickly make custom apps for their business without requiring any mobile programming skills. Continue reading “What is Snappii?” »
The Snappii mobile app builder is designed for anyone looking to build (non-gaming) mobile apps because no coding skills are required. If you are a reasonably technical user of the internet, a UI/UX person, wanting to go beyond wireframes and create functional prototypes, or a programmer, even without having had time to obtain mobile programming skills in Java, Objective C or Java script, you can build an app with Snappii. Continue reading “Who is Snappii designed for?” »
With the robust nature and flexibility of the Snappii platform, App creation is exponentially faster than traditional platforms, taking months of development time and compressing it to days. Continue reading “Why Snappii?” »
Making your own apps can offer a richer, more immediate and interactive way to engage customers, as well as leveraging your existing infrastructure to streamline your business operations and provide a greater return on investment. Continue reading “What benefit can apps bring to my business?” »
Snappii removes the issue of having to build/rebuild a separate app for each platform as it offers a single-build multi-platform capability. Currently, Snappii supports native iPhone, iPad and Android (phone and tablet) platforms.
Snappii allows you to create data rich, sophisticated, enterprise class apps with data coming from the web, internal systems and the cloud.
An App provides a more interactive and robust mobile user experience:-Allows you to send notifications directly to user phones which is 10 times more effective than email\n-Ability to have local databases on mobile devices\n-Enable users to take advantage of their built in camera\n-Gives users better performance because the app runs within the device rather than from the web\n-Help your business be found through the App Stores where tens of thousands of searches occur per day in your area\n-Native apps offer better security because the binary code is compiled and more difficult to compromise
Yes, you can charge for your app by setting the price in the App stores.
No, we don’t make games. We only focus on business apps creation.
Reasonably technical non programmers and programmers. Prior experience using visual studio tools for building UI or graphics editors like Photoshop is helpful.
Partnership
Becoming a Snappii partner means being able to build your business through the creation of unlimited apps for your customers, at whatever price point you determine, while still paying only one price to Snappii. To sign up as a partner, please contact us at: sales@Snappii.com and we will contact you to discuss your partnership opportunity.
You can try out the Snappii platform including building apps, previewing them through the Snappii App Previewer at no cost. Once you are ready to release and publish apps please purchase a pricing plan.
Please note that the Snappii splash screen and “powered by Snappii” verbiage will display on your demo apps until you have purchased the Snappii platform. Continue reading “Do I need to pay when I sign up as a Partner?” »No, you do not pay for White label apps. It is included in the Partner Program.
Creating Apps
No. You can make your own app in Snappii using one of our hundreds of pre-built app templates allowing you to add your own content and have your own native app built in minutes. Just sign up to access these templates and begin developing your app.
If you want to start from scratch, you will be able to leverage our easy-to-use, drag, drop and configure WYSIWYG Visual Editor.
With either option you can simultaneously build your app and view it on your smartphone or tablet.
For more information, please, read the User Manual.WYSIWYG is an acronym for What You See Is What You Get. WYSIWYG Editor gives you total control over the User Interface (UI) of your app. Continue reading “What is WYSIWYG editor and how does it help me build my app?” »
It’s easy to customize your app and make it look nicer changing the fonts inside it.\nYou can choose among various fonts that can be found under “Color theme” in Editor.\n\n- Set up Default font for your app\n- Choose to change font for all controls with one button click\n- Use different font for different elements in the app\n\n
Snappii professional service staff or our partners can make an app for you. The turn around time and cost will depend on the complexity of the app but we can often have it build for you in a few days. Please contact sales@Snappii.com for more information.
When you make the app with Snappii yourself, you pay maintenance fees. When you have us make the app for you, you do not necessarily pay maintenance fees. Snappii can create the app for you – just send us your requirements here.\n\nDIY only makes sense if:\n\n- You will build lots of apps\n- You don’t want to rely on us\n- The app is very complex and it would be too expensive if we do it\n- You will be making lots of changes and it would be too expensive to do it
To submit an Android app to Google Play within the Snappii platform is a straight forward process, just click the “submit” button in the WYSIWYG editor and follow the directions. Android apps are usually available immediately after submission. Read more here.\n\nFrom the Snappii platform, the process to submit your app to Apple is the same, just click the “submit button” and follow the directions. However, Apple requires a review process by their engineers which may delay the release of your app. We strongly recommend utilizing our pre submission review service to increase the odds of your app being approved. Please contact sales@Snappii.com to get more information.
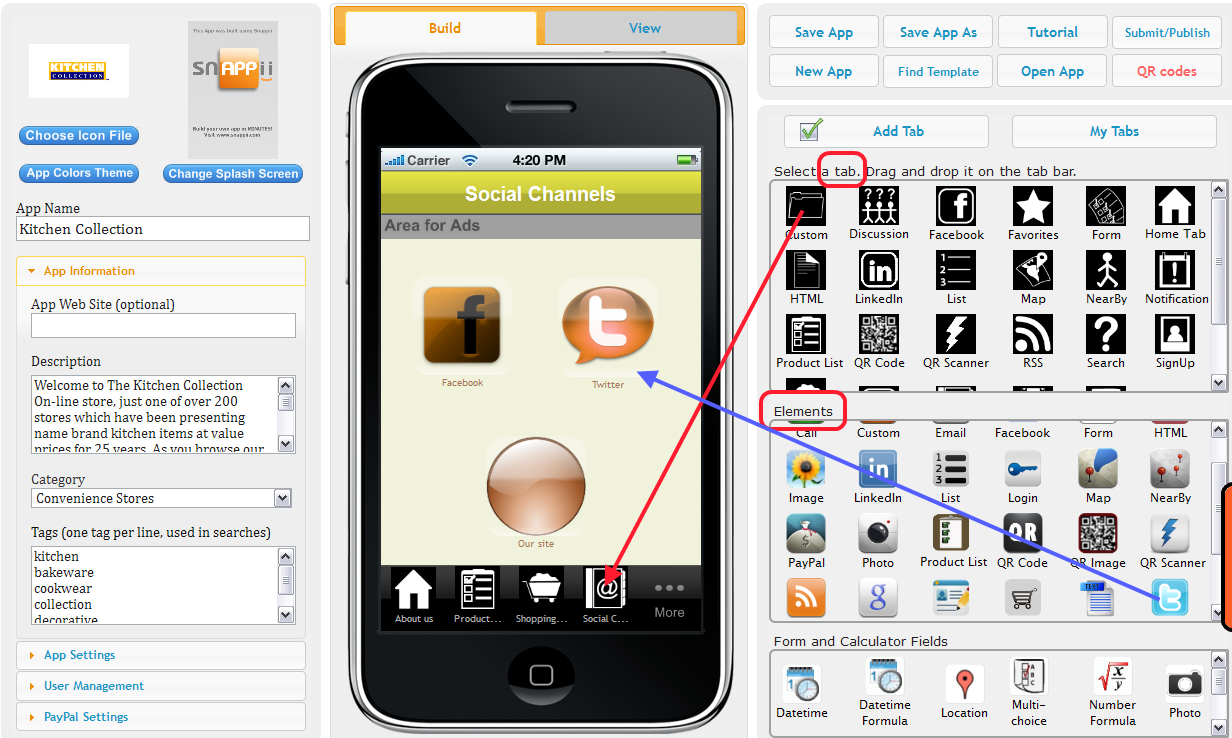
Tabs and Buttons (Elements)
A tab is placed along the bottom “row” of the app and a new tab is added each time you want to create a new page. Selecting from the different tabs determines what type of page you will create (i.e. Home, NearBy and Custom).\n\nA button/element is an icon you put within a page to allow for various functionality (call, email, facebook, lists, etc).
Tabs are what sit at the “bottom” of your app screen and allow users to locate different pages within your app, whereas the buttons are what allow functionality within the app. Some are invoked from the bottom of the screen and others can be selected by putting them anywhere within your pages.\n\n
The information like Phone numbers or locations can be added to Favorites via the Map and/or NearBy elements. If you have these elements in your app, drag and drop Favorites tab where all the places, added to Favorites from NearBy/Map, are stored. Read more here.
Nearby Tab perfectly suits businesses with multiple locations. All you need to do is enter the name of your business, and it will show up in Nearby wherever user happens to be. Just imagine how convenient it is! You can always drive users to your nearest location. Continue reading “What is the NearbyTab?” »
Search allows you to either browse a specific site you enter, or internet for a specific keyword.\n\n
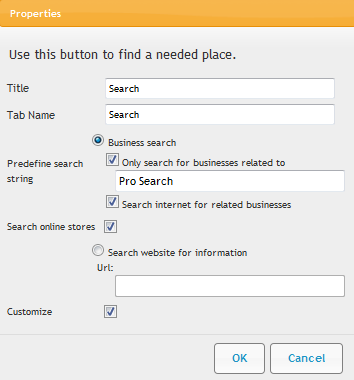 \n\nWhen you choose to browse site, you enter a keyword in a search string, it will show all the related info to the search term.\n\nWhen you choose to browse the Internet on a particular keyword, it will show all the results as if you were browsing Google.
Adding a Discussion tab to your app helps you open a dialog with your customers. Use this tab to help customers interact with each other and with you. Your customers can ask questions and other customers or you can answer them. To participate in discussion forum, a user needs to log in, so this is one of the obvious benefits of signing up. Continue reading “How is Discussion Forum used?” »
Home Tab is like a face of your app. You can place your logo for users to see, and write a short message either about what the app is about, or what your company does, or a logo, etc. Continue reading “What is the Home tab?” »
Use List button when you want to show a list of items. When an item is selected a detailed view is shown. You can upload different lists to show info you wish. Drag and drop the List tab/button, download sample spreadsheet and modify it exactly how it looks in sample. You can’t use spaces in the headers, you can’t use formatting like Bold, Italic or Underline. Your file must be Excel 2003 and higher. You will see the List view template – it means how your app users see the list. You can choose any of the 4 templates and move to the Detail view template and choose 4 variants of the detail view.\n\n
 \n\nRead more in our User Manual.
The advanced list button allows deeper and more detailed information and functionality than the standard list button. An advanced list takes advantage of datasources to provide a richer more robust functionality to your users. Continue reading “What is the Advanced List button?” »
This button stores all the submitted reports in one place as a PDF or Excel file. It’s a great substitution for Advanced List element in case you just want to display the report as it is. The settings of the Form report List button allow to select the button view – Button, Framed view or Full screen view just like it works for Advanced List. The List view template can be set with 3 different templates.\n\n

Data Source enables apps to work with data that is located in Database created on Snappii server or the data coming from external web services.\n\nUsers can use Data Sources to store and retrieve data inside apps. The data from Database can be populated from the Advanced list and users can update these lists right in the apps. Another way to update a Data Source is by using an Advanced Form. The information in the Data Sources can be sorted, searched, edited, updated, and deleted, it is stored on devices, uploaded from computer and can be sent via email. Everyone can use data from Data Source practically in all standard elements (YouTube button, Map, RSS, Twitter, etc.) to increase the app functionality. Continue reading “How to use Datasource dialog?” »
Runtime datasources is a great option to use inside big companies. This feature will allow to share data sources among some specific users but not all app users. On the app registration form, app users will enter the company identifier when they register. If users work in the same company they should enter the same value for this identifier. It will allow them to work with the same set of data. Continue reading “What is Runtime Datasource?” »
Relationships project allows Snappii users to create multilevel lists using advanced lists and advanced forms tabs and buttons. There are 3 types: One to One, One to Many and Many to Many relationships types. Continue reading “How to create multilevel lists using relationships?” »
Universal form is a combination of a simple Form and a Form that uses DataSource. If you need to put a form to your app, you can choose whether to use a simple form or a form that would take data from the DataSource. Use Universal Form to create input fields which can collect information from users. Continue reading “What is the Universal Form tab/button?” »
The table selection control is used to allow users to create relationships between the data entered/edited on the form, and the data selected on the table selection control.
Table selection allows to:
– fill table element with data from data source.
– replace table element with a more user friendly element.
– fill form fields with data from data source.Use Case 1: App creator has a data source with pictures and wants his users add these pictures into table element on form. User clicks table selection element, chooses needed photos with a check box, clicks Save button and photos will be automatically added into table.
Use Case 2: In the app there might be a form for getting some company information like name, address, email, website, etc. App user would fill out the form and the company information would be saved to a datasource.
Now there might be multiple other forms in the app where this company information needs to be filled into multiple input controls on the form so the user doesn’t need to re-type the company info every time.Forms can be embedded on advanced list, gallery and map detail views and also on custom tabs/button views. In this way, multiple forms could be added on one page. You can choose if this form is displayed as a button, or as framed view, specify the element height and width.
Embedded form is used to Add/Update information that was previously filled in from the Universal Form and is stored in Advanced list. Simply add the new universal form on the Advanced list cell or detail view, select the same Datasource as you use for the Advanced list and the original Universal form. Now select if you want to Add or Update information in the Saved Advanced List. Choose an option and click OK. Now drag and drop the form fields to this embedded form, you can select only those fields you want users to actually change. Once your app users click to Update the saved data and fill out the embedded form, the data will be changed right away. No need to close the app and open it again.

Fields Wizard allows to create a form that can be saved as a template form. Click on a field you want to add to your form, click Add, name it and it will appear in your form.\n\nYou can save the form fields as a template and use in your other forms by clicking “Select form fields from template” and choosing your saved template.\n\nRead more in our User Manual here
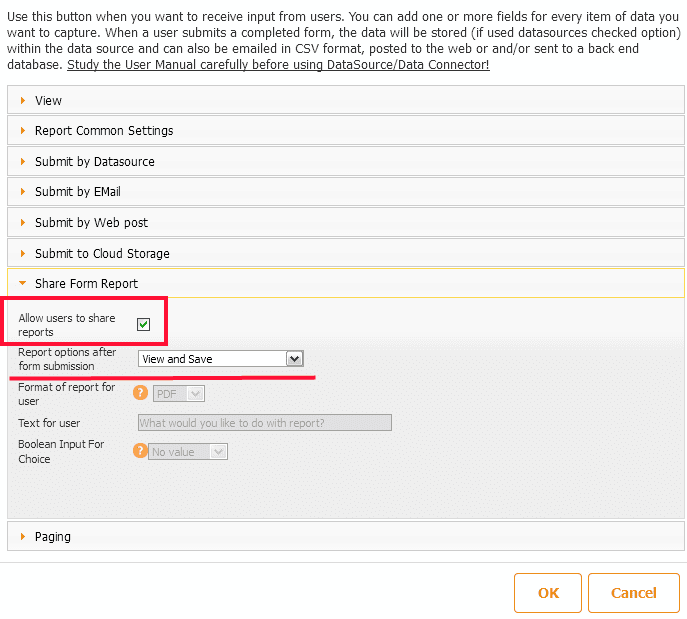
This setting allows you to specify what you want users to do with the submitted report:\n\n- View and Save\n\n- Just Save\n\n- By the user’s choice\n\n- By the boolean’s input choice\n\n
First, create PDF templates using online tools like http://www.pdfescape.com or http://www.pdfamigo.com/. Take any PDF form you already have and import it into Snappii Editor when creating a Universal form.\n\nSimply create your PDF file and name the form fields according to your fields in the Datasource. Save the PDF. Create an Excel spreadsheet with the corresponding form fields’ names. Save this spreadsheet and upload to the Datasource dialog. Save it. Continue reading “How to create custom PDF reports?” »
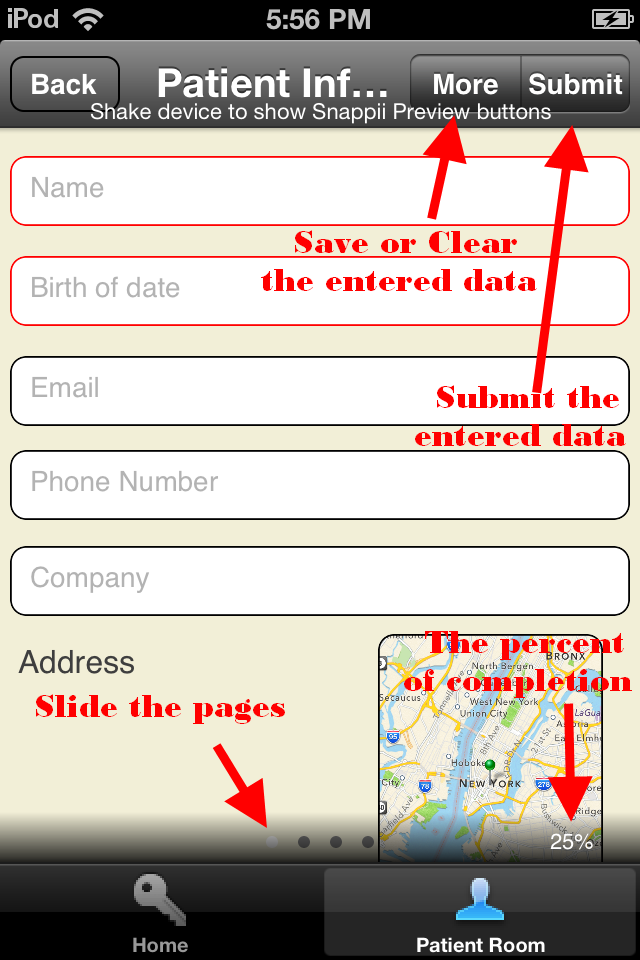
Pagination makes it possible to split long digital forms into several pages for an easier and more convenient access. Each page can be submitted separately if all required fields are filled out properly. Percents at the bottom right corner show how much of the form is already completed.\n\n
 \n\nRead how to set up paging here
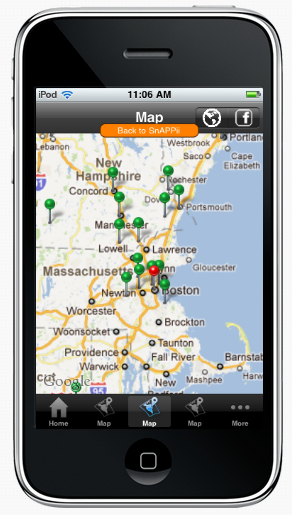
With the Map Tab you have the ability to display your business locations on a map, and give users directions how to get there. This will help users of your app to visually see how to get to your business locations. To add this tab to your apps, log in, go to My Apps, click Edit your app, click Add Tab and choose Map tab. Simply upload a list of your locations, and see them all on the map in Preview app. You can upload as many locations as you want. If you have more than 50, you will see the Show more button. You can also change your current location by clicking the globe icon.\n\n
The Advanced Map allows users to show all items from the list on a map. You must add latitude/longitude location column to the list. You have total control over the Map view now. Choose to:\n\n–Text for each pin on a map\n–Information your app users will see once the pin detail view is clicked\n–Show all locations via list deciding what information your app users will see Continue reading “What is the Advanced Map tab/button?” »
This button is added to all advanced controls including: Advanced Map, Advanced Gallery, and Advanced List.
When the button is tapped in the app, the data from the specified location field will be used as the destination.
The starting location in most cases will be the user’s current location. However, on advanced map if the user has changed the starting location shown on the map to some manually entered location, then this should be used as the starting location.
Use a Custom Tab to create a totally customized page where you can drag and drop text, images, email button, call button, social media buttons, hyperlink button and YouTube button, etc. Continue reading “What is the Custom Tab/Button?” »
The Photo Button lets developers create apps that leverage the mobile device camera to take pictures which can be shared, emailed, posted to a website, and sent to a corporate database. The camera has become a scanner of sorts to take pictures of documents and for other personal and business needs. This can be very useful for any number of reasons:\n\n–Document car accidents\n–Report vandalism\n–Report news\n–Send pics of houses for rent and purchase Continue reading “What is the Photo Button?” »
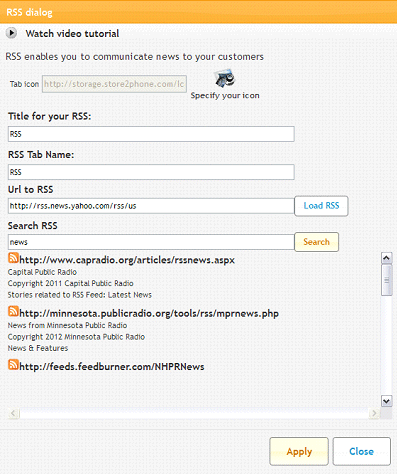
RSS looks like a news feed when added to an app. User can read news right from your site, and recurrently visit it. If your site doesn’t have an RSS, then you could add an RSS about the topic around your app.\nSome Snappii users get an RSS from their Twitter, it’s also a good way to get people’s interest.\nAnyway, it won’t hurt to add something useful for your users to read. Simply add RSS tab/button and you’ll see a dialog asking you to load the feed.\n\n
Extend you app with HTML, CSS, JAVA Script code to do anything you want. For example use in-app HTML to create custom database query, registrations, integration with other systems, etc. You can re-use existing code from your website.\n\nRead more about JS Plugin Tab/Button in our Snappii User Manual here
Push Notification is a built-in technology in smart phones that allow pop ups to appear when notifications are pushed out. They are a great way to keep your users updated on the latest happenings with your business.\nPlease keep in mind that Apple rejects apps that send promotional material “Apps that use Push Notifications to send unsolicited messages, or for the purpose of phishing or spamming will be rejected”.\nSnappii users can send notifications right from the app.\n\nRead more in our User Manual here
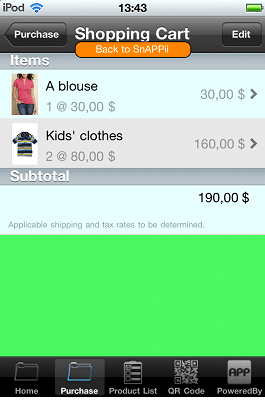
Product List works pretty much the same way as usual List tab/button does. There is a sample spreadsheet which can be downloaded and modified according to your needs. In difference with List controls Product List contains pricing details which are visible then in the app. As well the Details page shows up a Shopping Cart button after clicking on it, a chosen item goes directly to the Shopping Cart to be purchased.\n\n
Yes. Snappii provides PayPal support for credit card payment functionality. PayPal allows users to purchase physical goods or services such as organization memberships that give users benefits outside the app itself. Continue reading “Can I build apps that take credit card payments?” »
The calculator button allows you to make calculations using the date/time and/or number formula fields within a form.\n\nDrag and drop text or datetime fields onto Calculator tab/button. Choose the “Number” in the Data type of your text field and date, time or datetime format in your datetime field. To make calculations, use the Datetime or Number formula fields. Enter the formula to get needed calculation result.\n\nRead more in User Manual here
This element is added to the Universal Form. It is added on the Universal Form element together with the formula fields. When you click it, it performs calculations. Once you add it, you will see the list of available formulas. You can specify which one you want to be calculated automatically and which only after Calculate button is pressed.
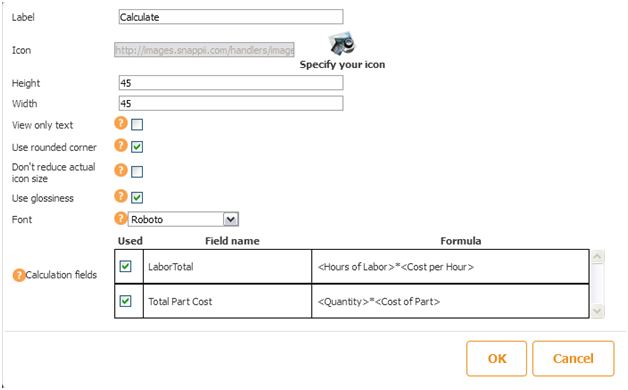
Calculated / Formula fields allow making calculations, showing user’s personal information, location data and more. Formula fields can be added to such controls as Form, Advanced Form, Universal Form, Advanced List and Gallery Layout and can be found in the Elements Panel – Form and Calculator Fields. They are:
1. Datetime Formula – read more here
2. Number Formula – read more here
3. Text formula – read more here
Add additional variables to extract parts of textAddress for user location result:
<user.location.textAddress.address> <user.location.textAddress.city>
<user.location.textAddress.region>
<user.location.textAddress.country>
<user.location.textAddress.zip>
Viewing Formulas option allows you to enable/disable input fields for Form and Calculator controls (Datetime, Location, Multichoice, Photo, Sign/Draw, Table and Text/Number fields) depending on the condition (formula) you’ll specify.\n\nWhen any of the input controls is dragged and dropped to Calculator, Form, Advanced Form, Universal Form, Advanced list, Gallery Layout, there will be an option to use formula to determine whether the control is disabled or enabled.\n\nStudy the User Manual for Viewing Formulas Option here
All controls in the “Elements” section and the “Form and Calculator Fields” section have the viewing formulas.
There are four options for viewing formulas:
- use formula to disable field
- use formula to enable field
- use formula to hide field
- use formula to show field
- Automatically move other controls up to fill space when this control is hidden
2.2. Viewing formula for tabs.
You can include following variables into a formula to show/hide the tab:
- <user.userName>
- <user.emailAddress>
- <user.memberId>
- <user.userType>
- <user.location>
- <user.location.latitude>
- <user.location.longitude>
- <user.location.textAddress>
- <user.location.textAddress.address>
- <user.location.textAddress.city>
- <user.location.textAddress.region>
- <user.location.textAddress.country>
- <user.location.textAddress.zip>
- <device.version>
- <device.model>
- <device.language>
Use cases:
Example 1: Show new questions to user depending on his answer on forms.
Example 2: Display different pictures to users depending on what you have in data source. If a pilot is unavailable, we can highlight him with red color. If he is available – with green.
Example 3:App creator can give some users access to a form (or any other button) with a password – the form will not be visible or accessible until the user enters a valid password.
Example 4: Display different background pictures for users depending on what country they are from.Yes, you can. The universal form tab/button allows you to collect whatever information you would like to receive from your users. You can use this form for many things including surveys, completing applications, scheduling appointments and signing up for membership. The data is then collected right from the app and emailed to you in the format you have specified.\n\nRead more information on Data Collection here
You can use the Sign Up Email box that is placed to the left from the iPhone simulator in Editor under “Miscellaneous” to say ‘Hello’ or thank registered users for choosing your app. Just input any message in the box and all users who signed up in your app will receive your follow up email.
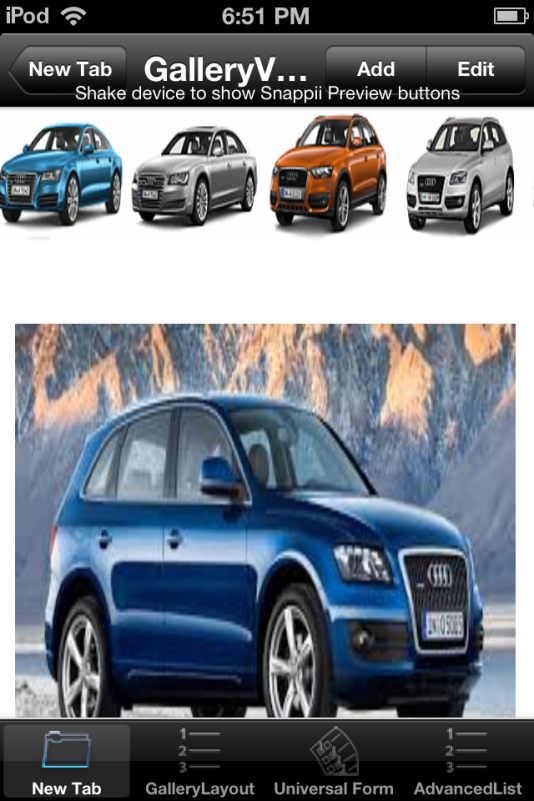
Allows to create image galleries by taking images from uploaded DataSources. The following image galleries types are available:\n\n– Grid\n– Horizontal view\n– Split View\n\nRead more about each type here\n\n
Apps created with Snappii can connect to Internet web services and enterprise backend systems using RESTful services. This can be done without any programming. You create a data connector that is an XML document which specifies how to “talk” to a web service. Once the document is imported into Snappii and appropriate security is enabled, any app can receive and update data in any systems. Here is a link for more information: https://www.Snappii.com/blog/articles/The_Snappii_Platform_Brings_Web_Services_to_Your_Enterprise_App
With the help of this tab it is possible to create and share digital signatures or draw pictures and send them to your friends and etc. Just add this element and draw anything you would like to share.\n\n
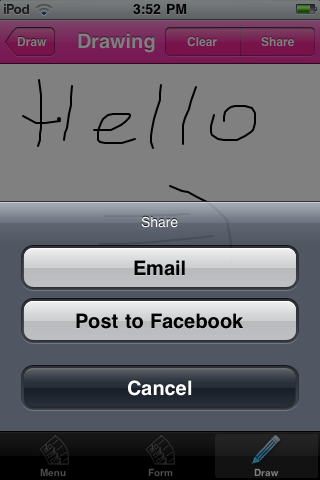
This control allows to share data by posting via Facebook, Twitter, Weibo, sending via Email, SMS, assigning to Contacts, copying to Board, printing out and saving to Camera Roll.
It’s easier to share your app with others. Simply fill out the Message you want to share and put a check next to “Share predefined message only”.
Use this tab to show Facebook pages to users. Use a mobile version of a URL which begins with letter “m”. To figure out the full url go to http://m.facebook.com site. Navigate to particular page of interest. Then copy the URL and paste it in to the url field. Continue reading “Facebook Tab/Button” »
Use this button to show LinkedIn pages to users. Navigate to particular LinkedIn page of interest using mobile browser. Then copy the URL and paste it in to the url field of LinkedIn control. Continue reading “LinkedIn Tab/Button” »
Use Twitter tab to show your tweets to the users. Simply enter your username on Twitter. Now your app users can see your Twitter updates. Continue reading “Twitter Tab/Button” »
You can add a link to your YouTube videos, simply copy it and paste in the YouTube tab/button.
This button allows you to add links to websites. The links will open inside the app or in browser.
Use this button to one-click call a number specified in Snappii editor.
Use this button to one-click send an email to the email address specified in Snappii editor.
You can add images to your app using this element. Add this element to the tab, a window asking about image location will appear. You can find the image in the internet, upload it from your computer, specify the web page with this image, or specify a direct link to this image. Choose Image height and width, as well as its quality by checking the “Don’t reduce the size after saving” option, and click Save. If you need to edit the image, click on the image and choose Edit element button.
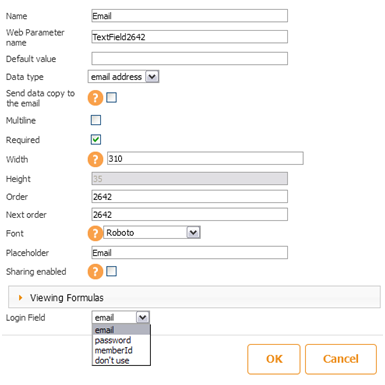
This button allows users to log in into your app with the credentials they used when registered, or with the credentials you send them in case of User Management.
Use this element to add text in your application. To show user information you can use the following variables: <user.username>, <user.emailAddress>, <user.memberId>, <user.userType> (e.g., “Welcome <user.userName> etc”). Specify the text size, color, alignment and width.
This button allows your app users to send text messages to the predefined phone number.
This button makes it easy to add a contact to the user’s Address book.
This element allows to add any item to Favorites. Let’s consider a use case. There is a list of doctors in the app, any doctor can be added to Favorites. Create a datasource of doctors. Upload it and save. Add Advanced list to display the doctors. The Cell view must be “custom” mode in order to add “add to favorites” button to it. Now go to Datasource dialog. Click to Add new datasource.
A separate datasource type called “Favorites” is available in the Datasource dialog.
Once chosen, name it. The very first value that you see there is “Name”. This field will be shown in a pop-up window when the item is added to Favorites. You can insert any value that is appropriate. Then click the Plus button to add the fields to it. We will add Doctor’s name, Picture and Specialty. Basically, all the fields we want to be added to Favorites. Save the datasource. Now go back to the Doctors Advanced list, drag and drop “Add to favorites” button to the Cell view, click its settings: Select Data Source –> Favorites, Favorites fields mapping –> Change –> Map the Favorites datasource field with the Doctors datasource field; Favorites mode: “Reference” means that the Favorites datasource will only add the data the User will enter when adding the doctor to the reference, “Copy” – means that all the information on the doctors will be copied from the Doctors datasource to the Favorites datasource once added to favorites.
Now drag and drop the Advanced list where all the Favorites will be displayed. Select the Favorites datasource. Set up the list view and save. Continue reading “Add to Favorites” »
This control allows to auto-fill form fields with the contact information from Address Book on users’ devices.
This button allows to post to Facebook directly from your app. You can specify the post text in Snappii editor.
Add this button to allow your app users to post tweets to their Twitter. You can specify the post text in Snappii editor.
This button allows your app users to send emails with the predefined message you set up in Snappii editor.
Apart from default SignUp form that we offer you can use your own SignUp form. To create one, please add the SignUp form element on a Custom/New Tab and populate it with your fields. Add fields just the same you do for Universal forms, and match them with the Sign Up Fields placed at the bottom of the field settings. You can choose “not to use” if you have a field that is not listed in the settings. This data can be submitted to the email address, via web post mode and can be received as PDF, Excel file or in the Email body. This data can also be stored in the Snappii cloud database. Read more in our User manual here.
0 Comments -Adding this element allows you to control the login fields and customize the login view you with your app to have and your users to see. Drag and drop this element on the Custom/New tab, then add form fields to it. Match each field with the login field offered at the bottom of each form field you are adding. See the screenshot below.\n\n
 0 Comments -
The Navigation button can be placed anywhere in the app and allows app creators easily open access to the destination element inside the app. The main benefit of using the Navigation button is to help the app user easily find the most relevant information inside the app without having to look for it.
To add side navigation to your apps, do the following. In Guru mode, select Visual Style –> App Layout –> select Side navigation. In Express mode, click Settings –> Visual style –> Edit. You will instantly preview the selected style on the device to the left from the settings
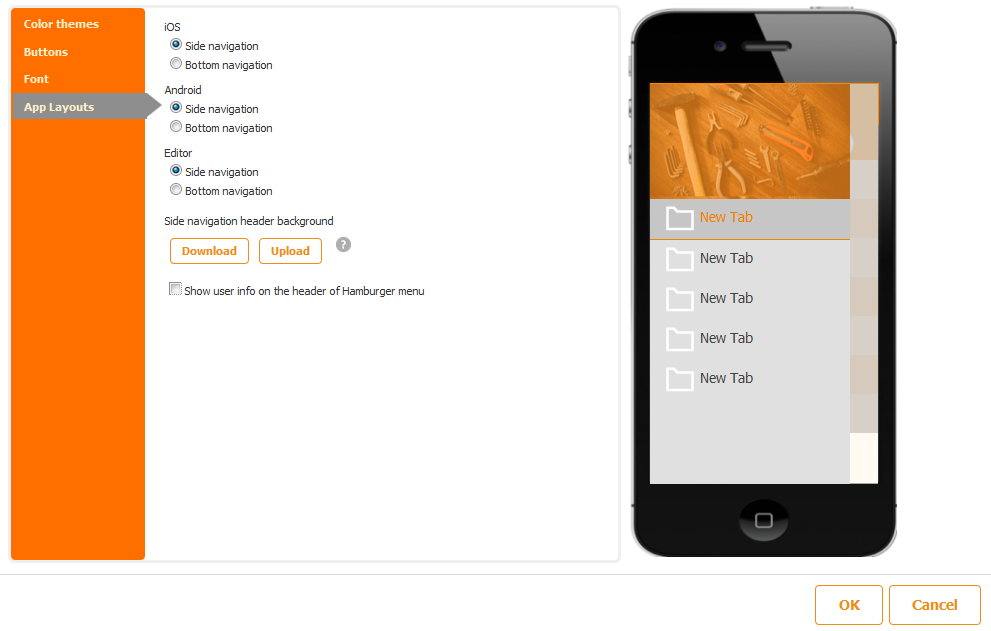
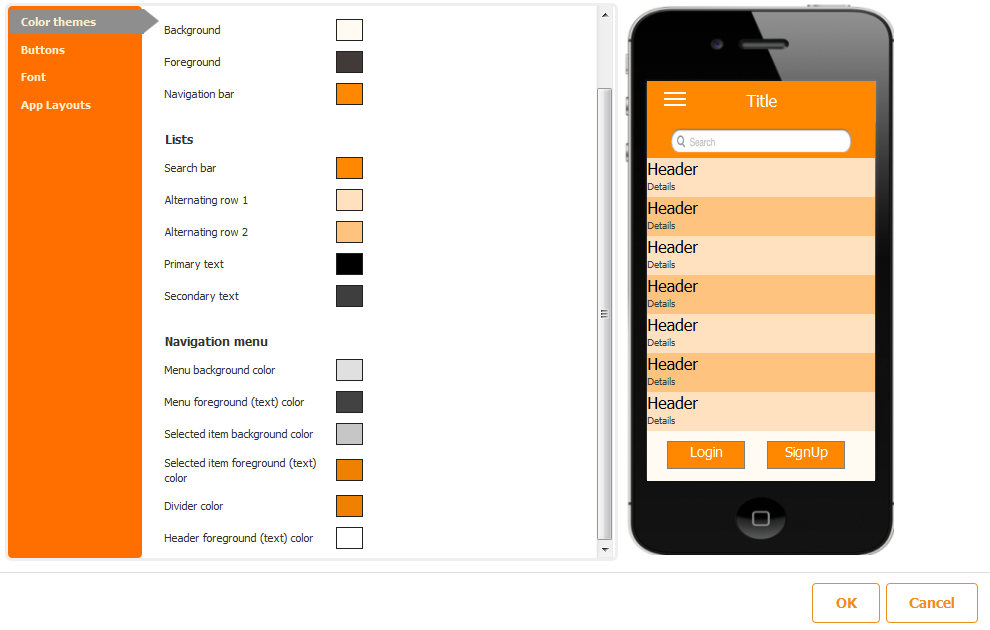
2. Change the background colors of your navigation bar. Under Visual style select Color themes –> Navigation menu
Remove Account Button allows the user to remove his account from app.
With the help of this button app creator can upload his own PDF form to be used in the app. App creator can allow app users to upload their own PDF forms that can be filled out, saved, edited and shared with others. There are 2 ways to upload a PDF file:
- From Cloud storage (Dropbox, Google drive, etc)
- From local storage (on Android device)
Once forms are uploaded they can be instantly:
– Used to enter information
– Filled out and shared with co-workers via email or cloud drives
– Stored locally on device or on cloud drives such as Dropbox, Box, Google Drive and MS One Drive;
– Printed
What’s more is that users can add additional capabilities (fields) to forms they have imported. The additional capabilities include:
– Signature capture fields
– photo capture fields
– time and date stamp fields
– additional fields to capture text and numbers
– show GPS location om the map,
– add bar code QR code scanners
– add radio buttons, multiple choice buttons, checkbox
Use Case. Fire inspector needs to inspect a fire extinguisher. The inspector opens the Fire Inspection app created by Snappii, clicks “Upload Form” button and loads a fire extinguisher inspection form that is used in the office. The form opens on the inspector’s device, and the inspector can easily fill out the data on inspection. The inspector can not only fill out the necessary details, but also add such data as location, date, signature, text, radio buttons and more.
You can play audio files in your apps. In order to do so, please drag and drop audio player button, and specify a link to the audio file you want to play. You can also upload a file from your computer. Only mp4a files are supported.
You can play video files in your apps. In order to do so, please drag and drop video player button, and specify a link to the video file you want to play. You can also upload a file from your computer. Only mp4 files are supported.
Data can be displayed as charts. Chart types: pie chart, bar chart, line chart, scatter chart
Use Case. You want to collect feedback about your website logo. You are considering changing the color of your logo. You have color choices: blue, green, pink, yellow, none. Create a datasource with these colors, select data type “boolean” next to each choice in the datasource dialog (we will have them as checkboxes) and the field to send colors to (name it choices). Data for the chart will be taken from that text field (choices).
You can view the results on the chart right below the question, or add it on a separate tab.
Read more how to set up charts here.
Widgets
Widgets are tabs and elements from the Editor created by Snappii users with predefined content. Users have the ability to save their tabs and elements with content as widgets that they can later use in their other apps. Users can suggest adding widgets they treat as extremely useful for every Snappii user to access and utilize in their apps. Users can create as many widgets as they wish For example, you can create a tab with elements as call, email, contact form that you later wish to use in other apps. Save this tab as widget and insert it in another app! Another example, you are using database in your app, have multilevel lists that you’d like to use in your other apps. Save this as a widget and add to your next app, no need to recreate that functionality from scratch anymore! Creating widgets allows to save time and development work, speeds up app making process significantly. Widgets are saved under Widgets tab in the Snappii Editor.
Read more in our User manual here
QR and Bar Codes
A QR code is a specialized type of bar code that allows you to encode information that can be read by a scanner app running on a mobile device. The QR stands for “quick response” because they allow the end user to quickly capture information you want to share. Much like a product bar code, the QR code is unique and the pattern is created depending upon the information it contains. To read the QR code you need to download a QR code reader to your smart phone or other mobile device. To read the code you simply activate your QR code app, and point it at the QR code square. Your device will read the code and transmit the information it contains.
Read more about Benefits of using QR codes here
To start making QR code click on “QR codes” at the right top corner. Fill in the form with data depending on the type of QR code you want to create. The required fields are marked with red. In a drop-down menu choose the type you would like to be coded.\nSpecify the size of QR code image to be displayed. After all the necessary information is inputted click on Save button. Now you can select readymade QR code in Tabs and Buttons settings.\nTo make another QR code go to QR codes again and press Add at the left corner. All the created QR codes will be listed on the left menu.\n\nRead more in our User Manual here
You can use QR code as coupon.\n\nA QR code coupon is a special type of QR code that you can use in your app to give your customers special discounts or rewards. The QR code coupon is only scannable from your app. Continue reading “What is a QR code coupon?” »
The QR Code Scanner allows your app users to scan QR codes using this tab/button. Simply add this element to your app, and you’ll be able to scan QR codes from any surface.
- To scan bar codes drag and drop Universal Form tab/button and add Bar Code input from Fields section. You can change the size of the input. Save the app. When previewing the app on a device tap on the bar code sign and scan the bar code you need. Once scanned it will allow you to submit the form with the bar code image in the email/pdf or spreadsheet mode depending on your choice.
\n
To see characters/value of the scanned Bar Code you may add a Text/Number input from Field Section and specify the name of your Bar Code element in the Formula – see more in our User Manual\n
User Management
User management option will help you specify the groups of users who will be able to use your app, e.g. setting various levels of access to an app. Find this button in the left part of editor menu. By default, there are the following types of users: anonymous, logged in and app reviewer. You can add more types, click on “Add new type” button and enter the needed types. In case you want to remove the types you entered, click on red cross to the right from type title.
Read more in our User manual here
PayPal Functionality
1. Login to developer.paypal.com with your developer credentials
2. Open https://developer.paypal.com/webapps/developer/applications/accounts
3. You will see the list of sandbox accounts. You can check their settings, or create new test accounts.- \n\nBefore submitting your app to Apple, you need to submit your app to PayPal to receive a PayPal Live App Id. Please make sure that you enabled PayPal settings in your app and entered a Sandbox Merchant PayPal ID. Otherwise you will not be able to test PayPal functionality:\n\n– From www.Snappii.com, click on the button to submit your app. Select Apple. You’ll get a message saying you need to submit to PayPal first. Click test build. Click ok.\n– In a while, you will receive an email with links to two files. Download them onto your computer.\n– Go to www.x.com and sign in using your PayPal credentials.\nSpecific instructions are available here: https://www.x.com/developers/paypal/documentation-tools/going-live-with-your-application\nYou will need to fill out all required fields marked with a *.\n– In the section, “App Information”, make sure you select platform iOS. For the description, just give an overview of how people will use your app to make purchases.\n– In the section “Services used by App”, click on “Adaptive Payments” and select “Mobile Express Checkout Library”.\n– In the “Testing Information” subsection, once again give an overview of how people will use your app to make purchases.\n– In the “Supply Test Account Name and Password field, enter:\naccount name: appreview@Snappii.com\npassword: appreview\n- Upload both the ipa and mobile provisioning files that you received in #2.\n\n
Making Changes in apps
Yes you can change your app in the WYSIWYG editor, save them, and your changes will appear instantly to your users.
For more information, please, read the User Manual.Anything you want, add buttons, change colors, change how buttons work, content, etc.
Resubmit is a process which is needed to change information about your app in the Apple App Store. It usually takes several days depending on the complexity of the changes you make. Before you hit “resubmit” make sure that is what you need to do, sometimes using the “publish” feature takes care of the changes you have made.
You need to click on Publish button when you want to make the following changes:\n\nApp color theme;\nContent of the tabs and elements (phone number, email, text, Url etc…) and their order in the app;\nThe name of tabs and elements (icons)\n\n\nUsing the “publish” feature is a much faster option as it sends out updates to apps immediately without having to do an app store submission.\n\nYou need to click on the Resubmit when you want to change:\n\nSplash screen, icon;\nName of the app;\nDescription;\nKeywords;\nCategory;\nApp website;\nApp language.\n\n\nIf you add new elements (tabs/buttons) which are not supported by your current app version (new functionality since the last version of your app) you will get the message telling you to Resubmit your app.
You can make changes to your app once it is released either through the “resubmit” or “publish” option depending on the changes you have made.
White Label
Yes. The white label app option is available with any subscription purchase of the Snappii platform. However, we do not white label the platform.
As mentioned above, once you purchase a subscription you have the ability to put your own branding information in place of the existing Snappii information within the app.
Yes, you can run banner and interstitial ads in your apps. Read how to set up ads and In App Purchases here
Hosting
You own the content, we own the code. You are basically “renting” the code from us for your monthly subscription price.
The app is hosted on our server, but for additional fee yes. Please contact us at sales@Snappii.com.
No. Snappii is a CMS (content management system) and any changes, updates, distributions, needs to go through the Snappii platform.
How to get Apple Developer ID and test my apps
You can sign up to Apple Developer Program here Apple Developer Program
To create a test build of your app, you need a device ID. Here are the steps how to get it.\n\n1. Open iTunes and connect your device\n2. Click “serial number” label. It will change to Identifier\n3. Choose from the file menu: Edit -> Copy. (This will put the device ID in your clipboard so you can paste it)\n4. Paste the device ID\n\n

You enter your Apple dev id to have an option to test your app before submitting it to Apple.\nwhen you like what you have, you submit the app to Apple under your own account. have access to downloads, and the stats.\nApple ID costs $99 onetime payment. Here’s where you can get one.
Prior to having purchased your subscription you can test your app on the iPhone/iPad by using the free Snappii Preview App located in the App stores.\n\nPreviewing/testing your app is as simple as downloading the Snappii Previewer App logging in with your Snappii credentials and you can then see and test the functionality of your app exactly as it will appear when released (except for white label). Continue reading “Can I test my iPhone app before submitting it?” »
Do you already have an Apple developer account? https://developer.apple.com/programs/ios/\nTo be able to make web2phone copies, you need to do the following:\n\n1. Complete apple developer profile here http://developer.apple.com/devcenter/ios/index.action\n2. Add at least one device ID to your Apple developer profile here https://developer.apple.com/account/ios/device/deviceList.action\n3. Go back to Snappii and click My apps –> at your app click web2phone copy\n4. You will receive an installation link to view the app on your device.\n\nHow to Revoke certificate\nTo test your app using a web2phone feature you should do the following: Upload your certificate in .p12 format and enter a valid password\nOR\nRevoke your distribution certificate and we will make you a new one when you click on Web2phone copy.* You can revoke it here https://developer.apple.com/account/ios/certificate/certificateList.action Please choose the one that has iOS Distribution type\nGo to Snappii editor and click Web2phone copy again. In this case, you don’t need to upload anything to us.\n*If you don’t have active apps subscribed under this certificate you’d better choose the second way.\n\nHow to make the web2phone copy work for other devices\nYou need to change your existing provisioning profiles so that they included the newly added device id.\nHere’s a link to do it\nhttps://developer.apple.com/account/ios/profile/profileList.action Find the Ad Hoc profile you wish to modify, click on it, then click Edit button and put a check at the device IDs you wish to have the web2phone copy work for. Click Generate. Done.\nAfter that you need to rebuild your app using web2phone copy.
Within the Snappii Preview App on your smart device, just press “Back to Snappii” and then click on “View” or “refresh” in app list. All the updates/changes you have made will be immediately viewable.
Usually Apple reviewing takes 2 weeks and once approved your app will go live in the Appstore.
You need to change your existing provisioning profiles so that they include this device id.
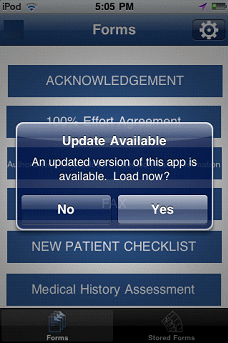
A Web2 phone copy allows you to create a binary executable and copy it to your mobile device for testing. The “update available” notification is not unusual for test builds. This type of pop-up message won’t show up for live apps when no updates are available.\n\n
How to submit apps to Android
Sign up here for the Android Developer Program. Google has a one time fee.
Usually Android apps go live on Google Play in 2 hours after submission.
App names for the apps to be submitted to Android Market Place must contain no more then 30 characters.
As with Apple, prior to having purchased your subscription you can test your app on your Android device by using the free Snappii Preview App located in the Google Play store: https://market.android.com/details?id=com.store2phone.Snappii or making a web2phone copy. Previewing/testing your app is as simple as downloading the Snappi Preview App logging in with your Snappii credentials and you can then see and test the functionality of your app exactly as it will appear when released (except for white label).
From the Editor or from the “My Apps” click the Publish button and choose Android, enter your credentials and we’ll do the rest. We would need access to your Google Play Developer Console to successfully complete the submission process. Continue reading “How can I submit my app to Google Play?” »
Within the Snappii Preview App on your smart device, just press “Back to Snappii” and then click on “View” or “refresh” in app list. All the updates/changes you have made will be immediately viewable.
To enable automatic app publishing for Google Play, follow the steps below:
1. Open Google Play Developer Console and go to Settings – API access
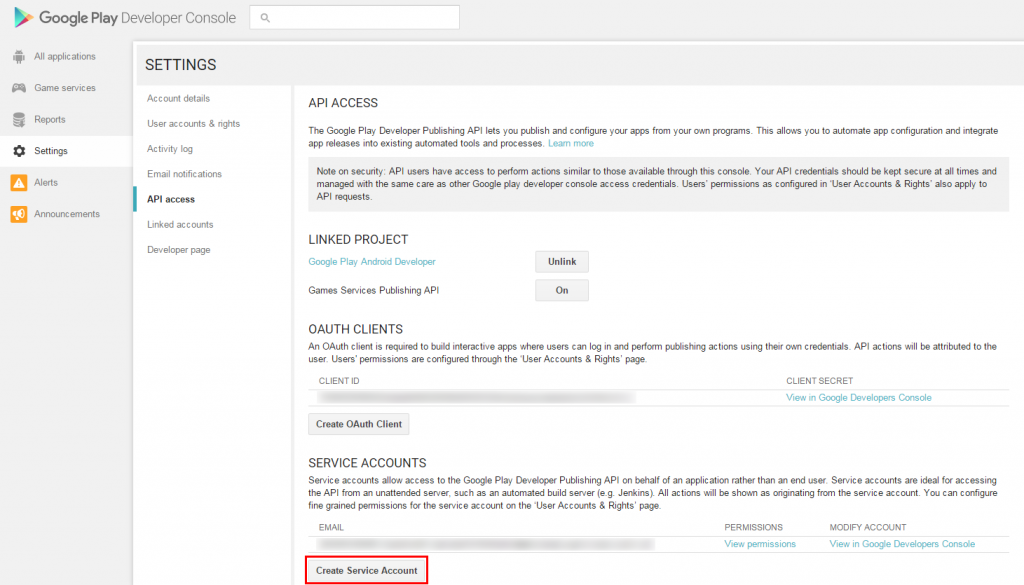
2. Click “Create Service Account”
3. Go to the link from the first point in the popup window “Create Service account”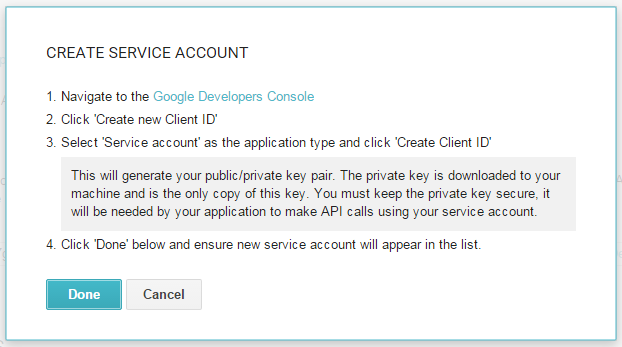
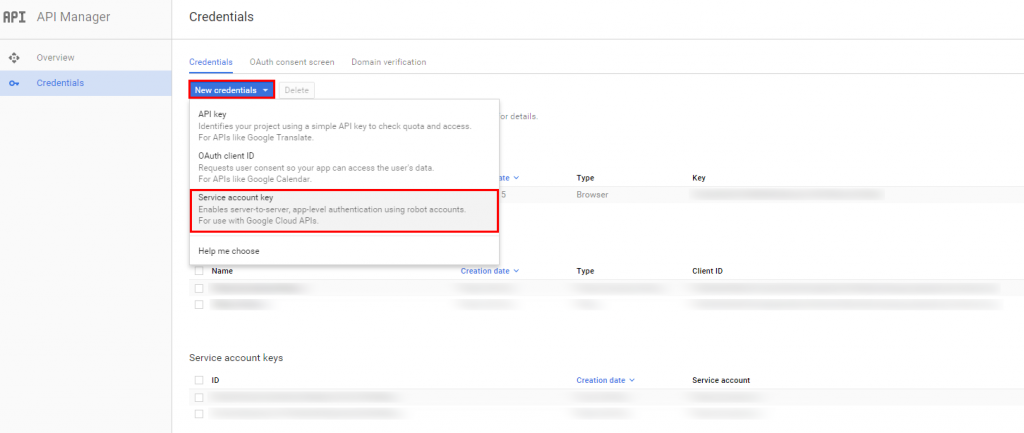
4. Choose New credentials – Service account key
5. In the Service account drop-down choose New service account
6. Specify any account name. In our example: snappii-publisher
7. Then choose JSON key type and click Create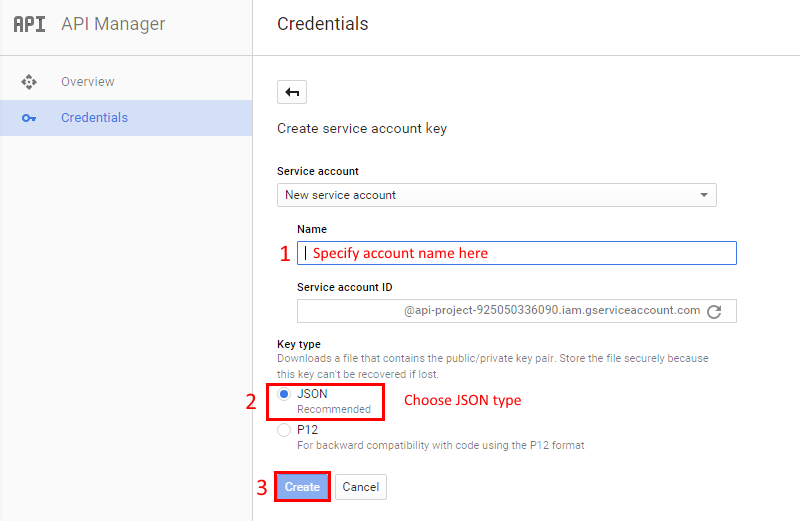
8. After that your browser will ask you to save key file. Please, save it.
9. Then go back to Google Play Developer Console – Settings – API access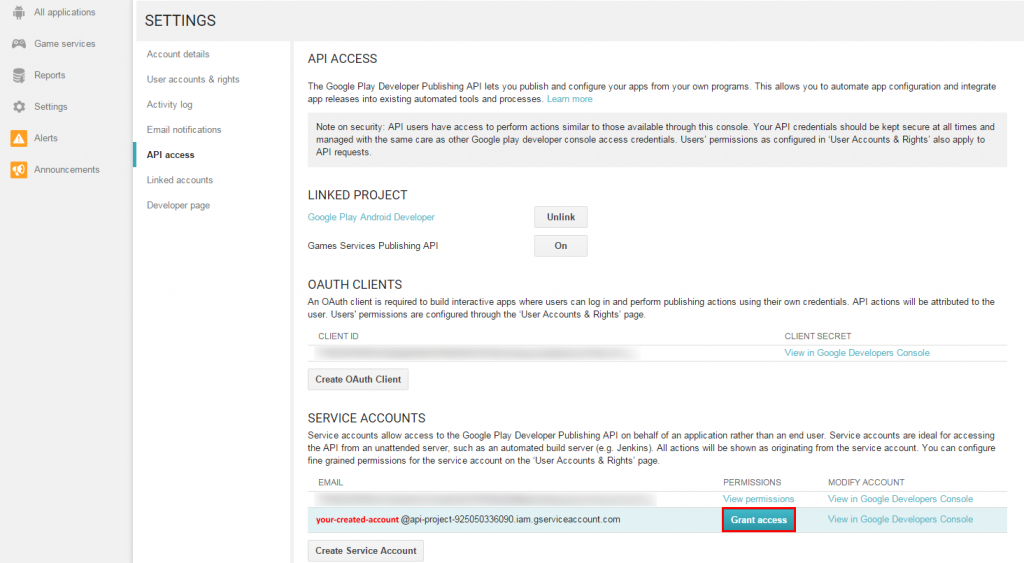
10. There you will see your created service account. Click Grant access to specify access rights for this account.
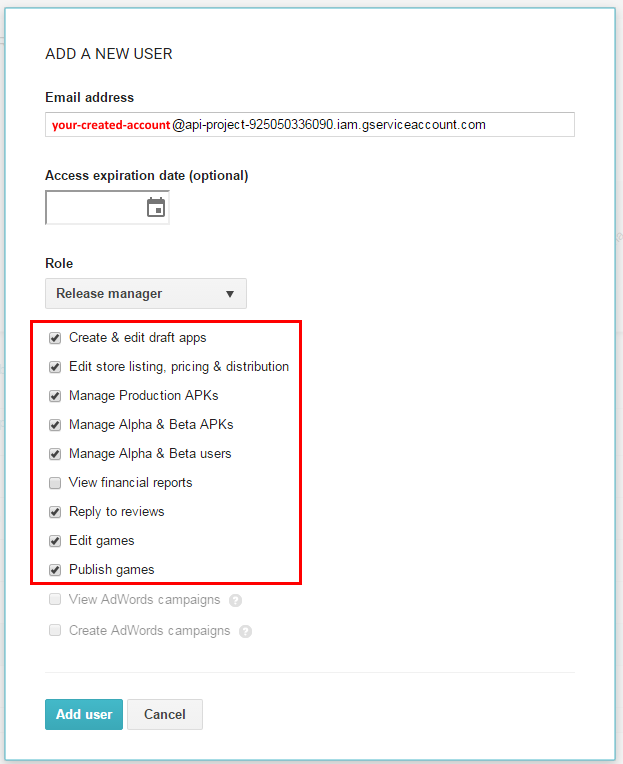
11. Check items as it is shown on the picture above and click Add user.
12. Then you can see your created user with Release manager access rights. Done!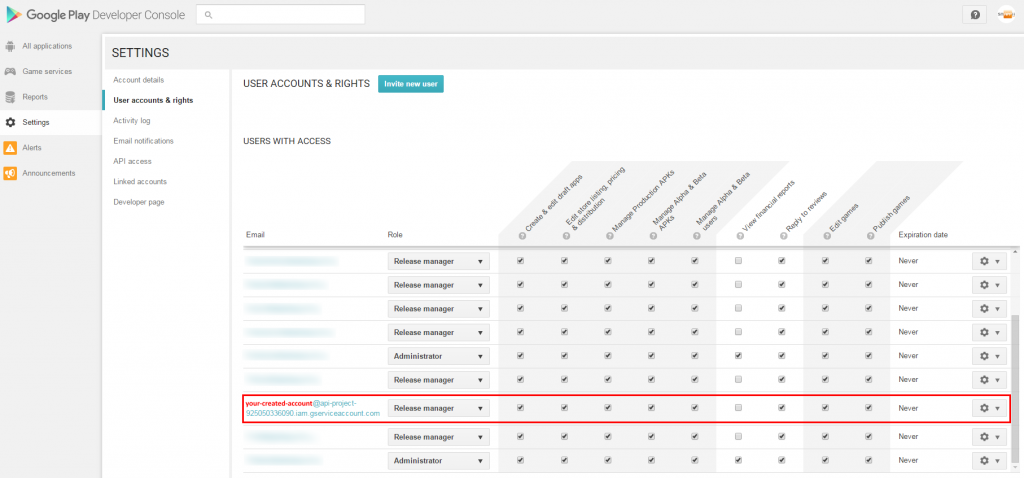
Dashboard
Your app Dashboard is a place where you can monitor how you app is being used, who’s downloading the app and how often it’s being downloaded. It is also the tool you will use to send your push notifications.
As a registered (non-subscribed user), you are able to access the Snappii dashboard features 5 times to test functionality.
Once you become a subscribed customer you have unlimited access to the Dashboard. Continue reading “What is a Dashboard?” »
Support
We offer live chat from our website from 1 am to 2pm EST Monday through Friday.
If your application closes unexpectedly, you can submit the Snappii app’s crash logs or a bug report to the Snappii development team for review.
Snappii offers a wide variety of support options from the support page on our website as well as webcasts, email, online chat, phone support and training. The level of support varies depending on the Snappii subscription plan selected.
Click Publish, restart your app and you will have eliminated the Snappii ads and Powered by button. Click Resubmit to make the Snappii splash screen disappear (Apple will not show this immediately as it usually takes a few days to a week to be processed).
Pricing
Snappii operates on an annual subscription based model with varying price points depending on your specific needs. Please visit our pricing page for full details. Remember that you can build your demo app and preview it with full functionality (iphone, ipad, Android) using our Snappii App Previewer for iOS and Android at no charge!
Pricing for custom development depends on the app’s complexity including number of platforms, potential development of custom code, etc. The Snappii platform offers a wide range of customizable options but if you require even more custom built functionality outside of the platform offering, please contact us at: sales@Snappii.com to discuss your needs.
Your monthly subscription gives you the ability to make changes to your app(s), distribute changes to all devices, take advantage of new features and enhancements that we continually release for the platform, product support (based on your subscription level) bug fixes, and unlimited submissions to the App stores (Apple and Google). Continue reading “What does my monthly subscription cover?” »
No. All platforms, iOS and Android are included in your subscription price.
Please, take into account that it is an annual commitment. If you cancel before the year is up we will disable your app on our server. If you cancel after 1 year your app will continue to run but you won’t be able to login into Snappii to update your app/apps until you renew your subscription.
About the Company
Snappii is currently based in two locations, the United States and Russia.
Snappii is a private software development company. Our management staff has extensive experience in the technology sector with proven success in high tech and start-up companies like Vkernal, Ecora, Cleversoft, Keyword Competitor, Cabletron, Alcatel and IBM.
Alex Bakman is the Founder and CEO of Snappii.\n\nYou can contact Alex at: abakman@Snappii.com
Snappii was founded in January 2010.
Other
No, you will not have access to the source code. We do plan to enable users to extend the Snappii platform with custom coded plug-ins to augment the current functionality. Information will be forthcoming.
Yes, you can. Please go to App settings in WYSIWYG editor and fill out the required fields there: SMTP host, SMTP port, SMTP login, SMTP password.\nThis account will be used for the following emails:\n\n– Data collected from forms\n– Discussion notifications\n– Signup emails\n– Requests to reset passwords
You can view details on the Snappii architecture here.
You can view details on the Snappii development process here.
Web Services
A Web service is a universal mechanism that connects apps with on premise data sources inside organizations as well as with websites on the Internet. There are literally hundreds of thousands of really useful data sources available for anything from weather, file storage, videos, pictures, marketing services, etc. Apps can retrieve data, show it and if needed update updated it.
For databases you have to upload data. With Web Services it is different. To make it work you need to create a “connector” that will describe how to retrieve data and possible update it. The “connector” is an XML file. For example of a connector please download several samples from “data source” dialogue. Continue reading “What is a web service and how it is used?” »
In the Snappii editor to the left from the iPhone canvas just under PayPal you will find Cloud Storage settings. Click the Plus sign to add new Cloud Storage. You will see a window. Select from the 4 Storages we offer:
– Dropbox
– Box
– Google Drive
– MS One Drive Continue reading “How to use Cloud Storages?” »
Ads and In App Purchase
To set up ad removals in iOS you need the following information:
-
iTunes Product Id – to get it you should have a valid Apple Developer Account. To add an app to it you at first should click to create a web2phone copy. You will see a message with a checkbox:“This app will be added into your iTunes connect account. You will be able to configure “In App Purchase” settings for this app in iTunes connect and test it before app is submitted into Apple App store.”
Put a check and proceed. The app will be then added to your account and you can continue setting it up.
-
Go to https://itunesconnect.apple.com/WebObjects/iTunesConnect.woa and login
-
Manage your Apps –> Click on your app icon –> Select Manage In-App Purchases on the right –> tap Create New –> Select Non-Consumable type.
-
To set up ad removals in Android you need the following information:\n1. Google Play Product Id. You should have a valid Google Developer Account. Before setting up ad removals in your app you should submit it to Google Play without in app purchases settings enabled.\n2. Once submitted you can login to Google Developer Portal http://www.google.com/accounts/Logout?continue=https://play.google.com/apps/publish\n- Find the app you want to enable ads into\n- Open it and go to In-App Products in the menu on the left\n- Click Add New Product\n- Choose Managed Product category and enter your product id. It should be a unique id for your app. Example: For Construction Manager App we will use: ad_removal_for_construction_manager\n- Add a title and some description about your app\n- Enter the price ( you can auto-convert it)\n- Click Activate at the top and Publish your app changes\n- Copy your Product Id and paste it in the corresponding section in the Snappii editor\n3. Add your iTunes Product id in the editor and save the changes. Be sure to enable add removals in your app in the editor.
To be able to disable your ads your app users can purchase a one-time payment. To allow them to do it, drag and drop In App Purchase Button to a desired place in your app.
In a live app users will click it and be able to pay a fee to turn ads off.

1. You should have a valid Google Developer Account. Before setting up ad removals in your app you should submit it to Google Play without in app purchases settings enabled.\n2. Once submitted you can login to Google Developer Portal http://www.google.com/accounts/Logout?continue=https://play.google.com/apps/publish\n3. Open an app and go to Services & APIs, copy your base 64 encoded PSA public key\n4. Paste it in the corresponding section in the Snappii editor.
1. Register at https://apps.admob.com
2. Monetize your App
3. Find an existing app or add a new one manually
4. Enter your App Name (if manual) and choose the required platform, Add App
5. Select a required format
6. Once saved you will see an Ad Unit Id. Be sure to copy it and paste in the corresponding section in the Snappii editor.
Ad Unit Ids for Banner Ads should be specified for each tab/element separately while Interstitial Ads are set up just once in Ads and In App Purchase settings.
There is a special Ads section for it in all Tabs/Elements in the editor. You can either place Banner Ads at the top or at the bottom.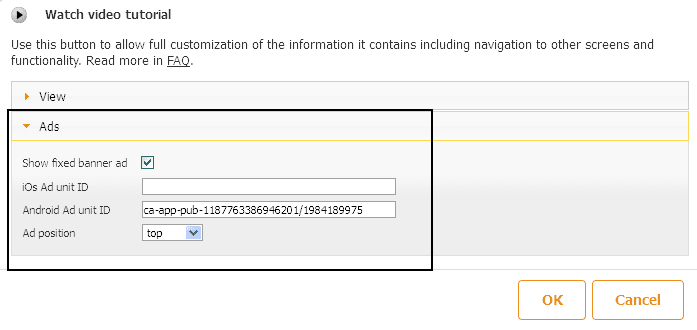
You can track and control a number of app user’s clicks before showing him your interstitial ad. Just enter a number and specify the places that will count users’ clicks.


